Teleportation, Line Traces, and Height Correction
Moving across the world in VR has its own unique set of challenges. Unpredictable surfaces, great distances, and varied elevations characterize the vast dataset that is Earth. Because of the range of terrain types, the best solutions provide a comfortable experience for players under a variety of circumstances.
With these considerations in mind, teleportation can be an essential tool for navigating large-scale environments. Teleportation allows the player to travel long distances quickly, and, because it’s instantaneous, it does not cause motion sickness. On this page, you will learn a method to implement teleportation into your VR games and applications, as well as how to position the pawn effectively on Cesium World Terrain.
This tutorial assumes you have a basic understanding of Unreal Engine and Blueprints. We recommend reading the Getting Started series and Building a VR Application tutorial prior to this series.
You’ll learn how to:
- Bind button inputs to actions in Unreal
- Teleport to different locations on a 3D tileset
- Visualize a pointer and create line traces to gather collision points on Cesium World Terrain
- Implement accurate surface positioning and height correction for players
- Unreal Engine 5
- Cesium for Unreal
- Basic understanding of Blueprints and Unreal Engine
Clone or download the project files here to get a more in-depth look at the project and solutions provided. Refer to the README for more information on the blueprints and levels corresponding to this tutorial, as well as headset compatibility.
Our goal is to design a teleportation system that can work across large distances and with the unique characteristics of 3D tilesets that have levels of detail.
Typically, VR apps with teleportation use a curved arc to determine where the player will travel. This is appropriate for indoor and small outdoor environments, but not ideal when exploring the globe. The player may want to teleport hundreds of meters at a time, so we instead use a straight line trace shooting out of the player’s hand to determine the destination. We also visualize this line for the player.
Finally, we need to consider the level-of-detail refinement that will happen when traveling far away. Consider a mountain with a convex surface. When far away, the mountain’s surface may be low detail and simplified to a straight slope. But once refined to higher detail, the true surface is above where we originally teleported to, and the player will find themselves below the ground.

From far away, the mountain has a straight surface due to its low detail

Once the mountain refines to higher detail, the surface protrudes up from the original teleportation location
With our design challenge in mind, we need to create an interaction easy enough to access, but not too shallow that a player might accidentally teleport when they do not intend to. The interaction works in two phases:
- The player holds down the trigger to turn on a laser pointer directed outwards from their hand towards a target location.
- Then, when a corresponding button is pressed, they teleport.
At a high level, we create a Pawn class as a central hub that handles player input, facilitates player movement, and holds motion controller components (one per hand). The pawn also has two actor components, one per hand, for finding a viable teleport location and to teleport the player to that location. Finally, the player has to see the line trace they’re performing, so we’ll create child actors, one per hand, to render the line trace in the scene.
All the components we’ll create in this tutorial will be attached to the Pawn, so that the final construction looks like:
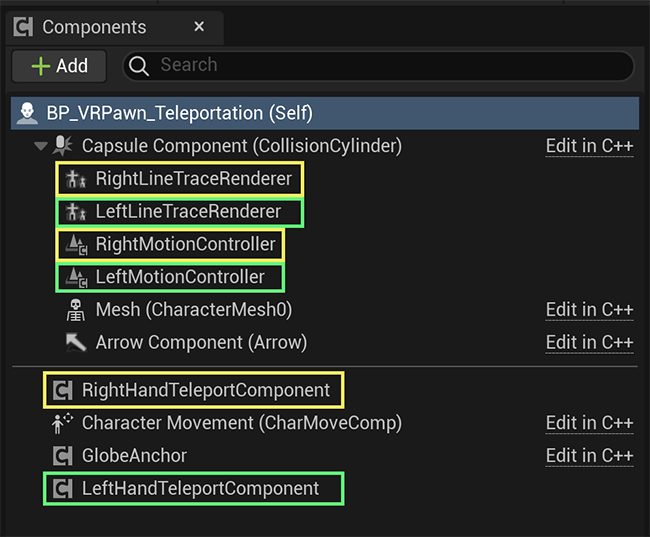
The setup of the pawn and its components. No need to add these components yet - we will be creating the classes as we go along
The first step to teleporting is for the player to be able to determine the location they wish to teleport to. An actor component is a modular way to hold all of the needed logic to allow for the player to do so. Let’s create a new BP_VRTeleportationComponent blueprint class, inheriting from the UActorComponent base class.
This component requires some understanding of what direction to point in and how to show the line trace. To achieve this, we create a Setup function within BP_VRTeleportationComponent, where we store references to other components and values.
Teleportation > Blueprints > BP_VRTeleportComponent > Setup function
The Motion Controller Source (of type UMotionControllerComponent) and LineTraceRenderer (of type BP_LineTraceRenderer, which we will create later on) are passed into the Setup function and stored as references.
We also store the CesiumCameraManager, register a CesiumCamera view frustum, and store its ID. Tiles at a distance have a lower level of detail, making line traces on them inaccurate. Registering an ID allows us to later pass in a custom view frustum and tell Cesium for Unreal to load the area within it in higher detail, which in turn gives us a more accurate location to teleport to.
Once the component and its Setup function have been created, we can call those methods from the Pawn. Let’s create a new BP_VRPawn_Teleportation that inherits from the ACharacter base class, as the ACharacter base class provides movement capabilities that we will implement in future tutorials. We then add two BP_VRTeleportationComponent instances to the actor component list, and name them LeftHandTeleportComponent and RightHandTeleportComponent. Then, in the blueprint’s BeginPlay, we will call the Setup function created earlier.
Teleportation > Blueprints > BP_VRPawn_Teleportation > EventGraph graph
To detect if the player is trying to teleport, inputs need to be set up for each controller in the project settings under the “Input” section. Below are the axis input configurations for activating the pointer. In this project we used the index triggers of an Oculus Touch.
See here for more information on how to bind inputs.

The axis input bindings set up within the Input section of the project settings
Now that inputs are set up, events will be called to the blueprint whenever the trigger is pressed. The AxisValue of the input is determined by how much the trigger is pressed. We compare the input value in order to determine if the trigger is pressed.
See here for more information on how to set up inputs.
Teleportation > Blueprints > BP_VRPawn_Teleportation > Input graph
Lastly, a function on our teleport component is called to perform the line trace from the player’s hand. This function also keeps track of whether the player is pointing at a location they are allowed to teleport to.
Teleportation > Blueprints > BP_VRTeleportComponent > FindTeleportationLocation function
This line trace uses a custom trace channel called “CesiumWorldTerrain”, which ignores all objects besides the Cesium World Terrain 3D tileset actor. See here for more information about collision filtering.
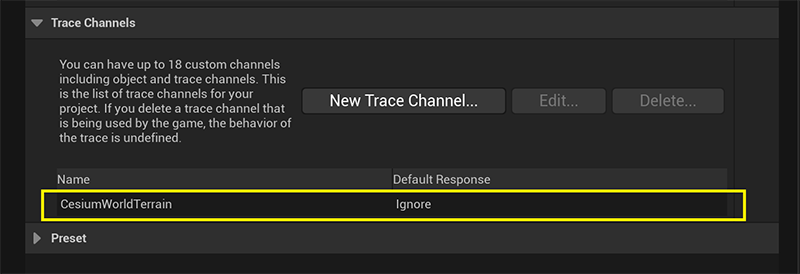
Trace channel set up within the project settings
The Cesium World Terrain actor is set to block collisions from the CesiumWorldTerrain trace channel.
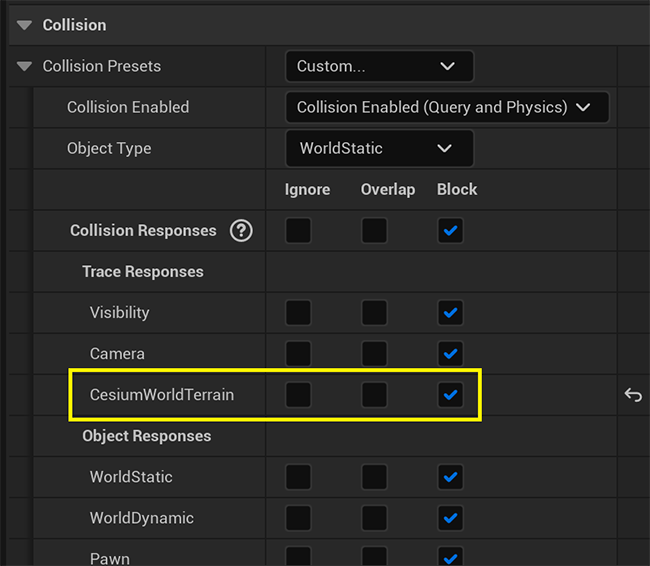
The collision settings on the Cesium World Terrain actor
Once the player is pointing to a location, they can press a corresponding button to teleport to that location. An action input is created (Project Settings -> Input) for both controllers, using the “X” button on the left controller and the “A” button for the right.
See here for more information on how to bind inputs.

The action input bindings set up within the Input section of the project settings
Teleportation > Blueprints > BP_VRPawn_Teleportation > Input graph
The function to teleport then checks whether or not the player is pointing at a valid location to teleport to, and if they are then it sets the actor's location to that point.
Teleportation > Blueprints > BP_VRTeleportComponent > Teleport function
3D Tiles are streamed at runtime and supply varying levels of detail depending on how far away the viewer is from a tile. This means that a spot that the player selects from a distance may change shape as the player teleports closer and higher-detailed child tiles are loaded. Therefore, it’s possible for the player to teleport to a tile whose higher-detail children have not yet loaded, and the player to be below the ground when they finish loading.
In order to solve this issue, the player pawn will repeatedly check on Tick whether it is below the ground.
Teleportation > Blueprints > BP_VRPawn_Teleportation > Input graph
If the player is below the ground, then the function will relocate the player to above the surface.
Teleportation > Blueprints > BP_VRPawn_Teleportation > CorrectHeight function
Handling line trace visualization can be tricky when many gameplay components want to render line traces. One can either create and render a line trace mesh for each component, which creates redundant meshes, or handle the burden of updating a single line trace’s visibility state from many external components, which is complex and error-prone.
At this point in the tutorial series, there is only one component rendering a line trace, but in the future, we will be implementing more of these components and we want to have a scalable system. So, we will create an actor (one per hand) to handle rendering line traces for any gameplay component that requests it. This actor is designed to remove the burden of updating state from external components, while only rendering a single mesh.
To start, let’s create a new actor called BP_LineTraceRenderer and add a static mesh component called LineTraceMesh. The static mesh assigned to this component is LineSegmentCylinder, which is an editor asset (if you can’t find it while searching, make sure “Show Engine Content” is enabled). Back in the LineTraceMesh component, we will set its material to M_Emissive_Color. The BP_LineTraceRenderer’s line trace color should be dynamically set, because gameplay components should be able to request different colors. In order to change its color at runtime, the BP_LineTraceRenderer creates a dynamic material instance.
Teleportation > Blueprints > BP_LineTraceRenderer > EventGraph graph
The BP_VRTeleportComponent needs the pointer to be visible whenever the player is pointing at the ground. To do this, if a point is found, then on Tick it will call ShowLineTrace on the BR_LineTraceRenderer.
Teleportation > Blueprints > BP_VRTeleportComponent > EventGraph graph
The line trace renderer receives any number of calls from external components during a single frame and keeps only the shortest line trace since that is the one that hits a surface first. The color parameter is stored as well, giving the player more visual feedback as to what we are hovering over.
Teleportation > Blueprints > BP_LineTraceRenderer > ShowLineTrace function
On Tick, the BP_LineTraceRenderer will finally determine how it should render its mesh component after receiving all calls from external components telling it to render.
The BP_LineTraceRenderer renders its mesh component if at least one component has told it to render this frame. The BP_LineTraceRenderer’s tick group is set within the actor details to “Post Update Work” so that it ticks later than other components, allowing components enough time to tell the renderer to show this frame. See here for more information about actor ticking.
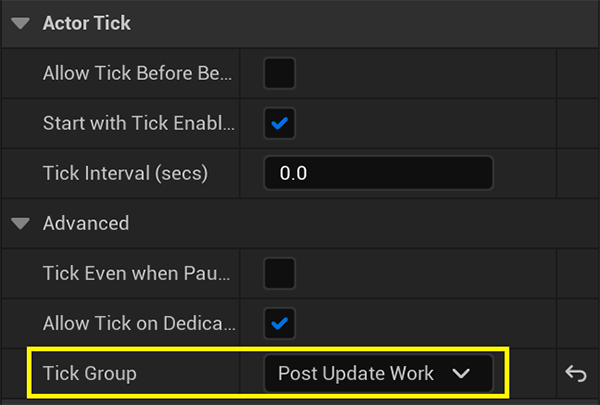
Tick settings for the LineTraceRenderer actor
Teleportation > Blueprints > BP_LineTraceRenderer > EventGraph graph
The last function will render the line trace, performing any mesh alignment and scaling.
Teleportation > Blueprints > BP_LineTraceRenderer > RenderLineTrace function
In this tutorial we learned how to teleport to a location on a 3D tileset, and which approaches and strategies can assist us in moving across large distances.
Continue to the next in the series, Free Movement