Editing Tileset Materials
While standard Unreal materials can be applied to 3D Tilesets, most tilesets will require the use of a specialized material in order to render imagery, water effects, and more. The materials included in the Cesium for Unreal plugin are designed to be modular, so that you can easily add what you need and remove what you don’t.
On this page, you’ll learn about Cesium for Unreal’s material system and how to design your own materials.
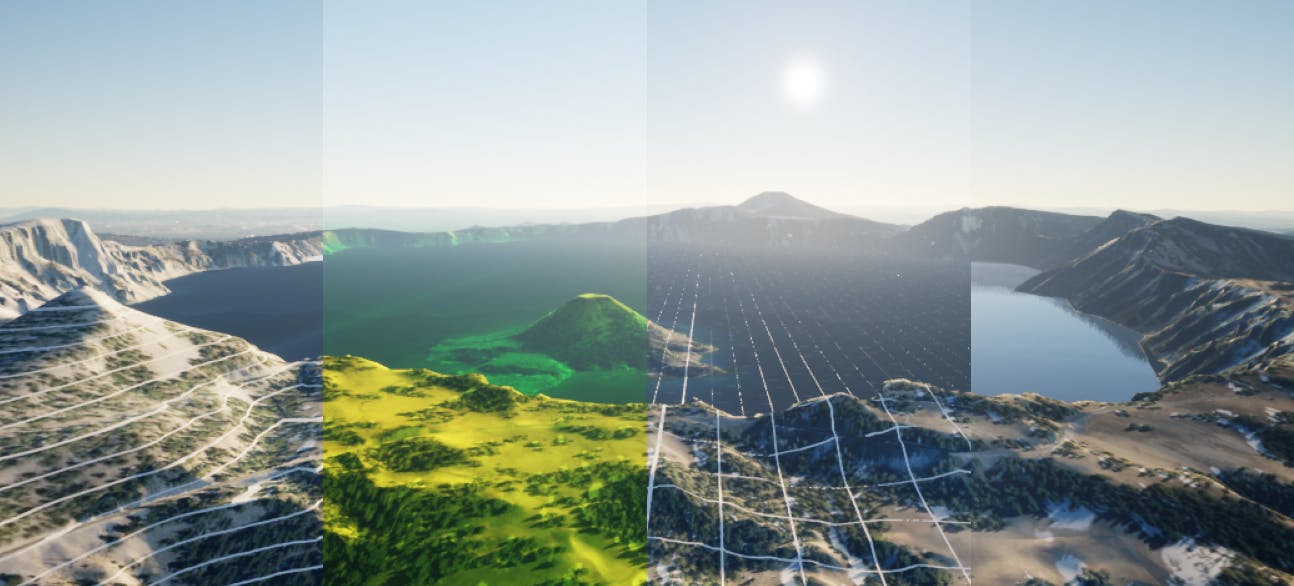
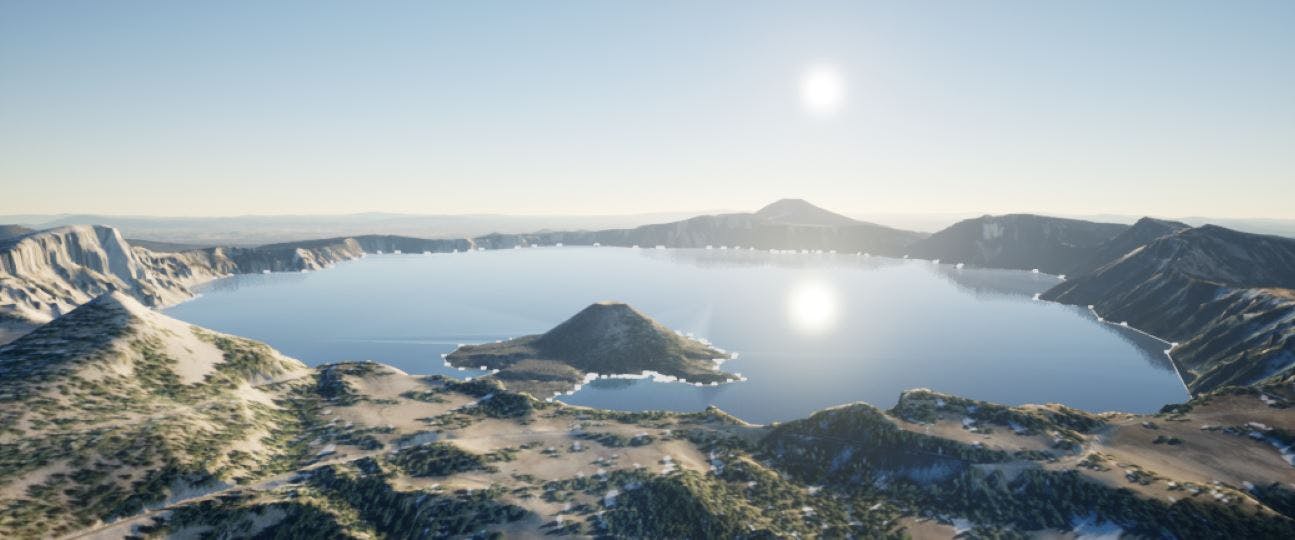
Editing a tileset’s material can enhance your project with helpful visual effects. This image demonstrates different materials included with the Cesium for Unreal Samples project.
You’ll learn how to:
- Navigate and understand the existing Cesium for Unreal 3D Tileset materials
- Create custom materials based on the materials included in the Cesium for Unreal plugin
- Change a tileset’s materials
- Understand the material limitations of tileset meshes
This is an intermediate-level project that builds on ideas from the prior Getting Started tutorials. If you haven't read those, it may be a good idea to review before beginning this project. A good place to begin is the Cesium for Unreal Quickstart tutorial.
If you are struggling with the Material Editor interface, you may want to visit Unreal Engine’s Material Editor reference.
- Unreal Engine (4.26 or later)
- The Cesium for Unreal plugin (1.6.0 or later)
- Know how to set up a basic Cesium for Unreal application. Check out our Cesium for Unreal Quickstart guide for instructions on starting with the Cesium for Unreal plugin.
- Start with a scene with Cesium World Terrain and CesiumSunSky. If you are using the Cesium for Unreal Samples, you can duplicate the level 01_CesiumWorld.
Cesium for Unreal uses Material Instances to allow for maximum flexibility. Each Material Instance will use one more more Material Layers to apply imagery overlays, water, or other material effects. Take a look at the Material Instance pictured below.
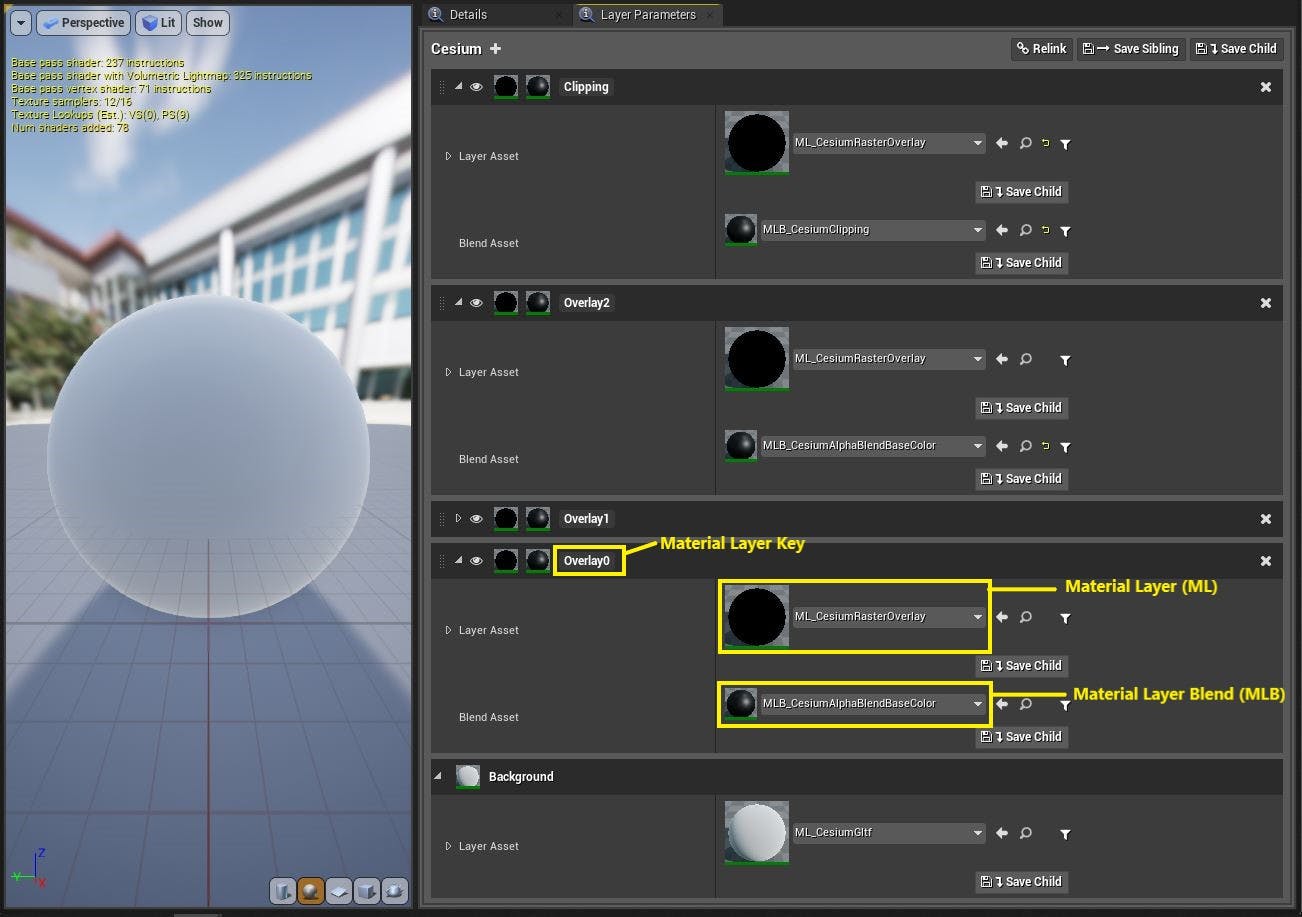
MI_CesiumThreeOverlays, the default Material Instance used with most tilesets.
You’ll see a Background layer at the bottom of the stack, followed by four other layers. Notice that each layer above the Background has both a Layer Asset (Material Layer) and a Blend Asset (Material Layer Blend).
- The Material Layer asset contains the material node graph that will be displayed on a given layer.
- The Material Layer Blend asset contains a node graph that determines how the layer will blend with the layers beneath it.
- Each Material Layer and Material Layer Blend can be edited like other materials in the Material Editor.
- The Material Layer Key will tell the tileset which Raster Overlay component to apply to a given material layer. For material effects that do not use a Raster Overlay, the Material Layer Key will not matter and can be set to anything. However, if a Material Layer needs to use information from a Raster Overlay, the Material Layer Key must match the Material Layer Key parameter set on the tileset’s Raster Overlay component.
Q: What is a Raster Overlay?
Raster Overlays are components that provide information to the Material about what to display on a given tile. Raster Overlays are primarily used for draping imagery over a tileset, but can also be used with Cartographic Polygons to draw an effect only in a specified area.
Each overlay on a tileset must have a Material Layer Key that matches the name of a layer in the Material Instance in order to render.
1Find the MI_CesiumThreeOverlays Material Instance in the plugin folder. It can be found in CesiumForUnrealContent>Materials>Instances.
2Drag and drop the material to your project folder. After releasing the mouse button, a menu will appear by your cursor prompting you to choose between moving the asset, copying the asset, or advanced copying the asset. Select “Copy here”.
When editing materials, you should always make a copy of the default Cesium materials and material functions. Editing the plugin materials directly could result in unexpected behavior or loss of work.
3Find the new material in your project folder. Rename it to MI_GroundTint.
4Right-click in the Content Browser and create a new Material Layer (Create Advanced Asset > Materials & Textures > Material Layer). Name your new asset ML_GroundTint.
In this tutorial and in the Cesium for Unreal plugin, asset names use asset prefixes like ML_ and MI_ to help improve clarity and assist with organization. Of course, you can use any naming system you would like, but sticking with the suggested names may make the tutorial easier to follow.
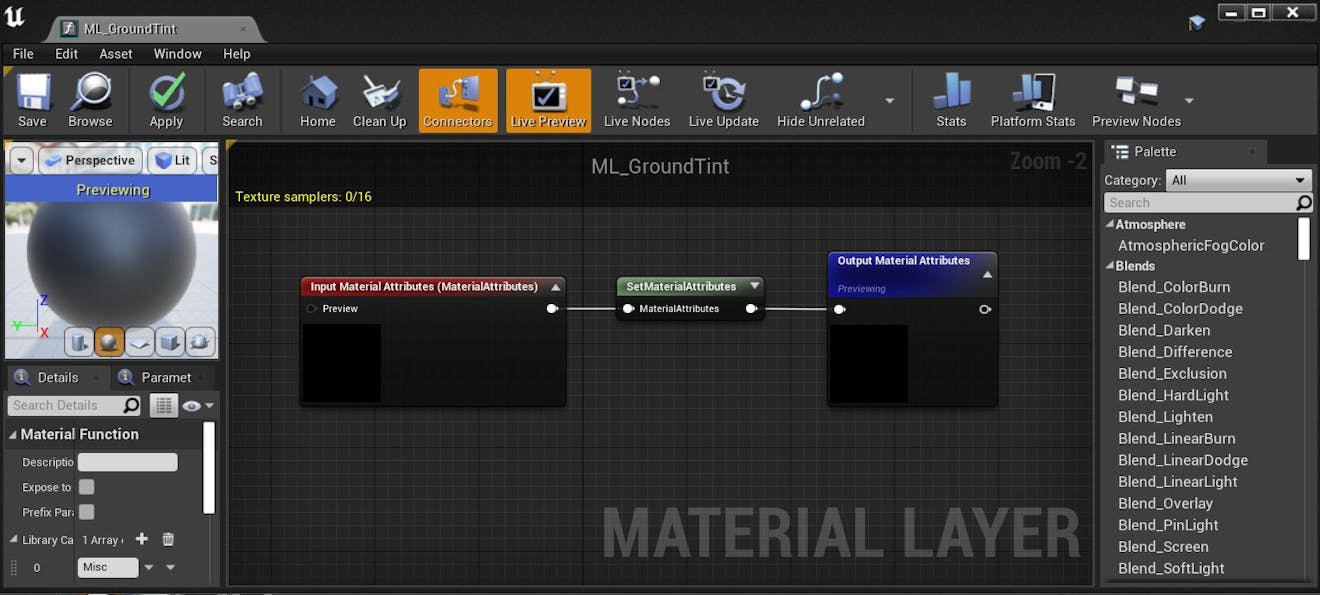
5Double click on ML_GroundTint. The Material Editor window will open.
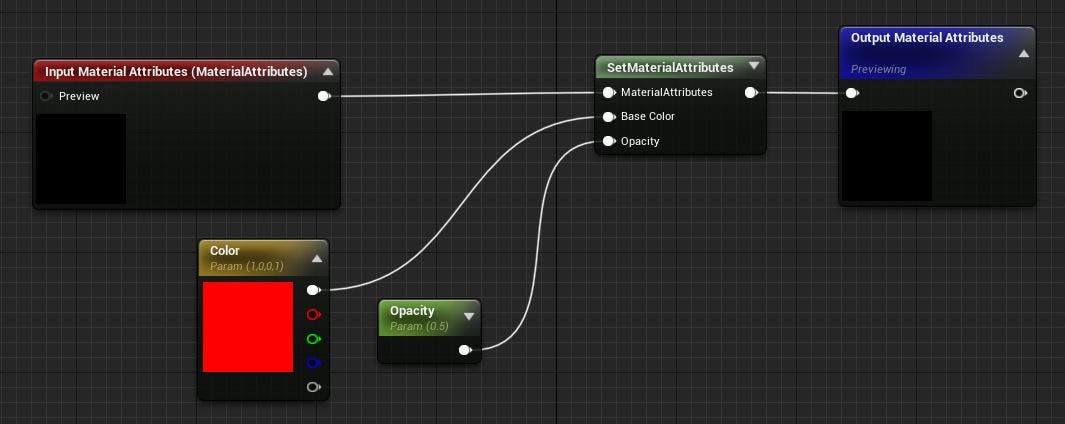
6Click on the SetMaterialAttributes node. In the Details panel, add two array elements to the Attribute Set Types. The first element is set to BaseColor by default, so leave it as is. Change the second element to Opacity.
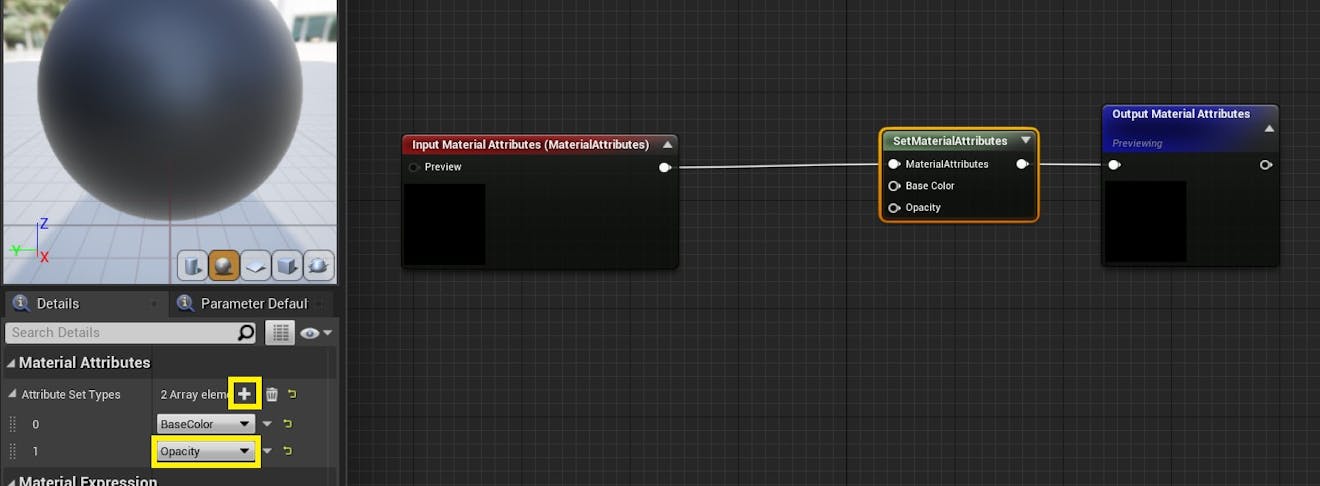
7Right-click on the graph and add a Constant3Vector node. Then, right-click on this new node and select “Convert to Parameter”. Name it Color.
8Add a new Constant node. Like you did in the previous step, convert this node to a parameter. Name it Opacity.
9You can set the default values of these parameters by clicking on the node and editing the value in the Details panel. Set Color to any color. Set Opacity to 0.5.
10Connect the top pin of the Color node to the “Base Color” pin on SetMaterialAttributes. Connect the pin of the Opacity node to the “Opacity” pin on SetMaterialAttributes.
Your graph should now resemble the graph pictured below.
11Save and close this graph.
12Open the MI_GroundTint Material Instance. In the Layer Parameters, rename Overlay2 to GroundTint. Then, set the Layer Asset to ML_GroundTint.
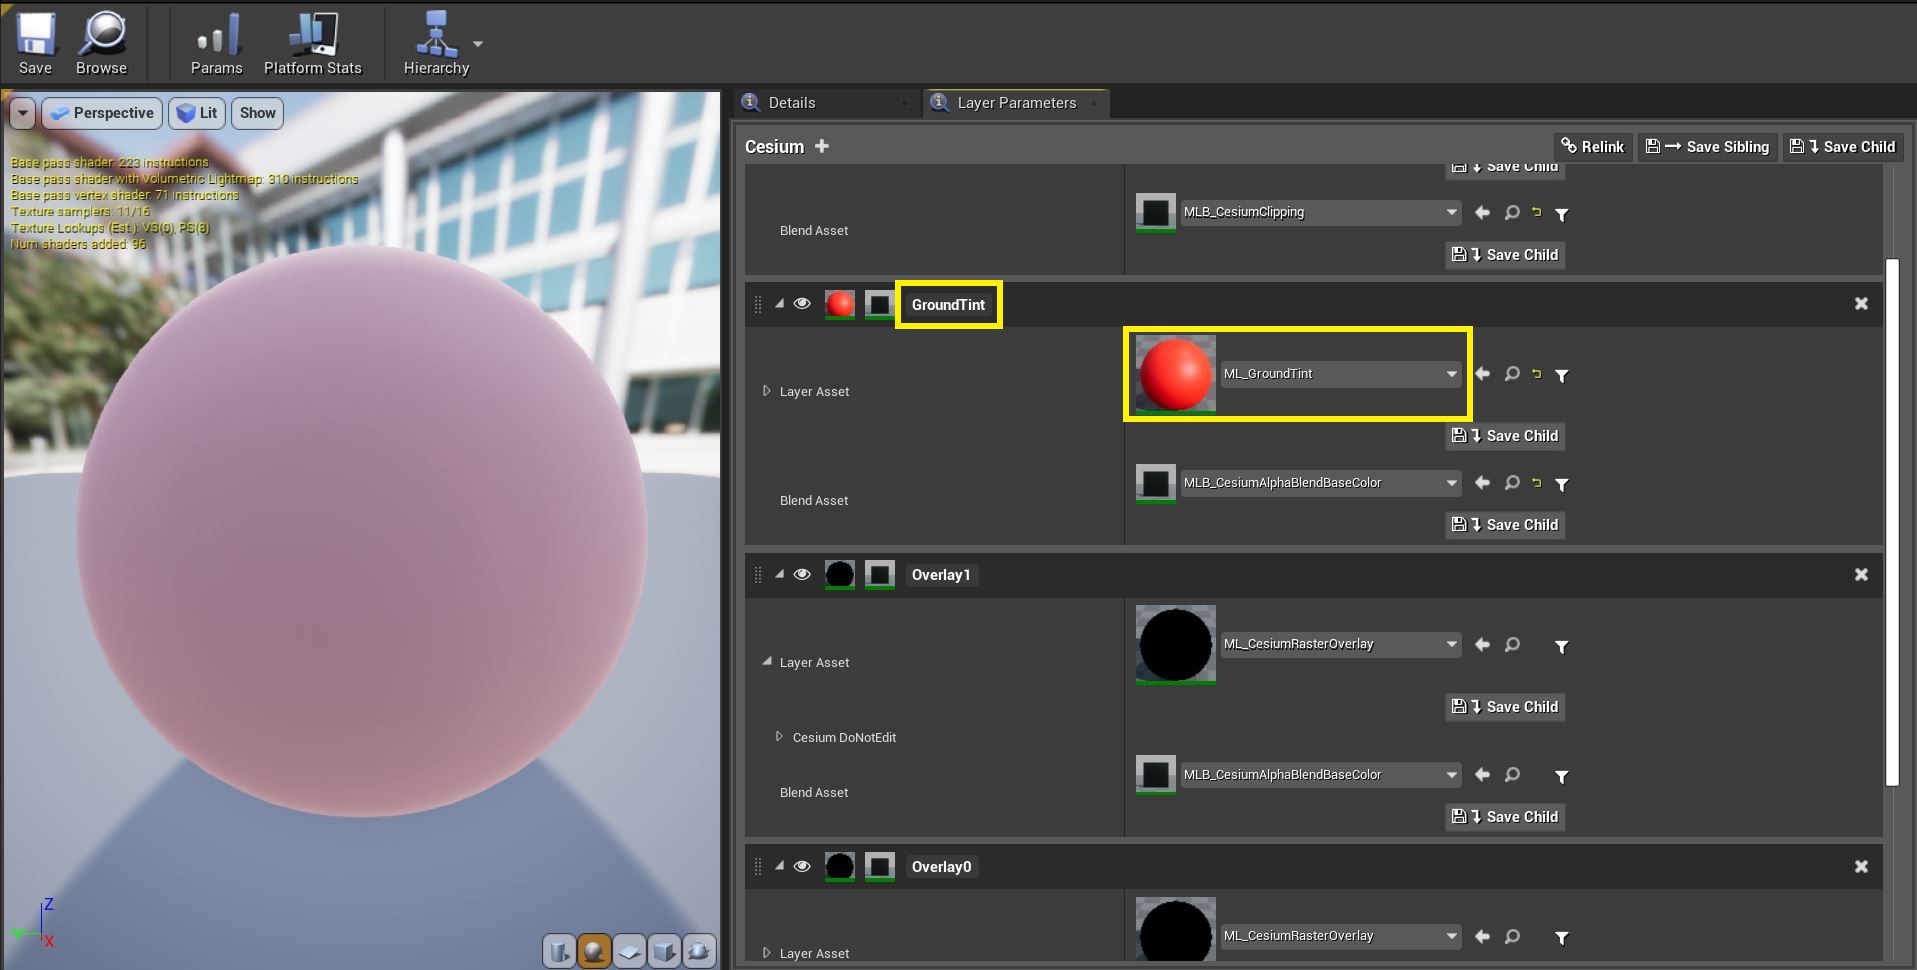
Leave the Blend Asset as MLB_CesiumAlphaBlendBaseColor. MLB_CesiumAlphaBlendBaseColor uses the Opacity channel of the layer to blend between the base colors of a layer and the layer below it. That will work well with the material you created above, and there’s no need to create a new blend asset.
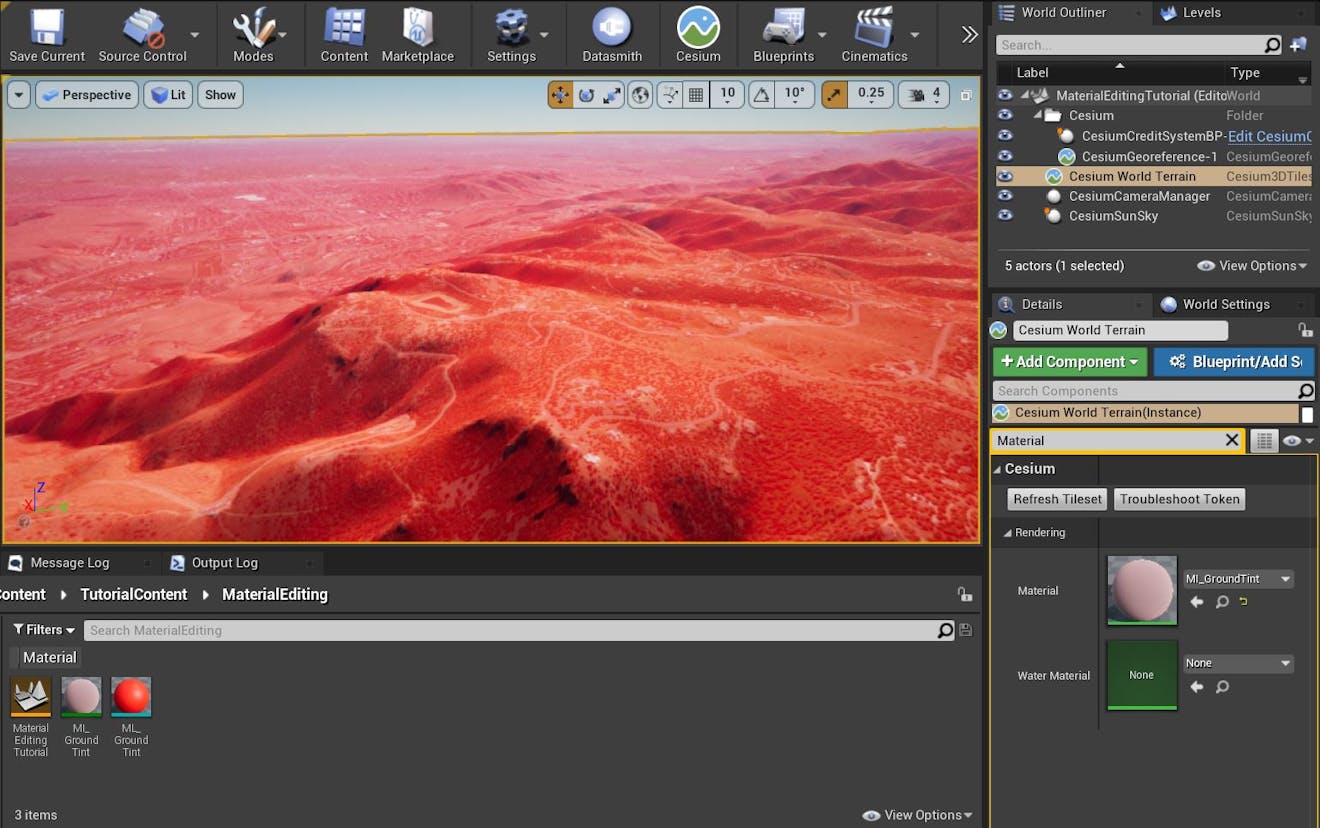
13Open a level with Cesium World Terrain and CesiumSunSky. Select the Cesium World Terrain tileset.
14Search in the Details panel for “Material.” Set the Material of the tileset to your new MI_GroundTint material. The tileset will refresh, and you should now see Cesium World Terrain tinted in the color you assigned in the material.
This section of the tutorial relies on Cesium Cartographic Polygons. If you are not familiar with Cartographic Polygons, read about them here before continuing with this section.
1As shown in steps 1-3 in the Create a whole-tileset material section, create a new Material Instance based on MI_CesiumThreeOverlaysAndClipping. Name this new Material Instance MI_AreaTint.
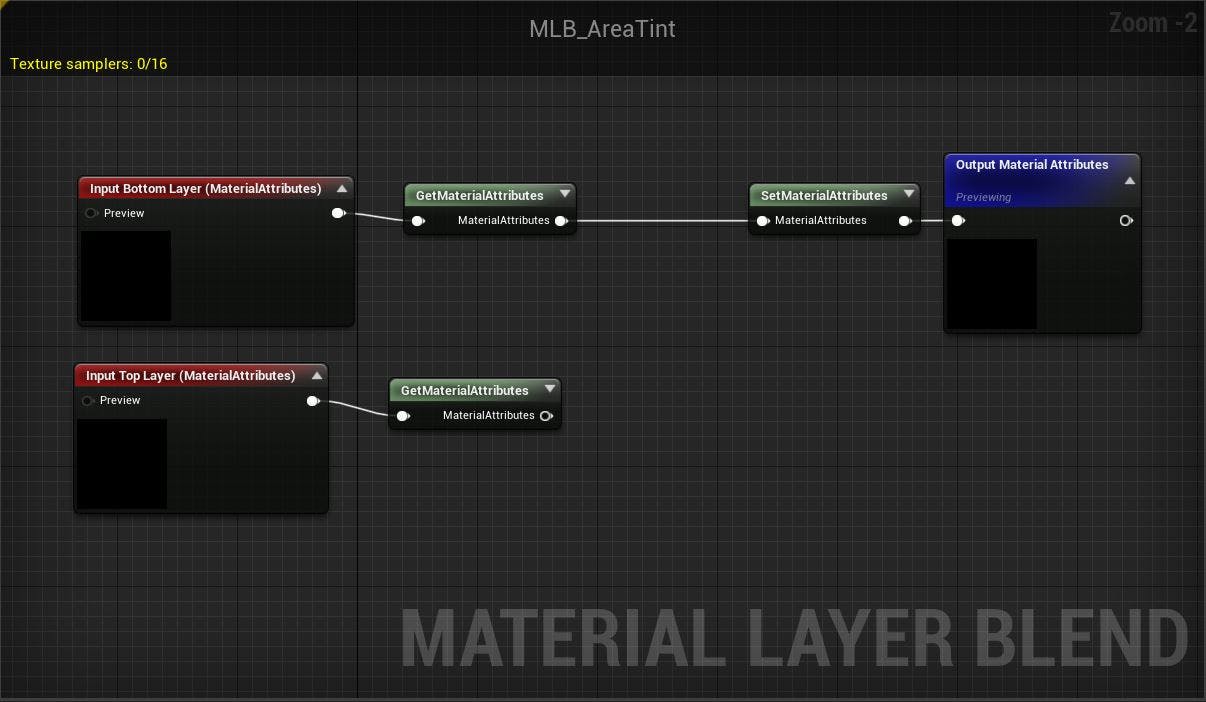
2Right-click in the Content Browser and create a new Material Layer Blend (Create Advanced Asset > Materials & Textures > Material Layer Blend). Name your new asset MLB_AreaTint.
3Open MLB_AreaTint.
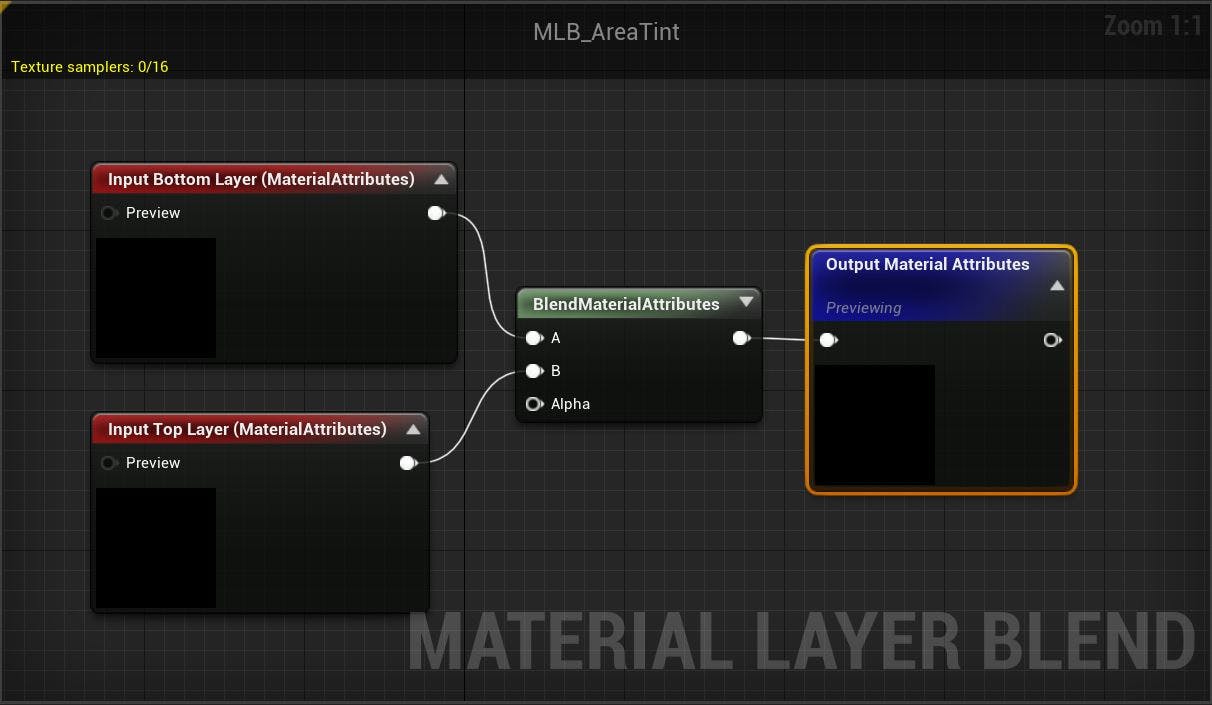
This asset will blend between the Bottom Layer (The result of all Material Layers under this one) and the Top Layer (The contents of the Layer Asset used with this Blend Asset).
When using Cartographic Polygons, you don’t just want to blend the two material attributes together evenly. Cartographic Polygon raster overlays do not work in the same way as imagery overlays. Instead, you’ll need to set up custom logic to use the Cartographic Polygon mask as the Alpha for the blend.
4Delete the BlendMaterialAttributes node.
Replace it with two GetMaterialAttributes nodes, connected to Input Bottom Layer and Input Top Layer, and one SetMaterialAttributes node, connected to Output Material Attributes.
Connect the Bottom Layer GetMaterialAttributes node to SetMaterialAttributes.
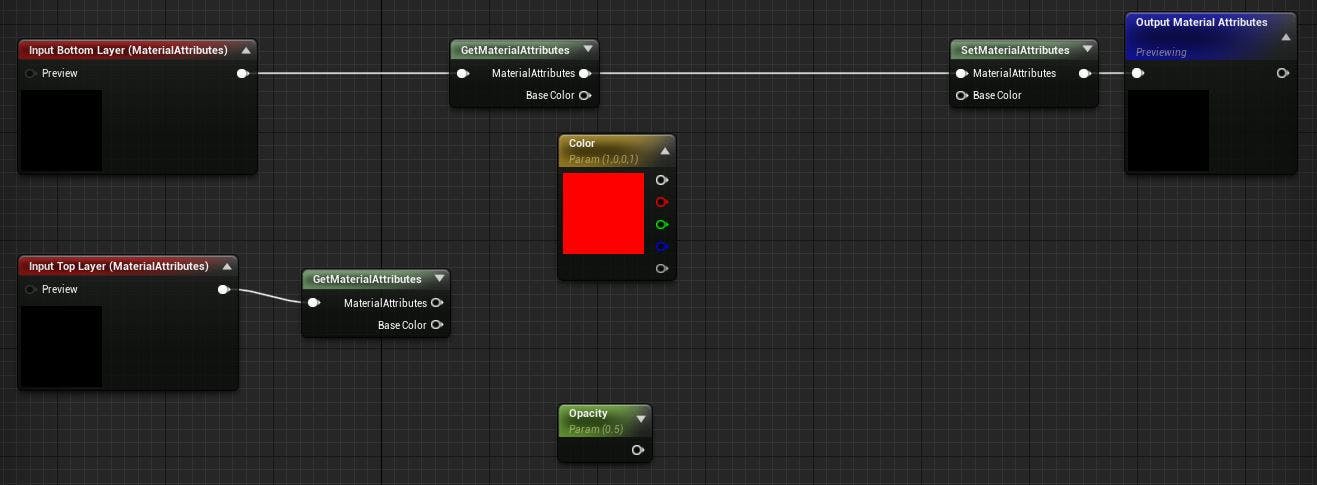
5Add a BaseColor attribute type to each of the nodes you created in the last step.
6Create a new Color (Constant3Vector parameter) node and Opacity (Constant parameter) node as shown in steps 7, 8, and 9 in the previous section.
Make sure that Color is set to a distinct color and Opacity is set to 0.5.
7Click and drag from the Base Color pin on the Bottom Layer GetMaterialAttributes node onto an empty space on the graph. From the menu that appears, search for and add a LinearInterpolate (Lerp) node.
This node will linearly interpolate between two inputs based on an Alpha value. In this case, you’ll want it to blend between the Bottom Layer BaseColor (The BaseColor of all the layers below this Material Layer) and your Color parameter. Connect your Color parameter to the B input of the Lerp node.
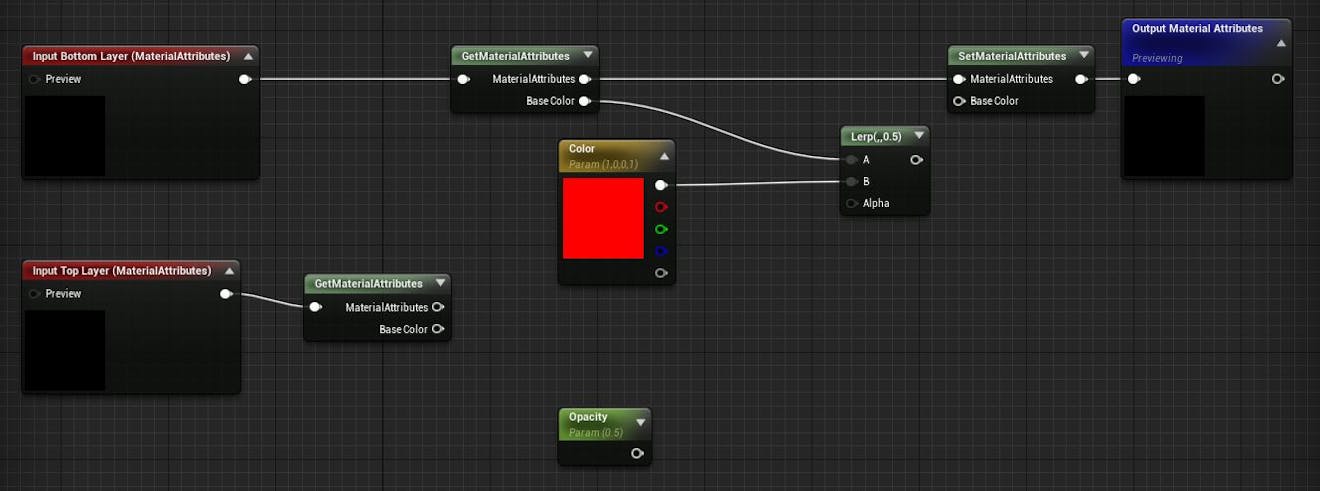
8Now, you’ll need to connect the Alpha value of the Lerp node. There will be two factors that determine where the color is applied - the Opacity value, and the cartographic polygon mask.
From the Input Top Layer’s GetMaterialAttributes node, drag out the Base Color pin and create a BreakOutFloat3Components node.
This node splits out the channels of the BaseColor. Cartographic Polygons are saved as a single-channel mask to the Red channel of the BaseColor attribute, and the other channels are not used.
9Drag out from the R pin of BreakOutFloat3Components and create a Multiply node. Then, connect the Opacity node to the B pin of the Multiply node. Your graph should now resemble the graph shown below.

10Connect the out pin of the Multiply node to the Alpha pin of the Lerp node.
11Finally, connect the out pin of the Lerp node to the Base Color pin of SetMaterialAttributes.
The finished graph should now resemble the graph below.

In the areas outside of the polygon, the Alpha value will be 0, and so the Base Color will be unchanged. Inside the polygon, the Base Color will be tinted by your chosen Color parameter, with the amount of the tint driven by the Opacity value.
12Save and close MLB_AreaTint.
13Open the MI_AreaTint Material Instance. Find the top layer and change the following parameters:
- Rename the layer from “Clipping” to “Tint”.
- Set the Layer Asset to ML_CesiumRasterOverlay.
- Set the Blend Asset to MLB_AreaTint.
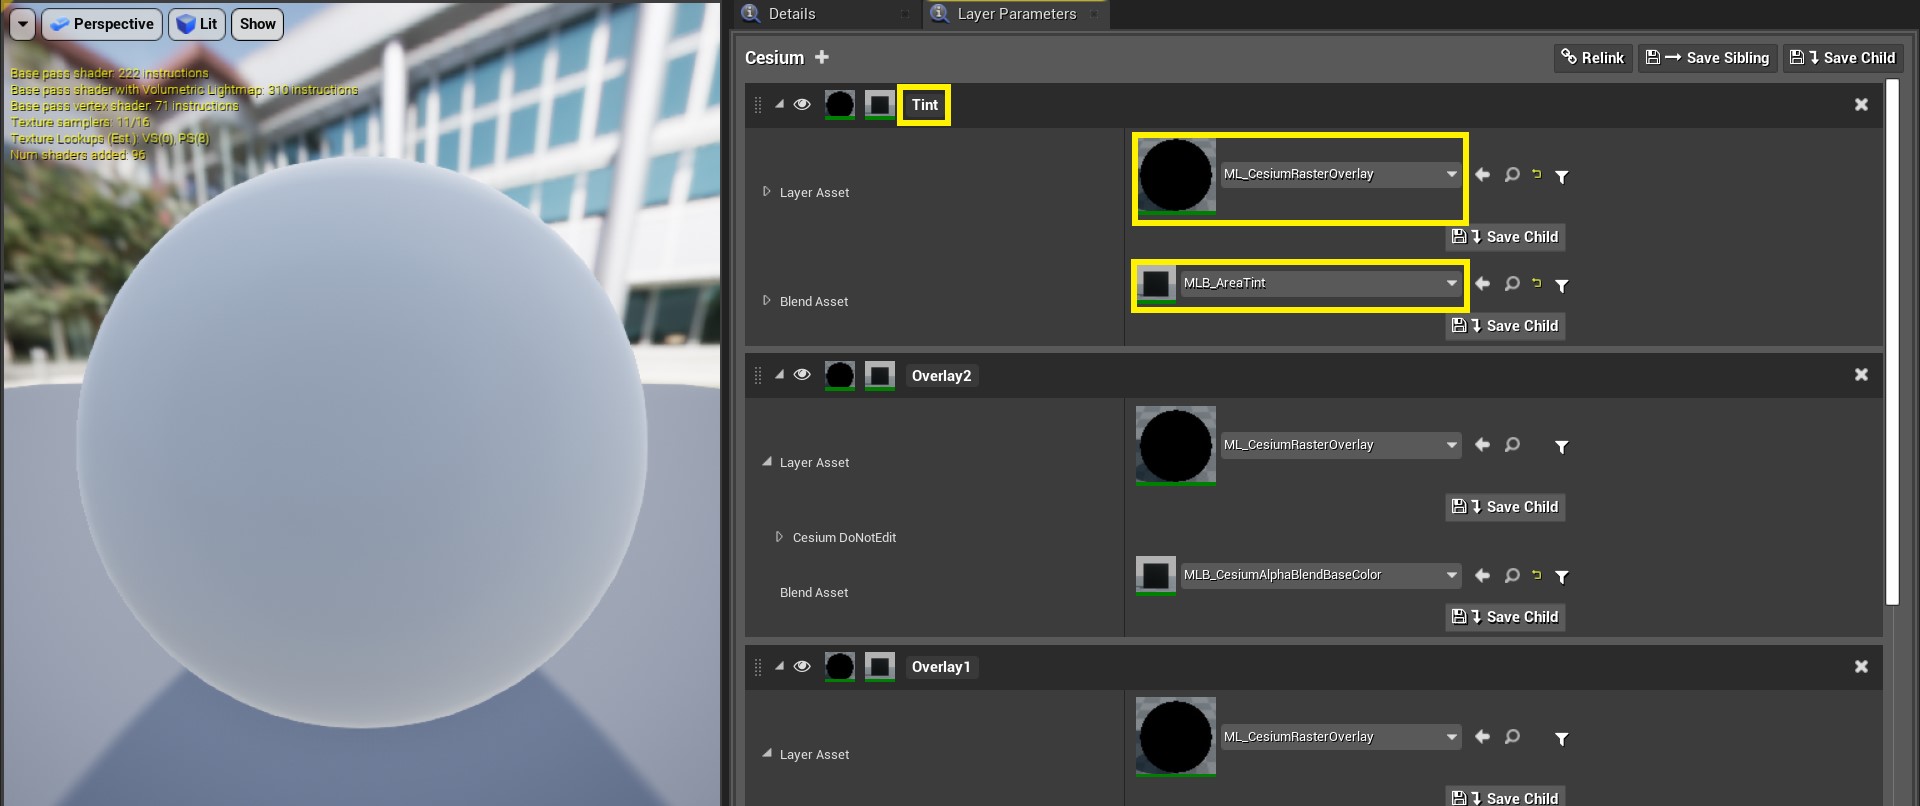
14Save and close the Material Instance.
15Add a Cesium Cartographic Polygon to your scene.
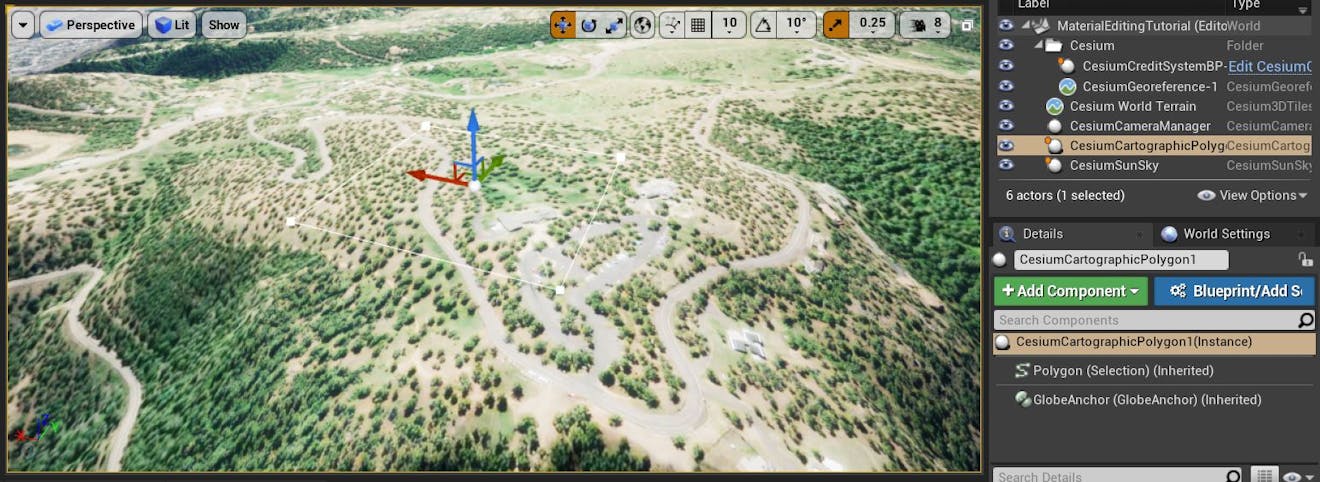
16Click on Cesium World Terrain and set the Material to MI_AreaTint.
17The material won’t look different until you connect the Cartographic Polygon to the tileset. Add a CesiumPolygonRasterOverlay component to Cesium World Terrain.
18Click on the Polygon Raster Overlay component and set the following parameters:
- Add an element to the Polygons array and set it to your new polygon.
- Uncheck Exclude Tiles Inside.
- Set the Material Layer Key to “Tint”.
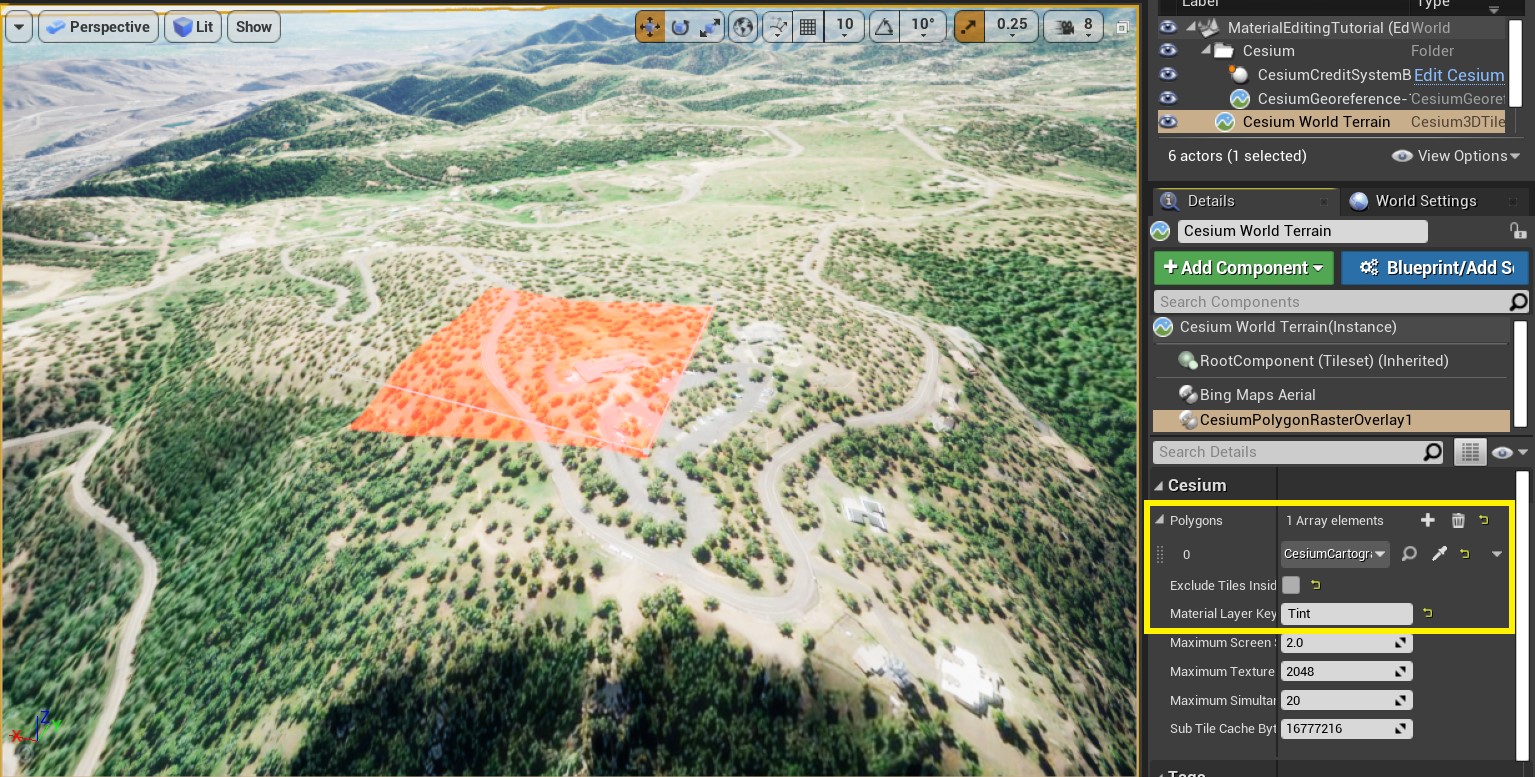
19The area of your tileset that is inside the polygon should now be tinted. If it is not, click the Refresh Tileset button in the Details panel of Cesium World Terrain.
- Are there other existing materials that I can use in my project?
The Cesium for Unreal Samples project contains several example materials that you are free to use and modify in your own projects. Currently, the sample materials include a custom watermask material, an elevation band/topographic line material, a grid material, and a material that colors by elevation. If there are other materials that you frequently find yourself needing, let us know on the community forums. Or, if you’ve created a material that others might find useful, consider contributing directly to the samples project. - How do I apply a texture to a tileset?
Textures on tilesets won’t behave like they might on normal meshes. If you simply hook up the texture, you’ll see that it will appear at many different scales, because tiles that are farther away will be larger. You can render a texture at a consistent scale by using the World Aligned Texture node.
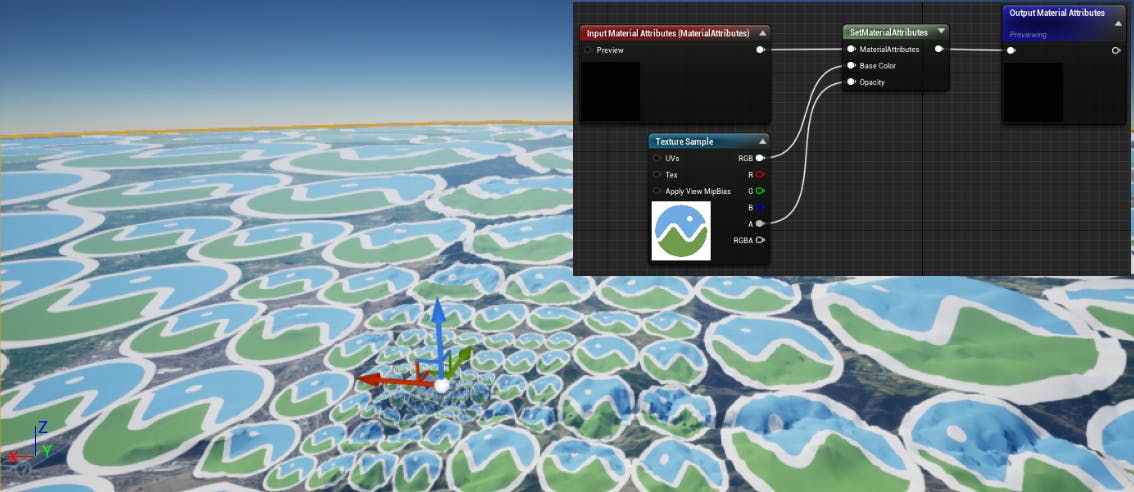
A texture implemented with a Texture Sample node will scale based on the size of the tile it’s applied to.
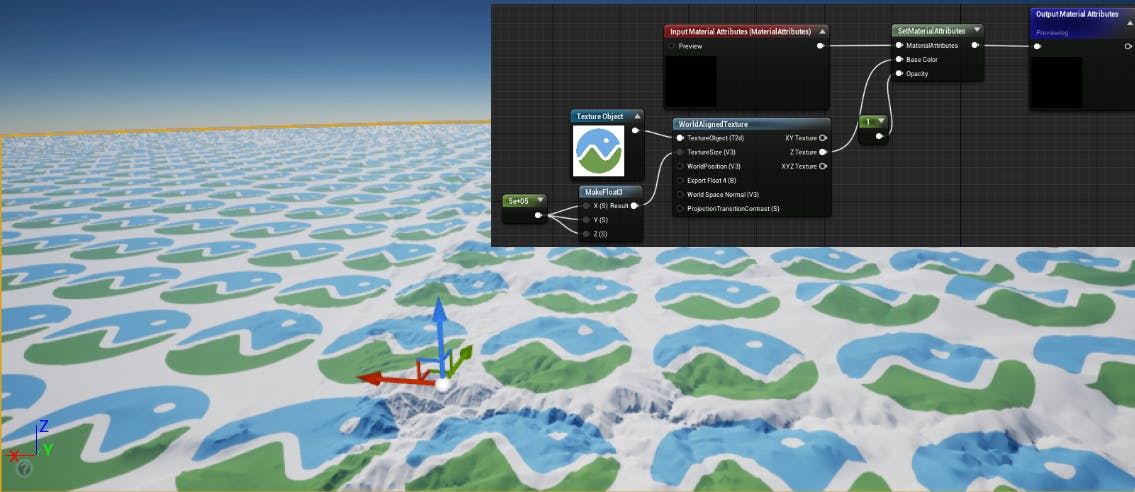
A texture implemented with a WorldAlignedTexture node will maintain a consistent size.
If you’re looking to apply a texture or image only on a specific part of the terrain, you may want to consider tiling it with Cesium ion.
- How do I edit the water material?
When Enable Water Mask is checked on Cesium World Terrain, a water effect will appear on oceans. There is a slot for Water Material right below the normal Material slot on 3D Tilesets. Create a duplicate of MI_CesiumThreeOverlaysAndClippingAndWater and a duplicate of the Material Layer Blend MLB_CesiumSimpleWater. Once you have edited the material, assign it to the Water Material parameter on Cesium World Terrain. - How can I change the water mask to include/exclude a certain area?
You can not edit the water mask directly, but you can use materials and Cartographic Polygons to define custom areas of water and land. See Level 9 of the Cesium for Unreal Samples for an example of this system in action, and pre-made materials to get you started.
If you’re interested in learning more about material editing in Unreal, or having trouble, the following pages may be useful.
Need help? Visit the Community Forum.
We’d love to see how you’re using custom materials in your projects! Share your work with us on Twitter by tweeting @CesiumJS.