Building a VR Application
This tutorial will take you through the process of building a virtual reality (VR) application using Cesium for Unreal. It will discuss deploying your application to both tethered and standalone headsets, and it will provide example code in both C++ and Blueprints.
You’ll learn how to:
- Create a VR-ready project in Unreal
- Create a simple user controller that works with your VR device
- Preview your level in your VR device directly from Unreal
- Package and deploy your application to a standalone headset
This tutorial builds on ideas from the prior Getting Started tutorials. While not required, it may be helpful to be familiar with the Cesium for Unreal plugin before beginning this project. A good place to start is the Cesium for Unreal Quickstart tutorial.
- A VR device, such as an Oculus Quest, HTC Vive, or Valve Index.
- A computer that is compatible with your VR device.
- Oculus Quest: requirements for Oculus Link and instructions for connecting
- HTC Vive: instructions
- Valve Index: instructions
- An installed version of Unreal Engine (at least 4.26 or later).
- An installed version of the Cesium for Unreal plugin.
- Visual Studio 2019 with Desktop Development with C++ workload.
If this is your first time developing Android apps with Unreal, be sure to set up the Android SDK for your development environment.
Building for Oculus Quest? You'll also want to follow the Oculus developer setup guide.
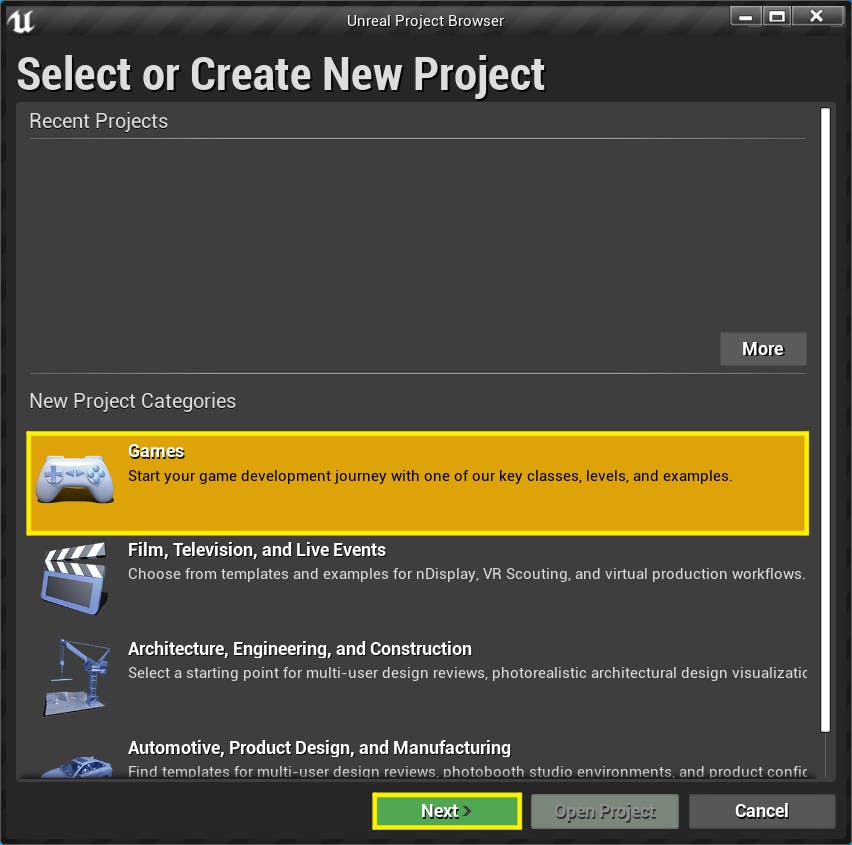
1Create a new project in Unreal, and under New Project Categories select Games. Click Next.
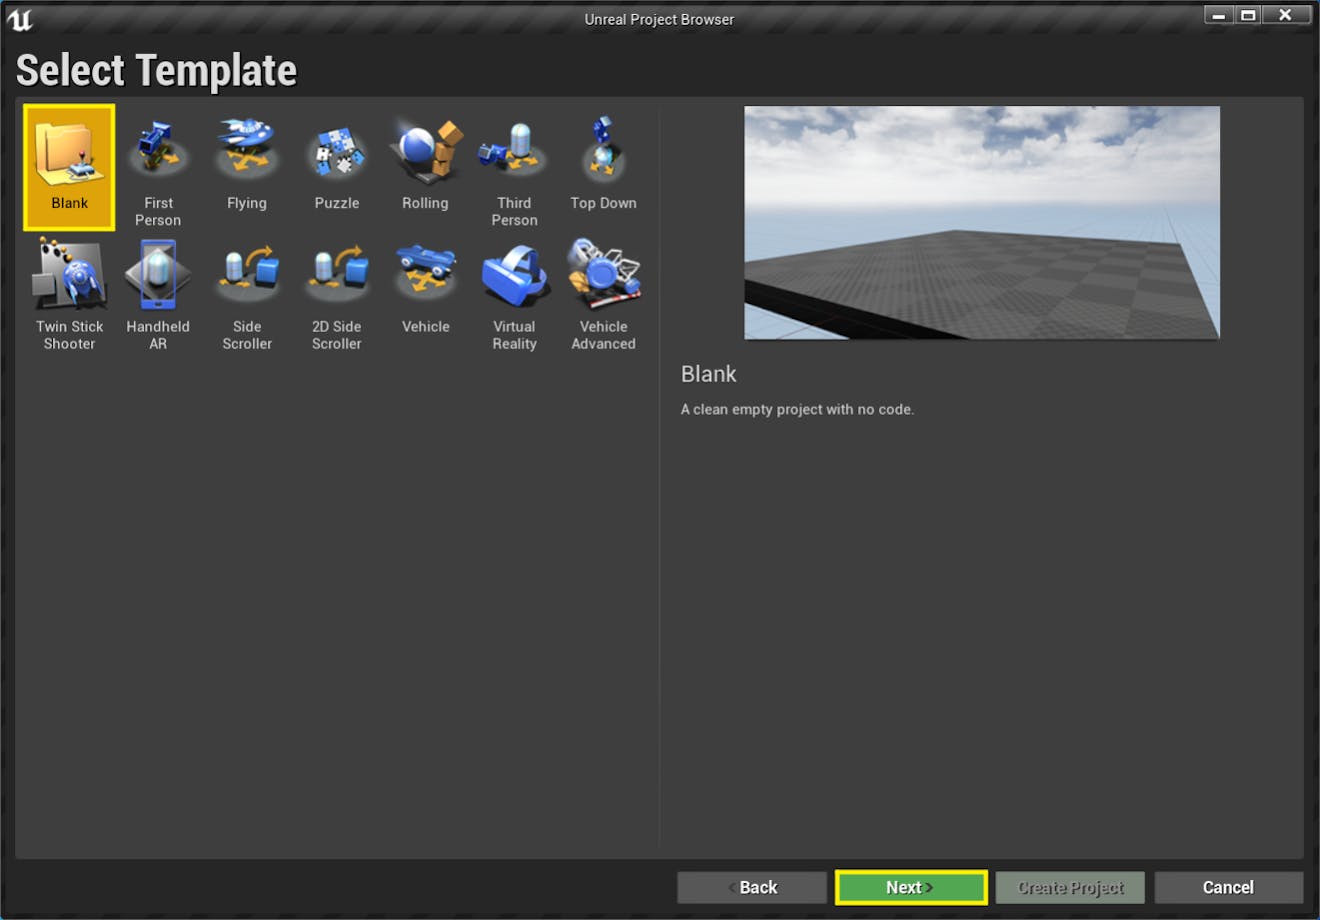
2Under Select Template, select Blank. Click Next.
3Under Project Settings, you may choose either C++ or Blueprint. This tutorial will provide instructions for both project types.
4Also under Project Settings, choose Scalable 3D or 2D, Raytracing Disabled, Mobile / Tablet, and No Starter Content. Give your project a name (e.g., “CesiumVRTutorial”).
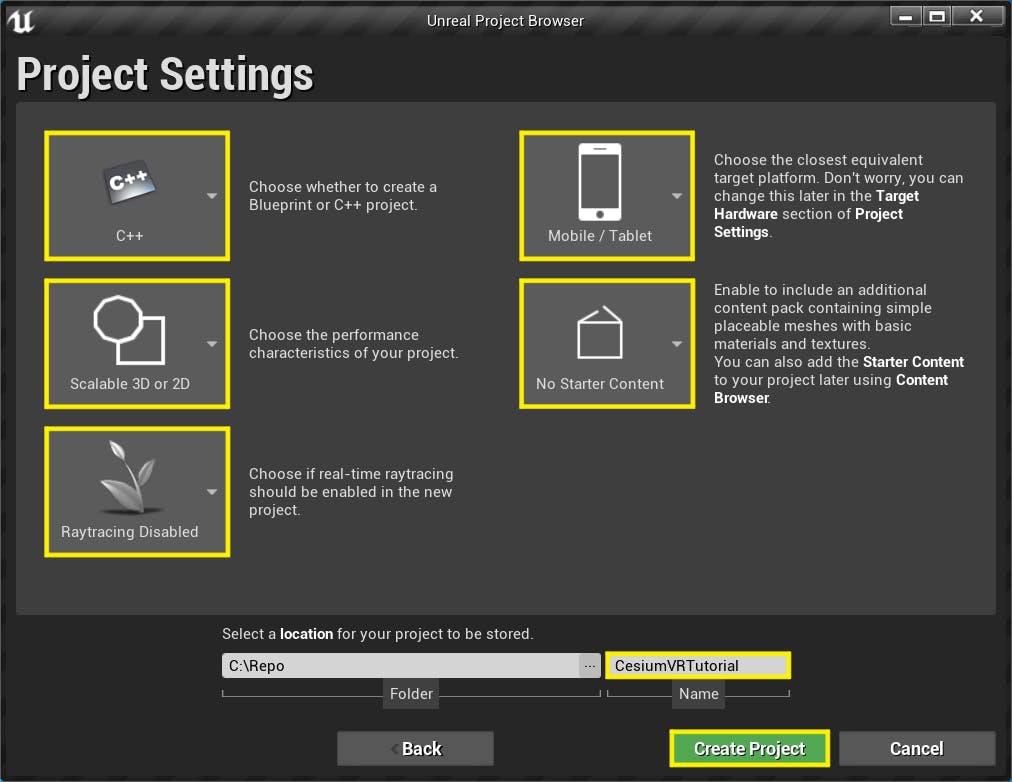
5Click Create Project. Your project will be created.
6Once the project is fully loaded, go to Edit > Plugins in the top menu. Find Cesium for Unreal and ensure it is Enabled. If it is not, enable it and then restart Unreal.
7In the top menu, go to File > New Level…, and then select Empty Level in the window that appears. The new level will open.
8With the new level open, go to File > Save Current As… in the top menu. Give your level a name (e.g., “Main”) and save it in the Content folder or a subfolder.
9On the left side of the screen, you should see a Cesium tab. Click on it.
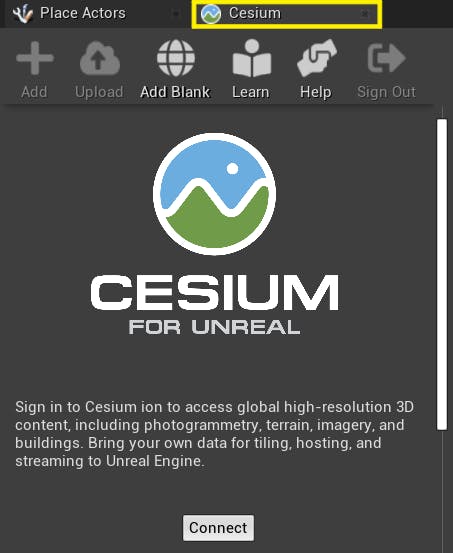
10In the Cesium tab, click the Connect button. Your web browser will open with instructions for logging in to your Cesium ion account. Follow the instructions, and then return to Unreal when prompted.
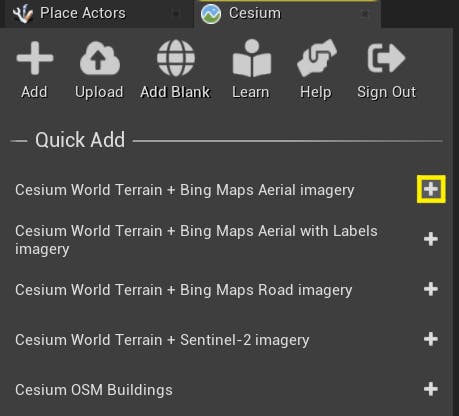
11The Cesium tab should now have some new options in it, including one marked Cesium World Terrain + Bing Maps Aerial Imagery. Click the + button next to that option to add Cesium World Terrain to your level.
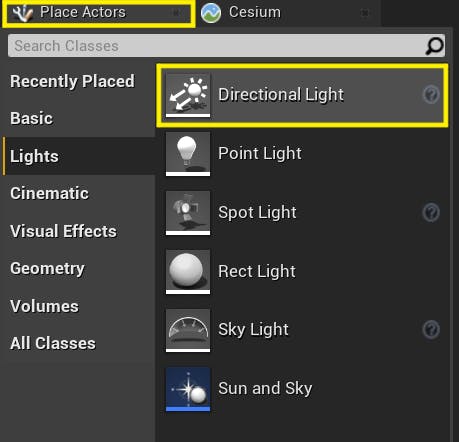
12Flip back to the Place Actors tab, which is usually found next to the Cesium tab.
13In the Place Actors tab, select Lights. Drag a Directional Light into the level. After this step, you should be able to see Cesium World Terrain rendered in the level preview window.
If you wish to include a skybox, add a BP_Sky_Sphere from the Place Actors panel.
Q: Can I use CesiumSunSky instead of a directional light and skybox?
A: Yes, but you'll need to enable the Enable Mobile Rendering option in the Details panel of CesiumSunSky. You will also need to enable Auto Exposure and Extend default luminance range in Auto Exposure settings under Project Settings > Engine > Rendering > Default Settings.
14At this point, you should be able to test your level using Unreal’s VR Preview feature. We’ll add a custom user controller in the next section, but for now, follow your device’s instructions for connecting to your computer (see the Prerequisites section above).
15Connect your VR device to your computer. You may need to restart Unreal in order for it to acknowledge the device.
16In the toolbar above the level preview window, find the Play button. Depending on your settings, it may be visible in the toolbar. If it is there, click the small arrow next to the Play button. If it is not there, click the double arrow on the right side of the toolbar (tooltip = Click to expand toolbar) and then select Active Play Mode.
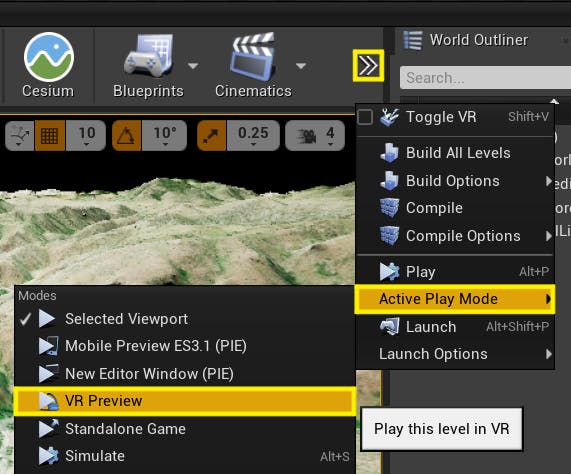
17Select VR Preview. Put on your VR headset and look around your level. You won’t be able to teleport around the level yet, but you should see Cesium World Terrain below you.
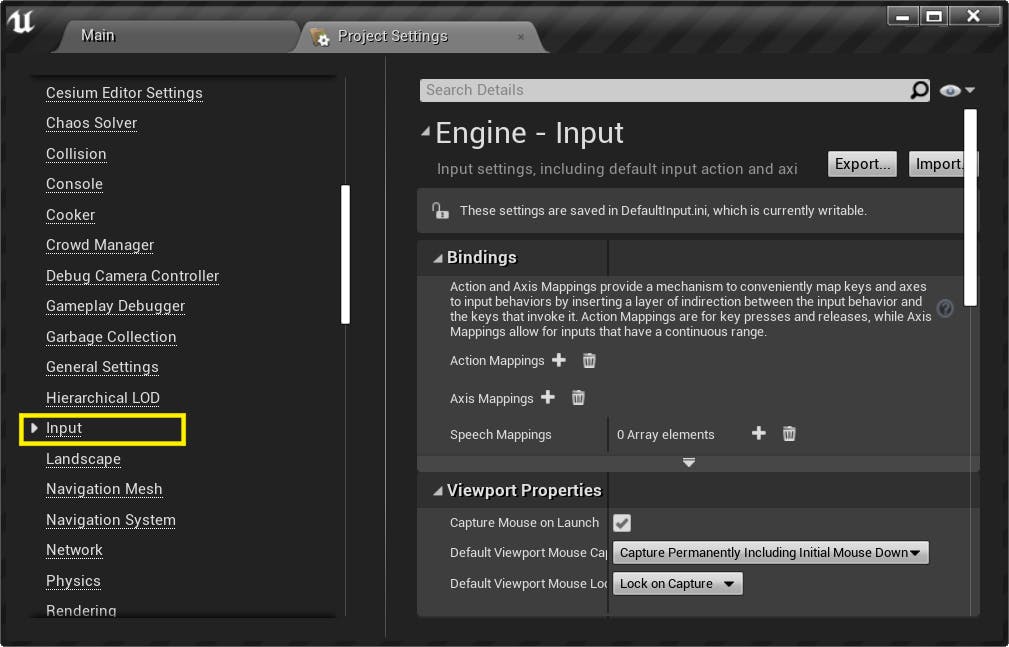
18Set up the Action Mappings we’ll need for the next step. Go to Edit > Project Settings…. A new window will appear. In the left sidebar of the new window, go to Engine > Input.
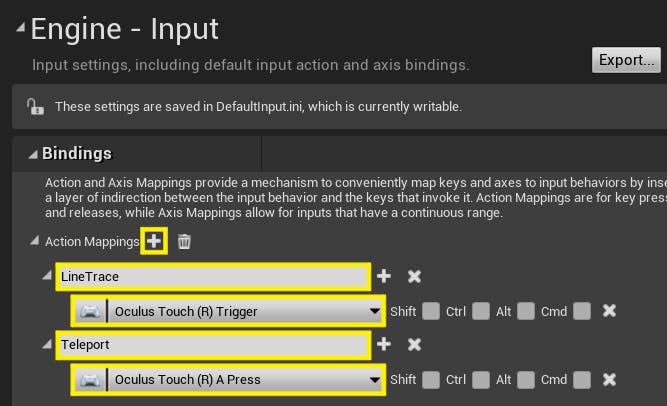
19Create two Action Mappings—naming them “LineTrace” and “Teleport”—and bind them each to a different button on your VR device’s right controller. The example below uses the Oculus Touch controllers, which are used for the Oculus Quest 2.
Next, you will make a simple user controller that will allow you to move around the level in VR. The controller will be made “from scratch” (i.e., using built-in Unreal components), rather than relying on a premade Pawn, so that you can understand the process from start to finish—and learn how to make changes to fit your use case.
Q: Can I use the Pawn in Unreal’s VR template instead of making my own?
A: Yes, but you would need to modify it. That Pawn relies on a Nav Mesh Bounds Volume for determining where the user can move, which does not work well with Cesium for Unreal, which loads terrain dynamically and has its own system for handling levels of detail.
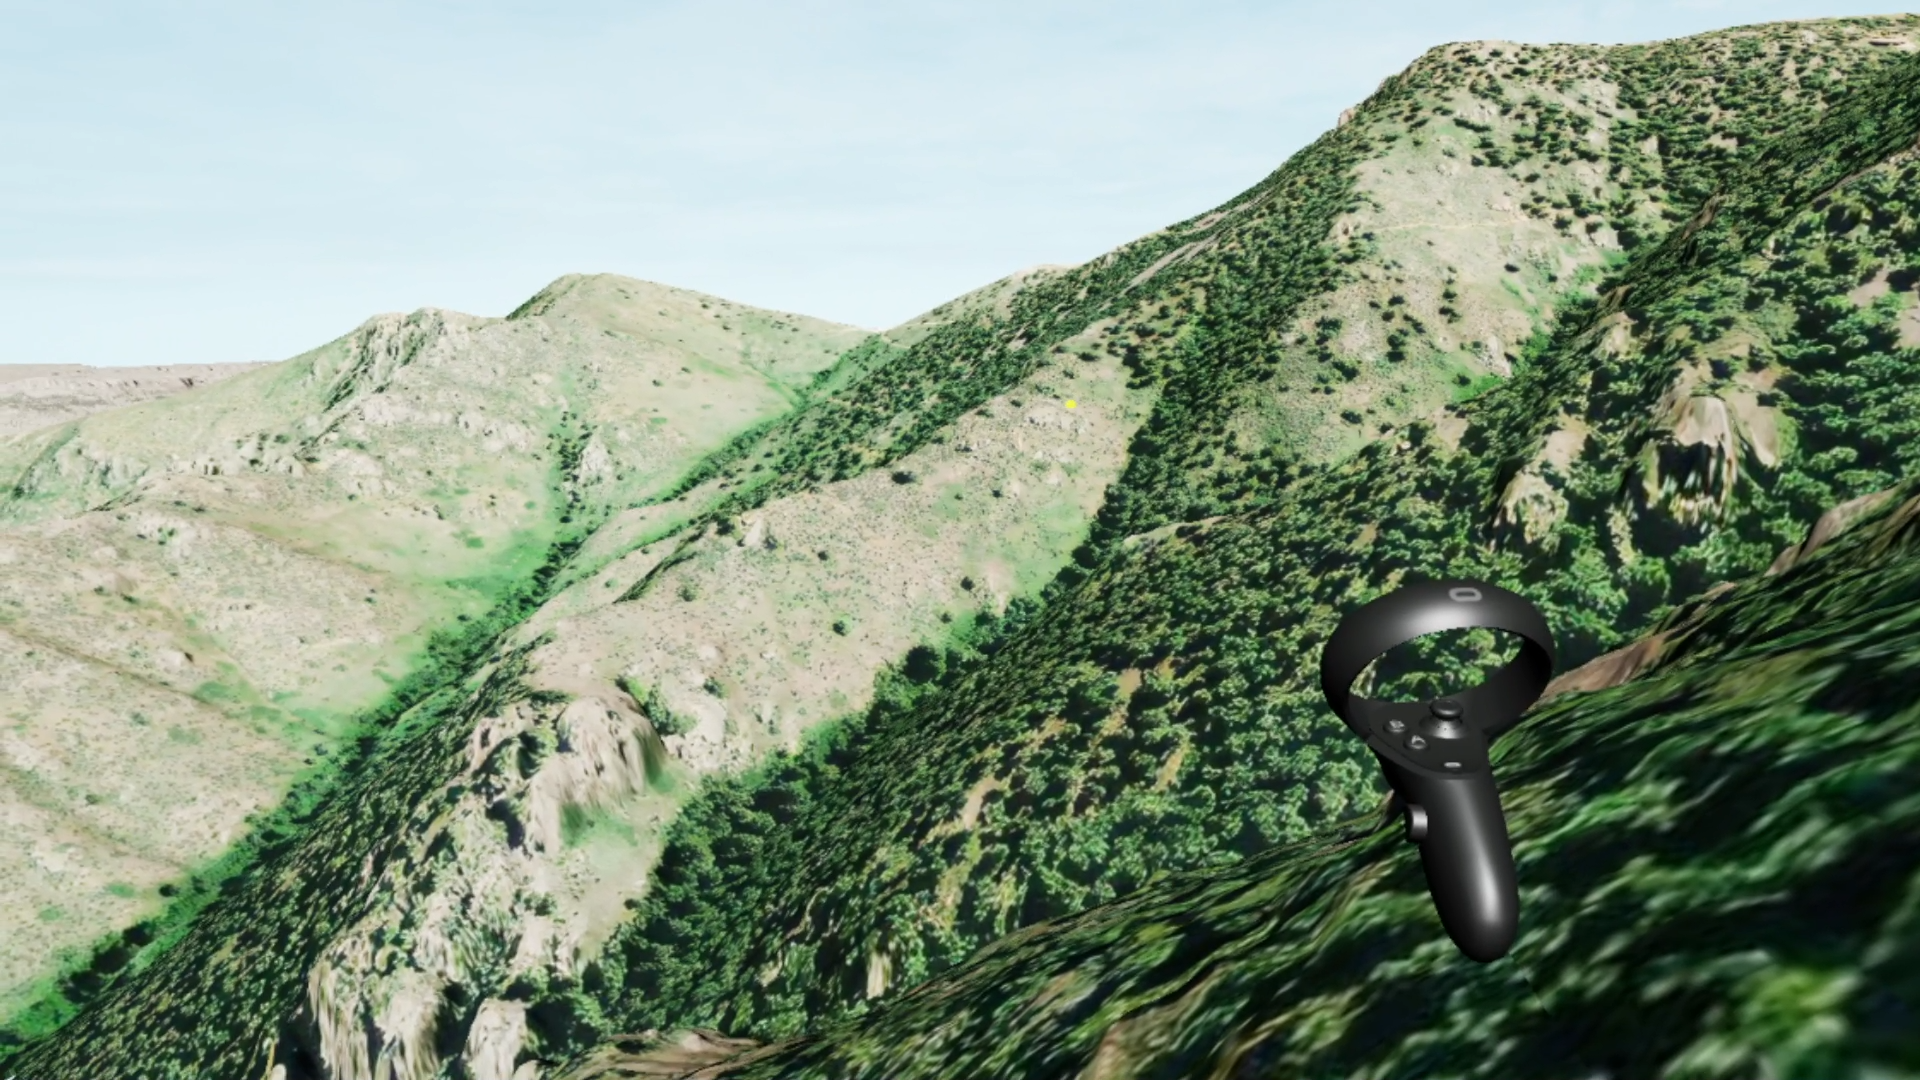
The user controller will use a virtual laser pointer to move around the level. Users will be able to point at the terrain with the right controller and press a button. As long as they hold that button, they’ll see a dot where their controller is pointing. Then, they can press a second button to teleport to that spot.
Q: Can I implement a different movement scheme, like using the thumbsticks to move continuously across the terrain?
A: Yes, if you’re already experienced with Unreal, you can make your own Pawn and add custom movement logic. If you’re new to Unreal, the steps below will show you the basics, and you should be able to modify the Pawn from there.
This tutorial uses a teleportation-based movement scheme because it’s the least likely to cause motion sickness in users.
In the next step, you’ll set up the Pawn to allow the user to move around the level. If your project uses C++, read on to Step 2a. If you wish to use Blueprints, skip to Step 2b.
If you would prefer not to code in C++ and wish to use the Blueprint event graph instead, go to Step 2b below.
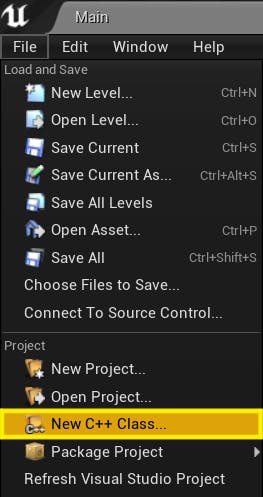
1Add a new C++ class by going to File > New C++ Class… at the top left corner of the Unreal Editor.
2Select Pawn as the parent class.
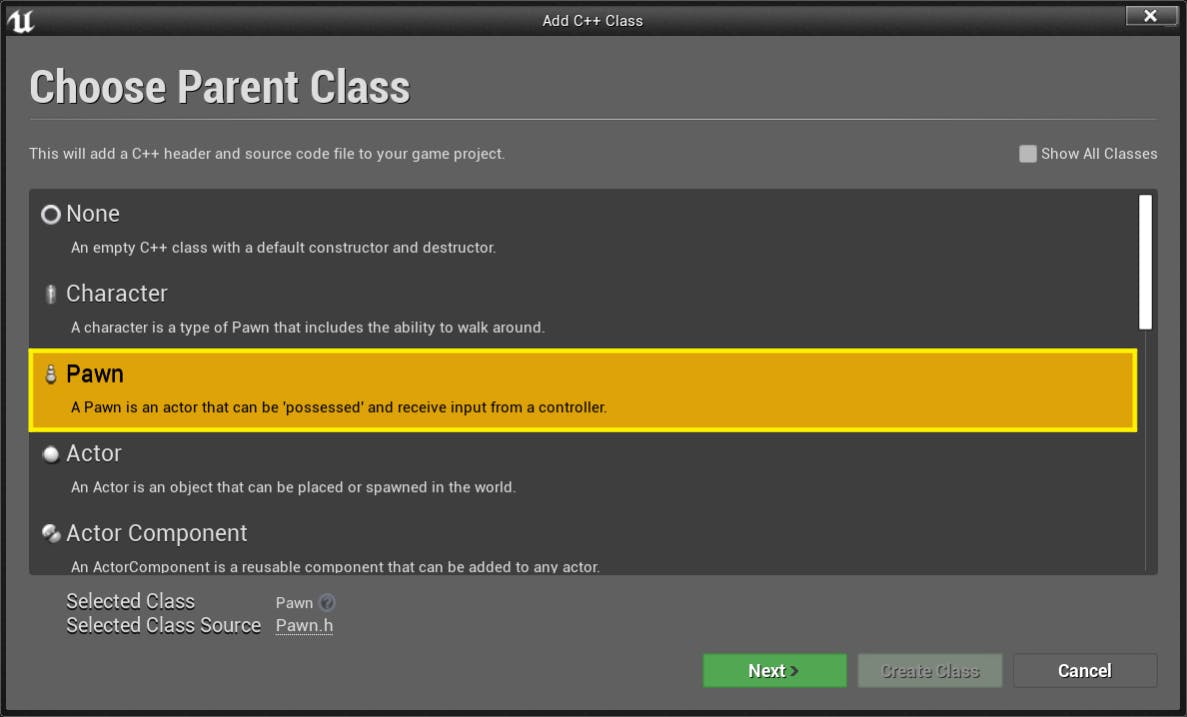
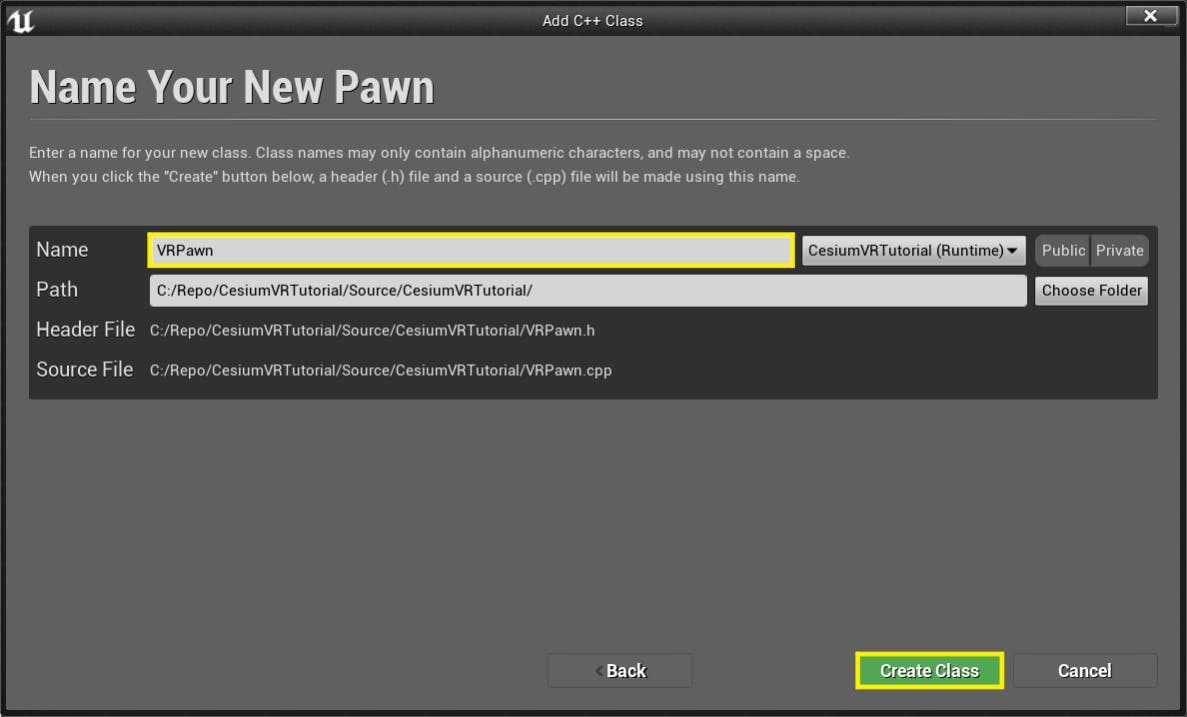
3Click the Next button. On the following page, set the name of the new class to “VRPawn”. Click the green Create Class button.
4Visual Studio should automatically open the file. If not, open the project in Visual Studio by going to File > Open Visual Studio.
5In Visual Studio, find and open the following file using the Solution Explorer on the right: Source/<YourProjectName>/<YourProjectName>.Build.cs.
6In that file, you’ll see a line that starts with PublicDependencyModuleNames.AddRange and includes an array of strings. Add "HeadMountedDisplay" to the array, to tell Unreal that we want to use that module. The line should look like this:
PublicDependencyModuleNames.AddRange(new string[] { "Core", "CoreUObject", "Engine", "InputCore", "HeadMountedDisplay" });
7Let’s modify our Pawn’s header file (VRPawn.h, which is located in the Source/<YourProjectName> folder) to include the fields we’ll need for laser-pointer teleportation. First, at the top of the file, you will see text that looks like this:
#pragma once

#include "CoreMinimal.h"
#include "GameFramework/Pawn.h"
#include "VRPawn.generated.h"
We'll need to edit it to let us use some necessary components in our code (such as a camera and motion controllers).
Revise it so that it looks like this instead:
#pragma once

#include <Camera/CameraComponent.h>
#include <Components/SceneComponent.h>
#include <Components/StaticMeshComponent.h>
#include <CoreMinimal.h>
#include <GameFramework/Pawn.h>
#include <MotionControllerComponent.h>

#include "VRPawn.generated.h"
8Further down in VRPawn.h, you will see a section marked protected. In that section, add these components, which will serve as the virtual counterparts to the physical headset and controllers, a cursor for indicating where the user is pointing, and some parameters for pointing and teleporting:
  UMotionControllerComponent* LeftController;
  UMotionControllerComponent* RightController;
  UStaticMeshComponent* LineTraceCursor;
  float LineTraceLength = 1000000;
  float OffsetFromGround = 4000;
9We need to mark these fields with the UPROPERTY macro, so that we can access them in the Blueprint Editor. We can do that by adding UPROPERTY macros with a couple of specifiers. Add the macros so that the final result looks like this:
  UPROPERTY(BlueprintReadWrite, EditAnywhere)
  UMotionControllerComponent* LeftController;

  UPROPERTY(BlueprintReadWrite, EditAnywhere)
  UMotionControllerComponent* RightController;

  UPROPERTY(BlueprintReadWrite, EditAnywhere)
  UStaticMeshComponent* LineTraceCursor;

  UPROPERTY(BlueprintReadWrite, EditAnywhere)
  float LineTraceLength = 1000000;

  UPROPERTY(BlueprintReadWrite, EditAnywhere)
  float OffsetFromGround = 4000;
If you need to see any code snippets in context, or if you simply don’t need to learn how to create a Pawn in Unreal, skip to the bottom of this tutorial. The complete C++ code is shown there.
10Add another section at the bottom of the file (before the closing brace) marked private, followed by a colon (:). The variables and functions you declare in this section will not be accessible to other classes, which is good practice if there is no need for other classes to see them.
11Declare these functions, which will allow the user to point at a location and teleport to it:
private:
  void _startLineTracing();
  void _stopLineTracing();
  void _teleport();
12Add the fields below in the private section as well. Even though we don’t need to modify _root or _camera in the Blueprint Editor, it’s still good practice to mark them with the UPROPERTY macro so that Unreal can track them properly.
  UPROPERTY()
  USceneComponent* _root;

  UPROPERTY()
  UCameraComponent* _camera;

  bool _isLineTracing;
  bool _isLineTraceHitting;
  FVector _lineTraceHitLocation;
13Now, open VRPawn.cpp. A constructor has already been added for us, but we need to add some code that initializes our components. Add the following lines to the constructor (the function that starts with AVRPawn::AVRPawn()):
  _root = CreateDefaultSubobject<USceneComponent>(TEXT("Root"));
  _camera = CreateDefaultSubobject<UCameraComponent>(TEXT("Camera"));
  LeftController = CreateDefaultSubobject<UMotionControllerComponent>(TEXT("LeftController"));
  RightController = CreateDefaultSubobject<UMotionControllerComponent>(TEXT("RightController"));
  LineTraceCursor = CreateDefaultSubobject<UStaticMeshComponent>(TEXT("LineTraceCursor"));
14Now, when our Pawn is constructed, the components will be constructed as well. We also need to define the relationship between them in the transform hierarchy. Below the code you just added, insert the following:
  RootComponent = _root;
  _camera->SetupAttachment(_root);
  LeftController->SetupAttachment(_root);
  RightController->SetupAttachment(_root);
  LineTraceCursor->SetupAttachment(_root);
15Additionally, we need to ensure that the UMotionController components track the location and orientation of your VR device’s physical controllers, and also that they are visible in VR. Add these lines to the constructor:
  LeftController->MotionSource = FName("Left");
  RightController->MotionSource = FName("Right");
  LeftController->bDisplayDeviceModel = true;
  RightController->bDisplayDeviceModel = true;
16Finally, let’s hide the line trace cursor when the Pawn is constructed, so that it’s not in the way. Add this line:
LineTraceCursor->SetVisibility(false);
17Let’s add definitions for two of the new functions we declared in the header file. These essentially just track whether the controller button that we map to the line tracing action is being pressed. When the button is released, hide the line trace cursor (the dot of our laser pointer).
void AVRPawn::_startLineTracing() { _isLineTracing = true; }

void AVRPawn::_stopLineTracing() {
  _isLineTracing = false;
  _isLineTraceHitting = false;
  LineTraceCursor->SetVisibility(false);
}
18With our laser pointer, we need to specify what happens every frame, depending on whether the pointer is on or not—and if it is hitting anything. We do this in the Tick function. The code below handles that.
void AVRPawn::Tick(float deltaTime) {
  Super::Tick(deltaTime);

  // If the user is pressing the line trace button, do the line trace.
  if (_isLineTracing) {
    // Use the right controller to aim the line trace.
    FVector start = RightController->GetComponentLocation();
    FVector direction = RightController->GetForwardVector();
    FVector end = start + (direction * LineTraceLength);

    ECollisionChannel channel = ECollisionChannel::ECC_WorldStatic;
    FCollisionQueryParams params(FName(TEXT("")), true, this);
    FHitResult hit;

    if (GetWorld()->LineTraceSingleByChannel(OUT hit, start, end, channel, params)) {
      // If the line trace hit something, move the cursor to that spot.
      _isLineTraceHitting = true;
      _lineTraceHitLocation = hit.Location;
      LineTraceCursor->SetVisibility(true);
      LineTraceCursor->SetWorldLocation(_lineTraceHitLocation);
    } else {
      // If the line trace didn't hit anything, hide the cursor.
      _isLineTraceHitting = false;
      LineTraceCursor->SetVisibility(false);
    }
  }
}
19Now, let’s add the function that handles teleportation. Start by adding an empty definition at the bottom of VRPawn.cpp:
void AVRPawn::_teleport() {

}
20We only want the user to be able to teleport if the following conditions are true: (a) their laser pointer is on and (b) the laser pointer is hitting a spot on the terrain. The code below checks for both of those conditions, and if either of them is false, the function will return without doing anything. Add this code to the top of the function:
  if (!_isLineTracing || !_isLineTraceHitting) {
    return;
  }
21If we pass both of those tests, we can teleport the user to the _lineTraceHitLocation—with one caveat. We don’t want to teleport them to the exact point where the laser pointer hit the ground, because then they’ll be eye level with the ground. Instead, let’s add a vertical offset to put the user some distance above the ground:
  FVector newLocation = _lineTraceHitLocation;
  newLocation.Z += OffsetFromGround;
  SetActorLocation(newLocation);
22Finally, we need to modify the SetupPlayerInputComponent function so that it looks like the code below. This will connect our functions to the LineTrace and Teleport Action Events we mapped in the first section of this tutorial, which will be triggered by our VR device’s physical buttons.
void AVRPawn::SetupPlayerInputComponent(UInputComponent* playerInputComponent) {
  Super::SetupPlayerInputComponent(playerInputComponent);

  InputComponent->BindAction("LineTrace", IE_Pressed, this, &AVRPawn::_startLineTracing);
  InputComponent->BindAction("LineTrace", IE_Released, this, &AVRPawn::_stopLineTracing);
  InputComponent->BindAction("Teleport", IE_Pressed, this, &AVRPawn::_teleport);
}
23Click File > Save All to save the files we just modified.
24Click Build > Build Solution.
25Return to the Unreal Editor. If you don’t see Cesium World Terrain in your level preview window, close and reopen the Editor.
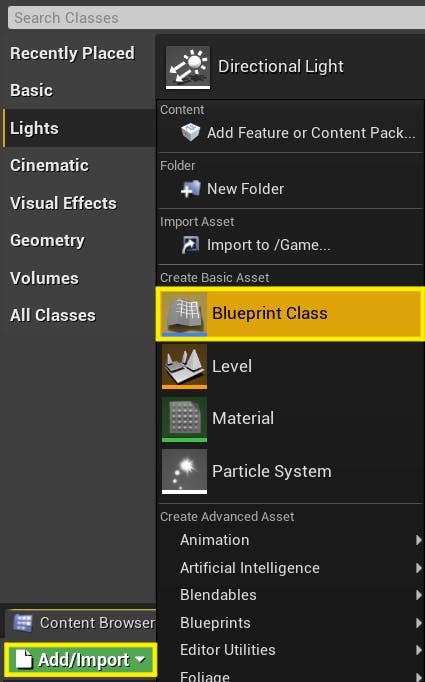
26Add a new Blueprint class by clicking Add/Import in the Content Browser at the bottom of your screen. Under Create Basic Asset, click Blueprint Class.
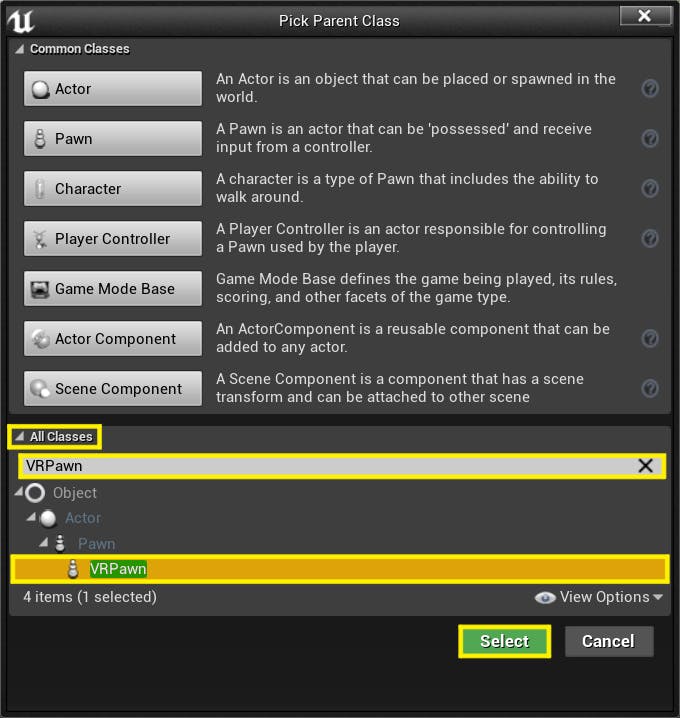
27Expand All Classes and search for “VRPawn” to find the class you created in C++. Click it and press Select.
28Name your Blueprint "BP_VRPawn".
29Double-click BP_VRPawn to open it in the Editor. If you see the text Open Full Blueprint Editor, click it.
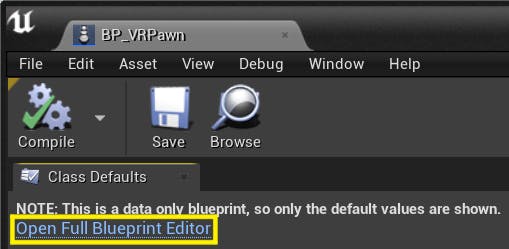
You’ve successfully created the core of your Pawn. Now, continue on to Step 3.
If you would prefer not to use the Blueprint event graph and instead code in C++, go to Step 2a above.
1Add a new Blueprint class by clicking Add/Import in the Content Browser at the bottom of your screen. Under Create Basic Asset, click Blueprint Class.
2In the next window, click Pawn.
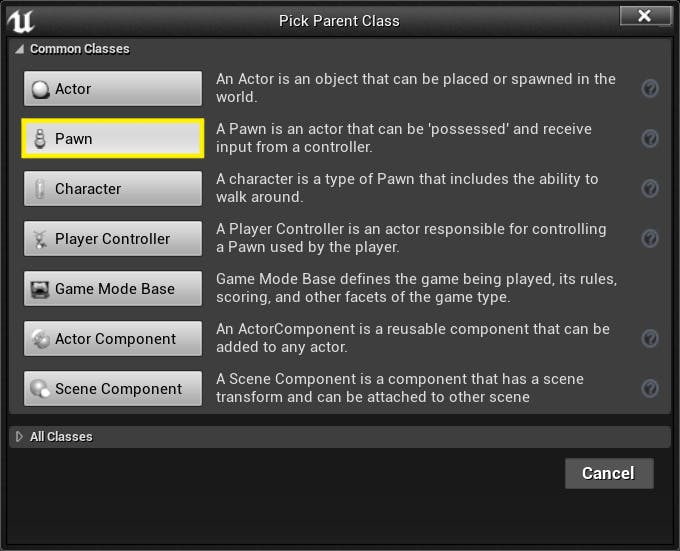
3Name your Blueprint "BP_VRPawn".
4Double-click BP_VRPawn to open it in the Editor.
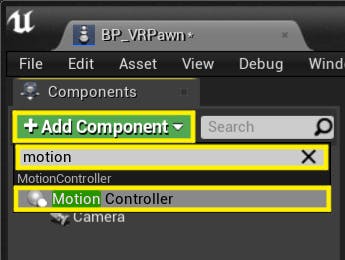
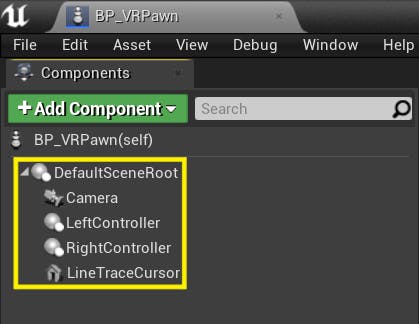
5Click the Add Component button in the top left and search for the Camera component. Click it to add it to your Pawn. Give it a name (e.g., “Camera”).

6Use the Add Component button to add two Motion Controller components. Give them names (e.g., “LeftController” and “RightController”).
7Use the Add Component button to add a Static Mesh component that will represent the dot of our laser pointer. Give it a name (e.g., “LineTraceCursor”).

8Ensure that all four of the components you added are direct children of the DefaultSceneRoot. If any of them were added as children of each other, click and drag them over DefaultSceneRoot and then click Attach.
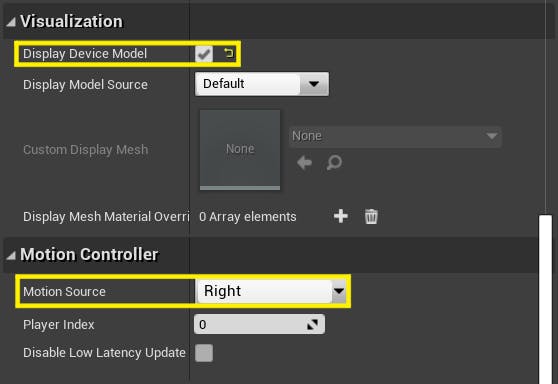
9Select the LeftController in the Components window, and then look at the Details tab on the right side of the Editor. Scroll down to find the Visualization section and check the box next to Display Device Model. Also find the Motion Controller section and ensure the Motion Source value is set to Left.

10Repeat the above step for the RightController. For this one, set the Motion Source value to Right.
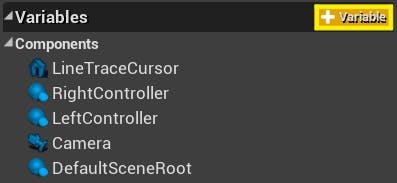
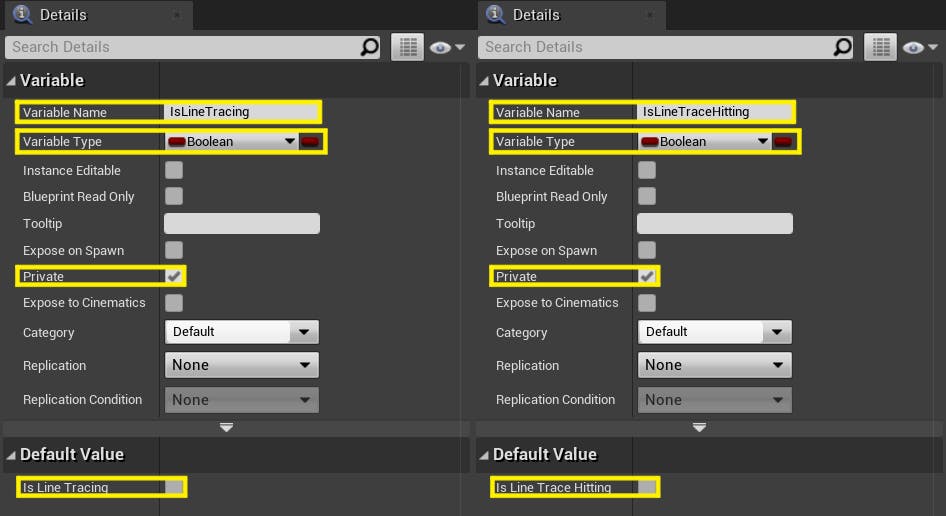
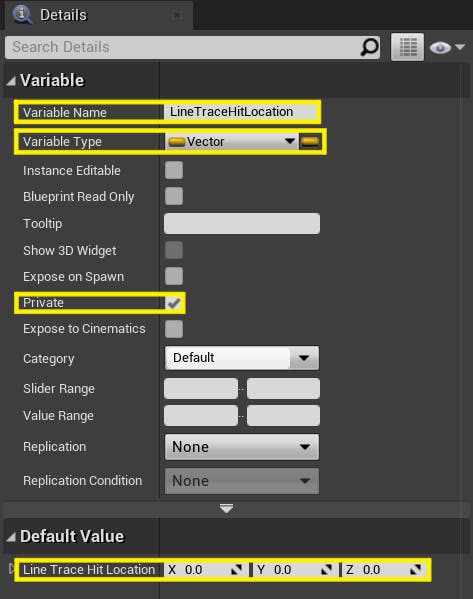
11In the bottom left corner, find the + symbol next to Variables. It will turn yellow when you hover over it with your cursor, and the word Variable will appear. Click five times to add five new variables.
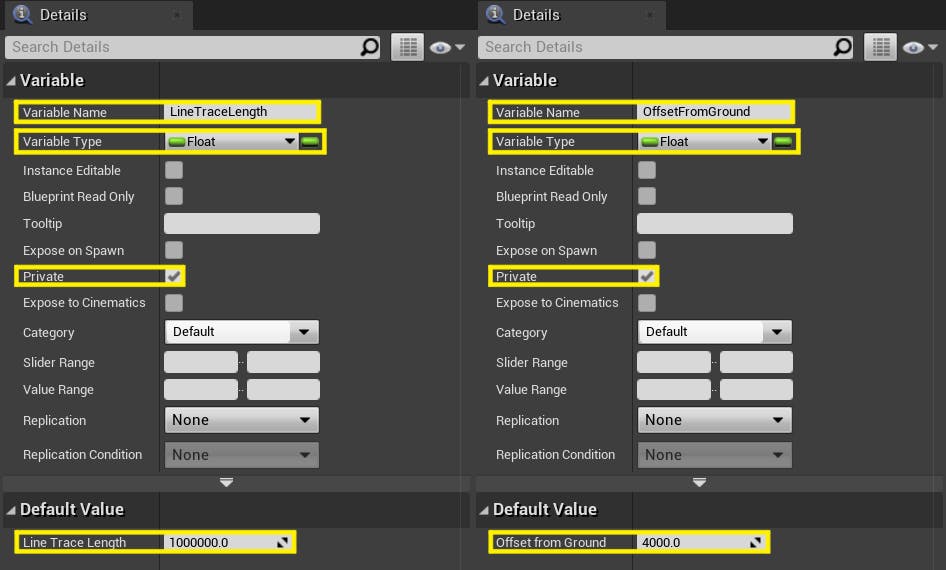
12Click each of your new variables in turn and look at the Details panel on the right when it is selected. Set them up as pictured below. You’ll need to click the Compile button in the top left corner before you can set each Default Value.
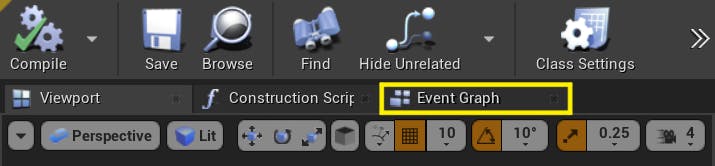
13Open the Event Graph by clicking on the tab near the top of the window.
14Right-click anywhere in the Event Graph and search for the first Action Event we created in our Project Settings—the one named LineTrace. Click it. A node will appear.
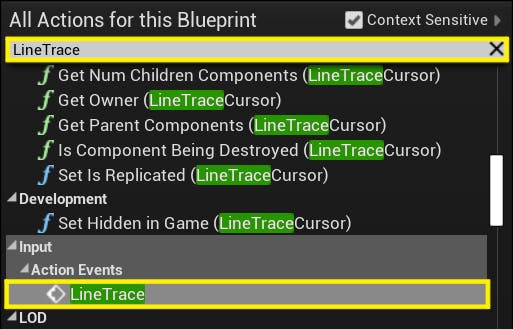
15Do the same for the second Action Event we created—the one named Teleport.
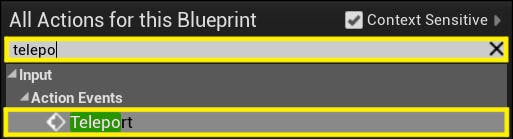
16Now the graph should have the three event nodes we need: Event Tick, InputAction LineTrace, and InputAction Teleport.
17Add and connect nodes (right-clicking in the Event Graph and searching for each one) to make the graph that flows from the Event Tick node look like the image below.
When you need to access a component or variable (e.g., LineTraceCursor), you can either search for it normally or drag it into the Event Graph from the Variables section in the bottom left corner. Select the “Get” option unless the node in the screenshot is marked SET.
This graph checks if the user is activating their laser pointer. If they are, it moves the dot to the point on the terrain that they’re pointing at.

Use a Break node to access the Location value of the Out Hit output of the LineTraceByChannel node.
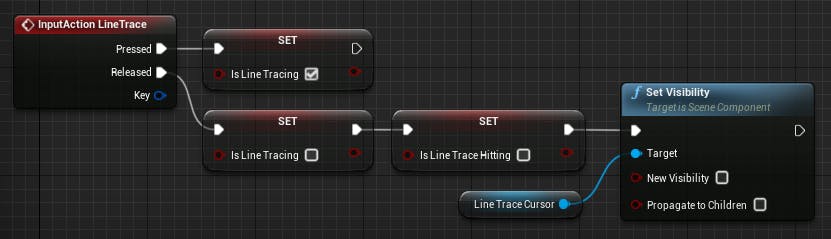
18Set up the graph connected to the InputAction LineTrace node as pictured below. This graph keeps track of whether the laser pointer is on or off, depending on when the user presses and releases the button associated with it.
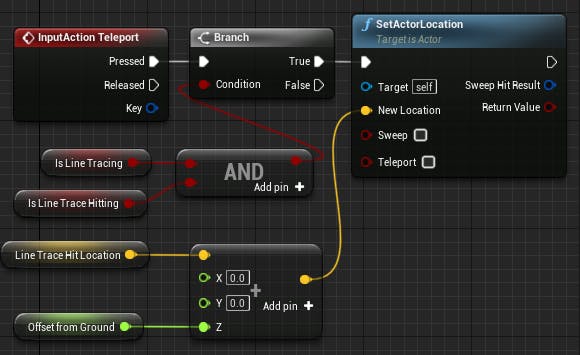
19Set up the graph connected to the InputAction Teleport node as pictured below. This graph moves the user to the dot of the laser pointer—if the pointer is on and aimed at the ground.
20Open the Construction Script by clicking on the tab beside the Event Graph.
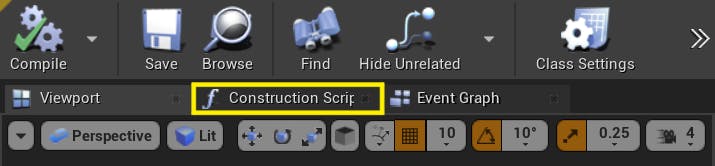
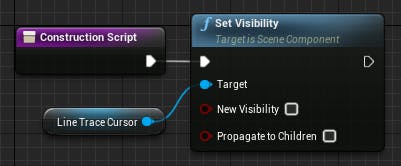
21Set up the graph connected to the Construction Script node as pictured below. This graph hides the line trace cursor when the Pawn is constructed, getting it out of the way until it is needed.
22Click the Save and Compile buttons in the top left corner of the window.

Continue here regardless of whether you followed Step 2a or Step 2b.
These steps will configure the appearance of the line trace cursor (i.e., the dot of the laser pointer). This tutorial uses built-in meshes and materials, but feel free to create your own assets or tweak these settings as you see fit.
1With BP_VRPawn open in the Editor, click on your Static Mesh component in the Components list (i.e., LineTraceCursor).
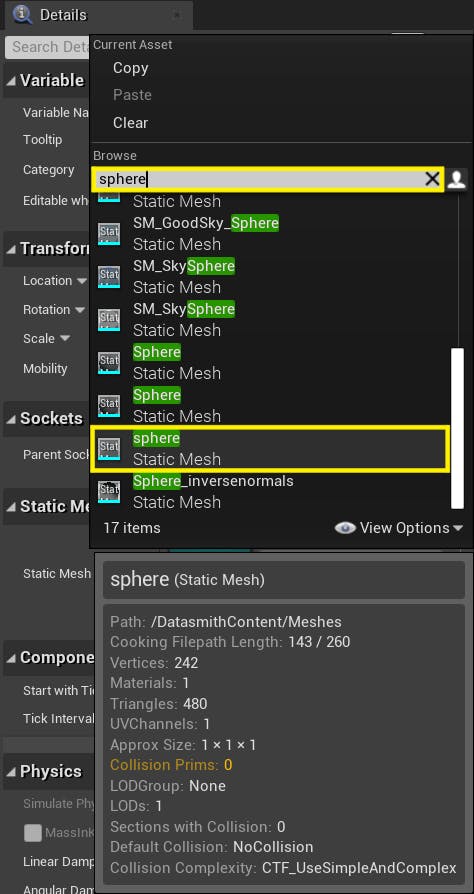
2With the Static Mesh selected, find the Static Mesh section in the Details panel on the right. Click the pulldown menu, click View Options, and then make sure the box next to Show Engine Content is checked. If it isn’t, check it.

3In the Search Assets box, search for the 1x1x1 sphere. There are several spheres, so make sure you have the right one.
4Find the Transform section in the Details panel and set the Scale to (500.0, 500.0, 500.0).

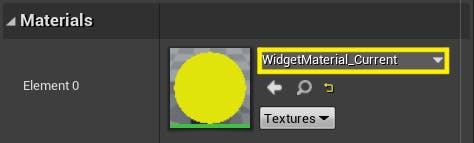
5Find the Materials section in the Details panel and set Element 0 to WidgetMaterial_Current. (Feel free to use your own material instead if you like.)
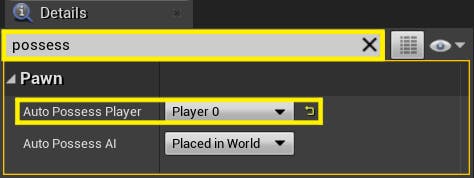
1In the Details panel of BP_VRPawn, search for Auto Possess Player and set it to Player 0.
2Click the Save and Compile buttons in the top left corner of the window.
3Close BP_VRPawn and return to the level preview window.
4Drag BP_VRPawn into the level and move it to a starting location of your choice.
5Just as you did in the first section of this tutorial, click the small arrow next to the Play button or the double arrow on the right side of the toolbar (tooltip = Click to expand toolbar) and then select Active Play Mode.
6Select VR Preview. Put on your VR headset. You should be able to look around your level and see your controllers.
7If you press the button bound to the LineTrace action (the Right Trigger, if you followed the steps exactly), you should be able to point to the terrain with your right controller and see a sphere at the spot you’re pointing at.
8With the LineTrace button held, you should be able to press the button bound to the Teleport action (the A button, if you followed the steps exactly) to move to a location directly above the selected spot.
The previous steps are adaptable to any tethered VR device. The only things that vary based on device are the Action Mappings and the process for making Unreal recognize that your device is plugged in (e.g., the Oculus app, SteamVR, or something else).
This next step is more device-specific. Currently, the only supported standalone device is the Oculus Quest 2. As support is added for other standalone VR devices in the future, this page will be updated with instructions for each device.
Two types of adjustments need to be made in order to deploy a standalone (Android) version of the application to the Oculus Quest 2. First, Unreal needs to be configured to build for Android. Second, the tileset settings need to be adjusted to make them more appropriate for a mobile device.
1Make sure you have the latest version of Cesium for Unreal. To find the updater, open the Epic Games Launcher and go to the Library tab. Below the version of Unreal that you are using for this tutorial, click Installed Plugins.
2Follow these instructions to set up Unreal for Oculus development. Since you already have Unreal installed, start at the section named, “Setup Unreal Engine for Android Development.” Skip the “Create a Project” section and proceed to the “Configure the Project for Oculus Development” section with the project you are using for this tutorial.
3In Project Settings, go to Platforms - Android > Build. Check Support arm64 and uncheck Support armv7.
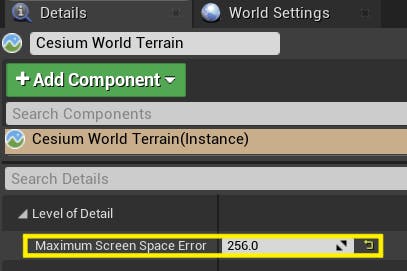
4In the Unreal Editor, click on Cesium World Terrain in the World Outliner on the right.
5In the Details panel below the World Outliner, find Cesium > Level of Detail and expand it. Set Maximum Screen Space Error to a high number, such as 256. This will make the tileset more manageable for the mobile device.
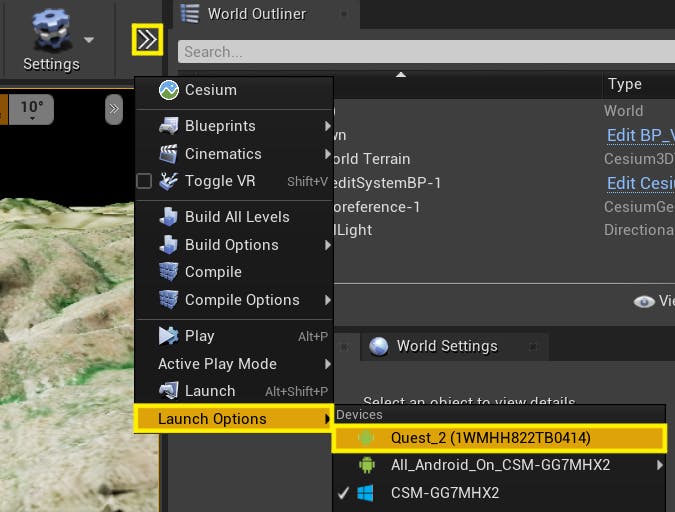
6In the top toolbar of the Unreal Editor, you may see a Launch button with a small arrow next to it. If it's there, click the small arrow. If it's not there, click the double arrow on the right side of the toolbar (tooltip = Click to expand toolbar) and then select Launch Options.
7In the submenu that pops up, you should see "Quest_2" followed by some letters and numbers. If you don’t see it right away, wait a few seconds and then repeat the previous step. It should appear once Unreal detects your Quest.
8Once you see “Quest_2,” click it to deploy the application to the Quest and launch it. You can open the Output Log (Window > Developer Tools > Output Log) to track progress. It will take several minutes, and Unreal may appear to freeze at the start. You will see the text “LogPlayLevel: Starting: Intent” and “LogTcpMessaging: Discovered node” when deployment is done.
9When the process is complete, you should be able to put on your headset and use it just as you did in the VR Preview.
#pragma once

#include <Camera/CameraComponent.h>
#include <Components/SceneComponent.h>
#include <Components/StaticMeshComponent.h>
#include <CoreMinimal.h>
#include <GameFramework/Pawn.h>
#include <MotionControllerComponent.h>

#include "VRPawn.generated.h"

UCLASS()
class CESIUMVRTUTORIAL_API AVRPawn : public APawn {
  GENERATED_BODY()

public:
  AVRPawn();

protected:
  virtual void BeginPlay() override;

  UPROPERTY(BlueprintReadWrite, EditAnywhere)
  UMotionControllerComponent* LeftController;

  UPROPERTY(BlueprintReadWrite, EditAnywhere)
  UMotionControllerComponent* RightController;

  UPROPERTY(BlueprintReadWrite, EditAnywhere)
  UStaticMeshComponent* LineTraceCursor;

  UPROPERTY(BlueprintReadWrite, EditAnywhere)
  float LineTraceLength = 1000000;

  UPROPERTY(BlueprintReadWrite, EditAnywhere)
  float OffsetFromGround = 4000;

public:
  virtual void Tick(float deltaTime) override;

  virtual void SetupPlayerInputComponent(class UInputComponent* playerInputComponent) override;

private:
  void _startLineTracing();
  void _stopLineTracing();
  void _teleport();

  UPROPERTY()
  USceneComponent* _root;

  UPROPERTY()
  UCameraComponent* _camera;

  bool _isLineTracing;
  bool _isLineTraceHitting;
  FVector _lineTraceHitLocation;
};
#include "VRPawn.h"

AVRPawn::AVRPawn() {
  PrimaryActorTick.bCanEverTick = true;

  _root = CreateDefaultSubobject<USceneComponent>(TEXT("Root"));
  _camera = CreateDefaultSubobject<UCameraComponent>(TEXT("Camera"));
  LeftController = CreateDefaultSubobject<UMotionControllerComponent>(TEXT("LeftController"));
  RightController = CreateDefaultSubobject<UMotionControllerComponent>(TEXT("RightController"));
  LineTraceCursor = CreateDefaultSubobject<UStaticMeshComponent>(TEXT("LineTraceCursor"));

  RootComponent = _root;
  _camera->SetupAttachment(_root);
  LeftController->SetupAttachment(_root);
  RightController->SetupAttachment(_root);
  LineTraceCursor->SetupAttachment(_root);

  LeftController->MotionSource = FName("Left");
  RightController->MotionSource = FName("Right");
  LeftController->bDisplayDeviceModel = true;
  RightController->bDisplayDeviceModel = true;

  LineTraceCursor->SetVisibility(false);
}

void AVRPawn::BeginPlay() { Super::BeginPlay(); }

void AVRPawn::Tick(float deltaTime) {
  Super::Tick(deltaTime);

  // If the user is pressing the line trace button, do the line trace.
  if (_isLineTracing) {
    // Use the right controller to aim the line trace.
    FVector start = RightController->GetComponentLocation();
    FVector direction = RightController->GetForwardVector();
    FVector end = start + (direction * LineTraceLength);

    ECollisionChannel channel = ECollisionChannel::ECC_WorldStatic;
    FCollisionQueryParams params(FName(TEXT("")), true, this);
    FHitResult hit;

    if (GetWorld()->LineTraceSingleByChannel(OUT hit, start, end, channel, params)) {
      // If the line trace hit something, move the cursor to that spot.
      _isLineTraceHitting = true;
      _lineTraceHitLocation = hit.Location;
      LineTraceCursor->SetVisibility(true);
      LineTraceCursor->SetWorldLocation(_lineTraceHitLocation);
    } else {
      // If the line trace didn't hit anything, hide the cursor.
      _isLineTraceHitting = false;
      LineTraceCursor->SetVisibility(false);
    }
  }
}

void AVRPawn::SetupPlayerInputComponent(UInputComponent* playerInputComponent) {
  Super::SetupPlayerInputComponent(playerInputComponent);

  InputComponent->BindAction("LineTrace", IE_Pressed, this, &AVRPawn::_startLineTracing);
  InputComponent->BindAction("LineTrace", IE_Released, this, &AVRPawn::_stopLineTracing);
  InputComponent->BindAction("Teleport", IE_Pressed, this, &AVRPawn::_teleport);
}

void AVRPawn::_startLineTracing() { _isLineTracing = true; }

void AVRPawn::_stopLineTracing() {
  _isLineTracing = false;
  _isLineTraceHitting = false;
  LineTraceCursor->SetVisibility(false);
}

void AVRPawn::_teleport() {
  if (!_isLineTracing || !_isLineTraceHitting) {
    return;
  }

  FVector newLocation = _lineTraceHitLocation;
  newLocation.Z += OffsetFromGround;
  SetActorLocation(newLocation);
}
Now you can add your own tilesets and use the Pawn we created to explore them in VR. Note that you can modify the OffsetFromGround parameter of the Pawn to change how high up the user is.
We'd love your feedback on this tutorial. Please share your suggestions or report issues on the Cesium Community Forums.