Visualize Mesh Features and Metadata
Features and metadata are core components of 3D Tiles that provide a finer granularity of detail to the data, enabling developers to build more complex and informational experiences. For example, a building can designate sub-building features in its 3D mesh—e.g., windows, walls, and roofs—and render them with photorealistic materials. Or a building can be part of a larger city block, where each building has its own metadata, including their number of floors and date of construction. Such information can be queried at runtime and displayed or visualized in meaningful ways.
In 3D Tiles 1.1, features and metadata are specified by the EXT_mesh_features and EXT_structural_metadata glTF extensions. These extend a model’s geometry and texture information, storing additional data for efficient retrieval at runtime. Both 3D Tiles 1.1 extensions are supported in the Cesium for Unreal plugin as of version 2.0. For backward compatibility, legacy 3D Tiles with batch tables or batch table hierarchies will be converted to the new extensions as they load. Although EXT_mesh_features is often used in tandem with EXT_structural_metadata to associate metadata with its features, these extensions can exist and be used independently of each other, too.
This tutorial outlines the basic steps to visualize mesh features and metadata in two ways. The first method is styling, i.e., modifying the tileset’s appearance to visually convey its features and metadata values. A second method is picking: selecting a certain feature in the tileset, then displaying its associated metadata. The steps below will use the New York City 3D Buildings dataset, which is available to all Cesium ion users via the Asset Depot. If you have your own 3D Tiles 1.1 tileset with features or metadata, you can use that as well. However, the availability of features and metadata properties may differ.
Still using Cesium for Unreal v1? We recommend upgrading as soon as possible, but you can find the tutorial for the old version here.
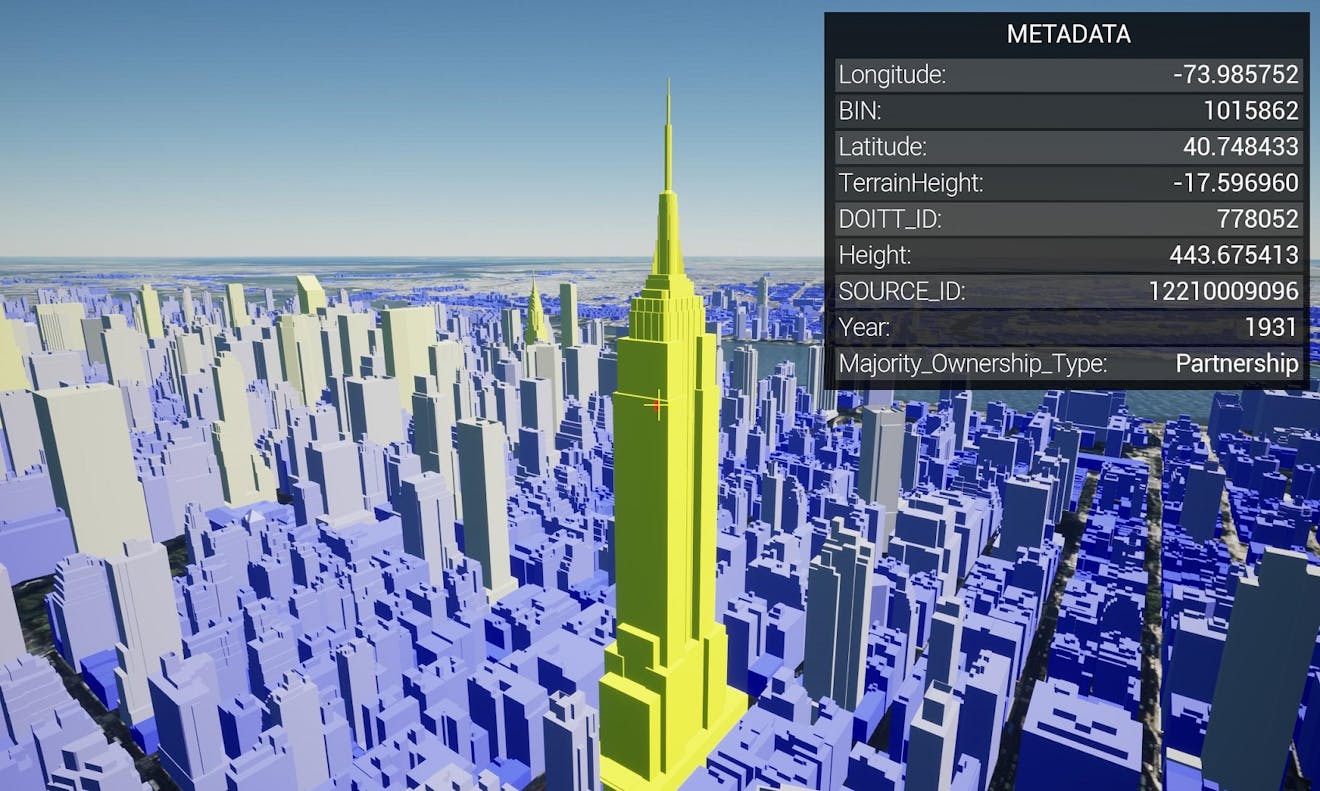
Metadata shown in a UMG widget from Cesium for Unreal Samples.
If you'd like a deeper dive into Cesium for Unreal’s features and metadata API, check out the Features and Metadata Technical Reference.
You’ll learn how to:
- Use CesiumFeaturesMetadata component to style a tileset with features and metadata.
- Access features and metadata of a tileset with Blueprints.
- Select features at runtime to view their associated metadata properties.
Want to see this feature in action without implementing it yourself? Check out the premade sample scene in Cesium for Unreal Samples. The level contains a UMG widget that displays the tileset’s metadata. Feel free to experiment with and build on the existing level for your own projects.
- Unreal Engine 5.1 (or a later version).
- Cesium for Unreal v2.0.0 or later.
- Know how to set up a basic Cesium for Unreal application. Check out our Cesium for Unreal Quickstart guide for instructions on getting started with the Cesium for Unreal plugin.
- A Cesium ion account. If you don’t have one, you can log in with your Epic Games account.
It is recommended that you familiarize yourself with the EXT_mesh_features and EXT_structural_metadata specifications, because Cesium for Unreal will interface directly with those extensions.
This tutorial uses the New York City 3D Buildings tileset to build an application. Each building in this dataset is a feature associated with various metadata properties, including height, type, and ownership.
1Start with a scene that includes Cesium World Terrain, CesiumSunSky, and a DynamicPawn. If you need help creating a level with these elements, check out the Quickstart for detailed instructions.
2Connect to Cesium ion using the Cesium panel, if you have not already connected.
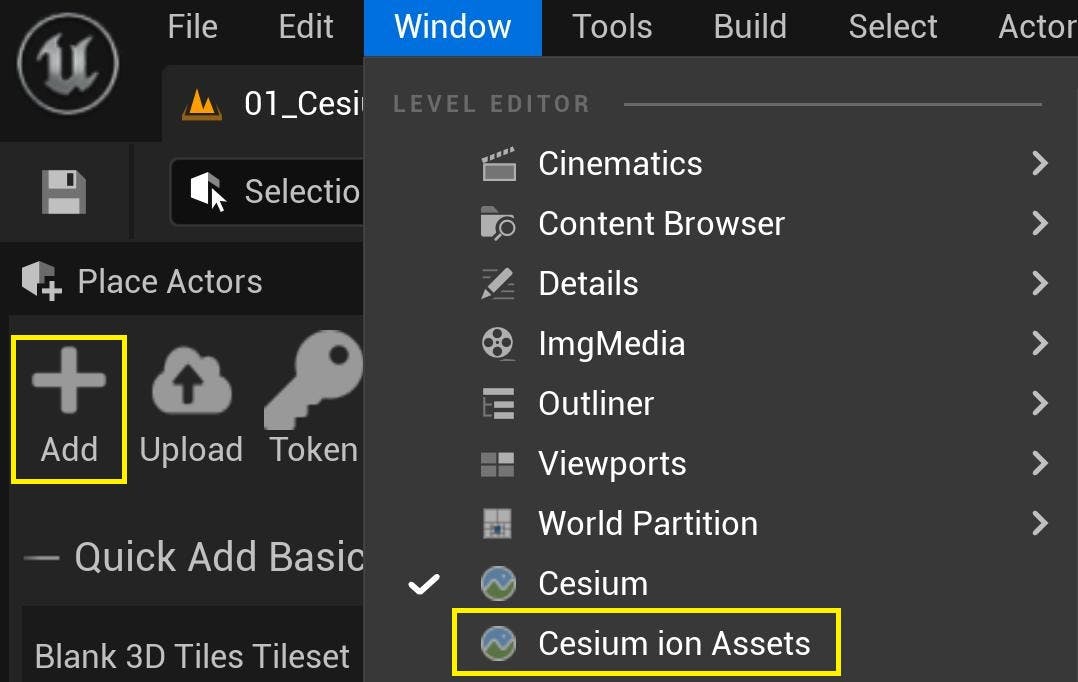
3Open the Cesium ion Assets window. If you don’t see the window in the Editor, open it using Window > Cesium ion Assets, or press the Add button in the Cesium panel.
4Find New York City 3D Buildings in the asset list and select it. Click Add to Level.
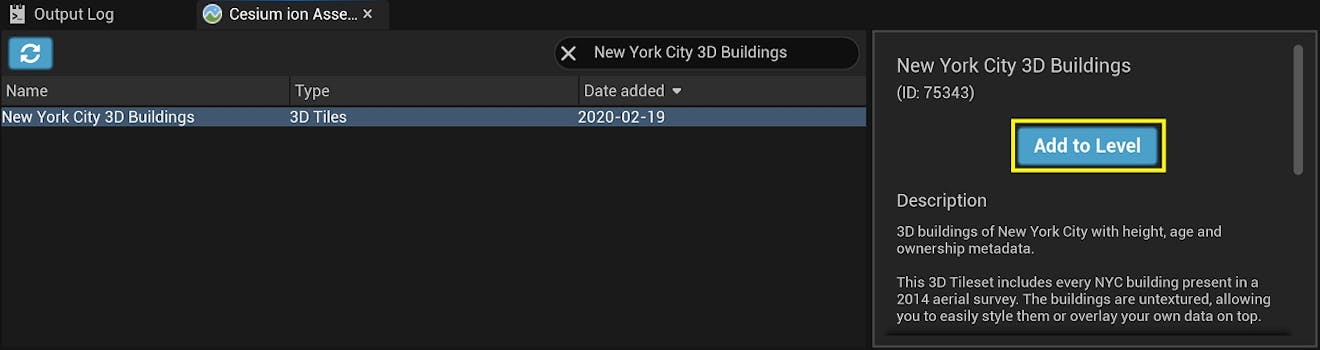
Is New York City 3D Buildings missing from the asset list? Visit the New York City 3D Buildings Asset Depot page and click Add to my assets. Then return to Unreal Engine. Click the blue Refresh button in the top left corner of the Cesium ion Assets panel to refresh the asset list.
5Double-click on the CesiumGeoreference in the World Outliner. In the Details panel, set the Georeference Origin to the following coordinates:
Origin Latitude: 40.700001
Origin Longitude: -74.002998
Origin Height: 418.0
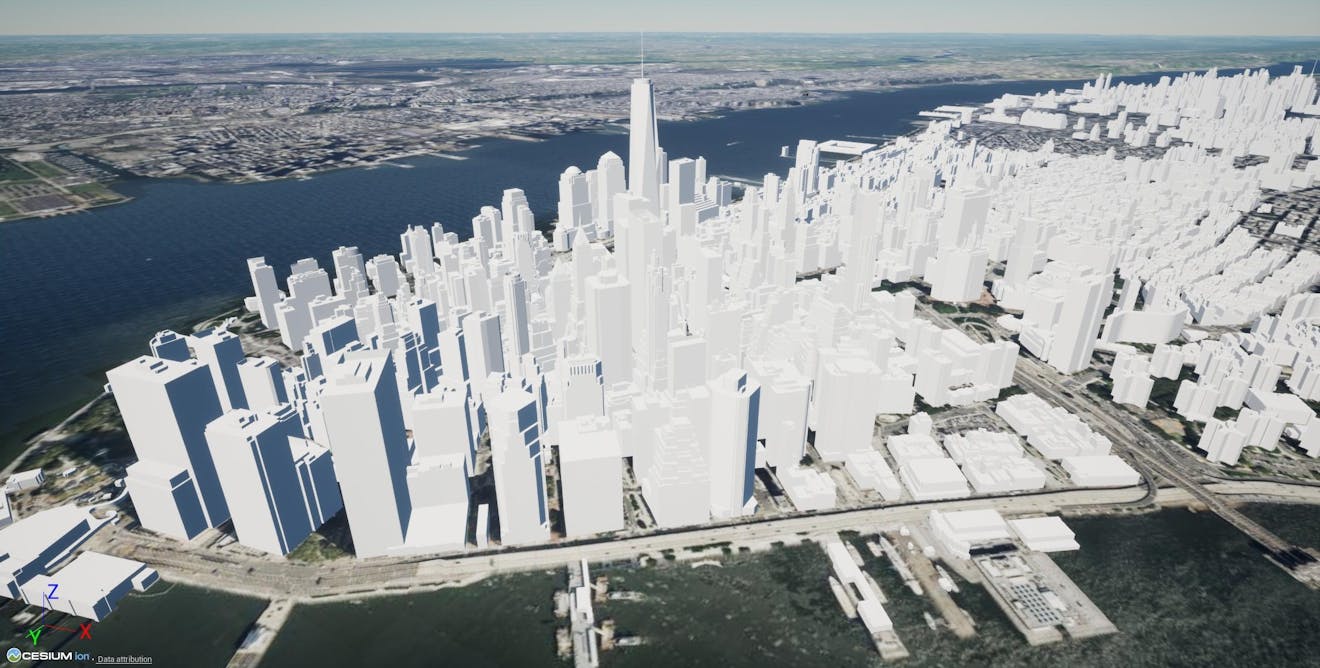
You’ll see the tileset you just added at this new location. Depending on the tileset you use, you may have to adjust the Time Zone or Solar Time on your CesiumSunSky to properly light the level.
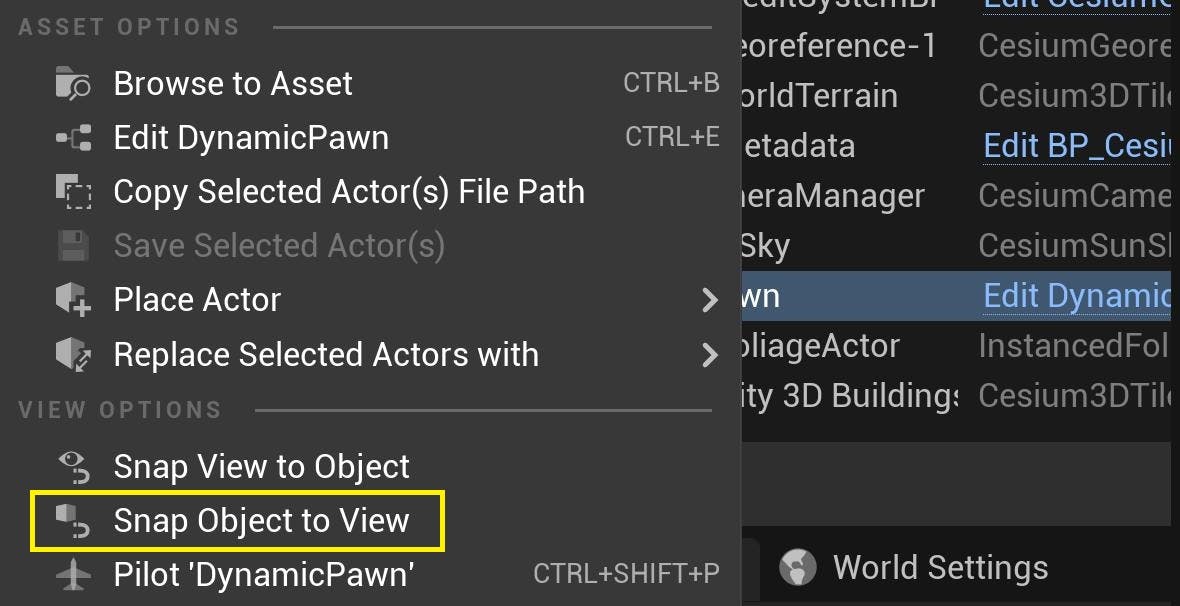
6Right-click on the DynamicPawn in the World Outliner and select Snap Object to View. This ensures that the game will start at the new location.
Next, you'll create a new material to style the tileset that you previously added. This tutorial will style the New York City buildings based on their height and year of construction.
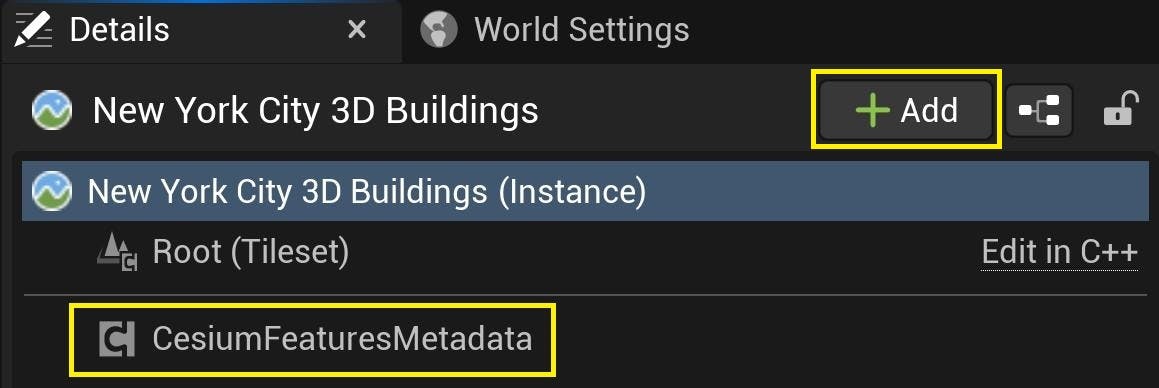
1Select the tileset you just added. In the Details panel, click the Add button and attach a CesiumFeaturesMetadata component to the tileset.
When the component is selected, the Details panel will display two buttons, as well as several drop-downs for listing the features and metadata present in the tileset.
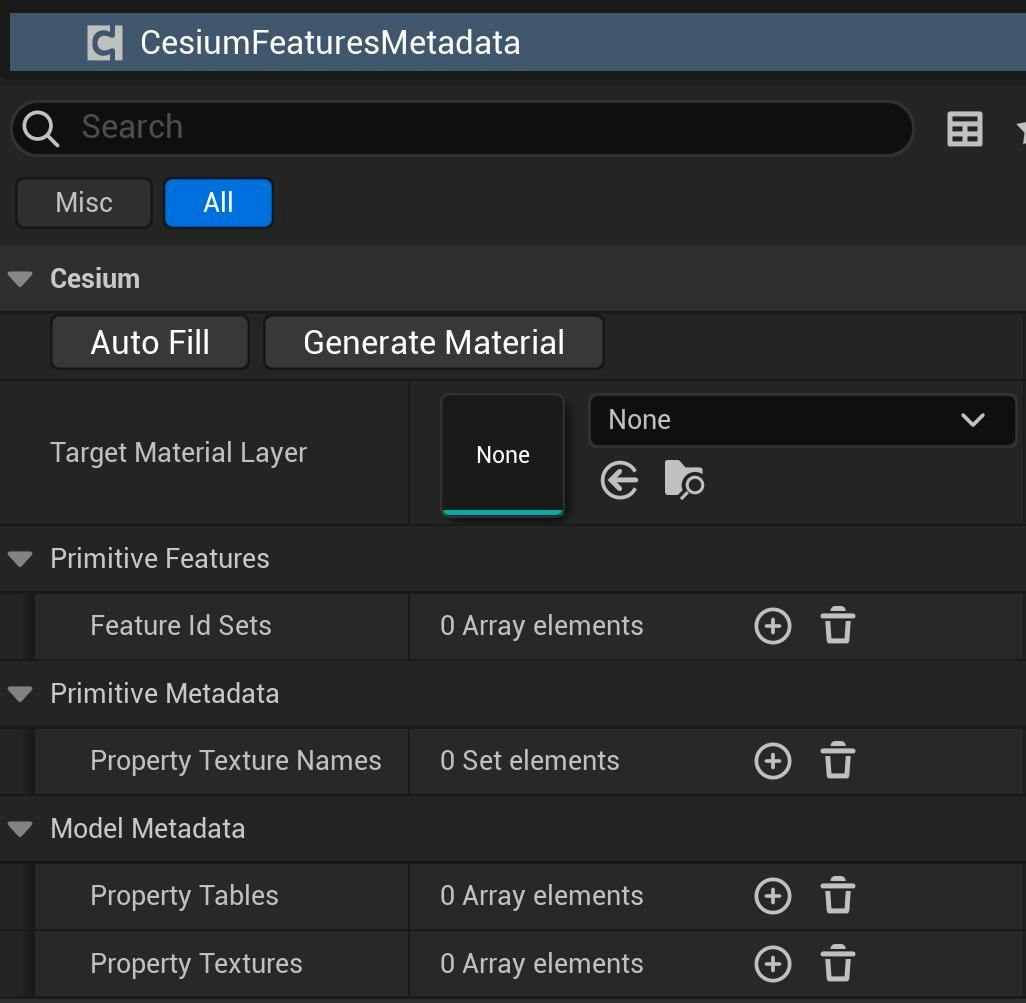
The Primitive Features will list the Feature ID Sets available throughout the EXT_mesh_features extensions in the tileset. Each feature ID set describes a defined set of features in the primitive’s mesh.
A feature can be thought of as a distinguishable part of a larger model. Features are indicated by numerical values called feature IDs, and components with the same feature ID belong to the same feature. In EXT_mesh_features, feature IDs can be assigned to vertices in a mesh or texels in a texture via different methods. A feature ID set refers to a set of feature ID values that are all assigned through the same method.
Underneath, the Primitive Metadata describes the contents of the primitive EXT_structural_metadata extensions across the tileset. In particular, it lists the names of any property textures used by the glTF primitives.
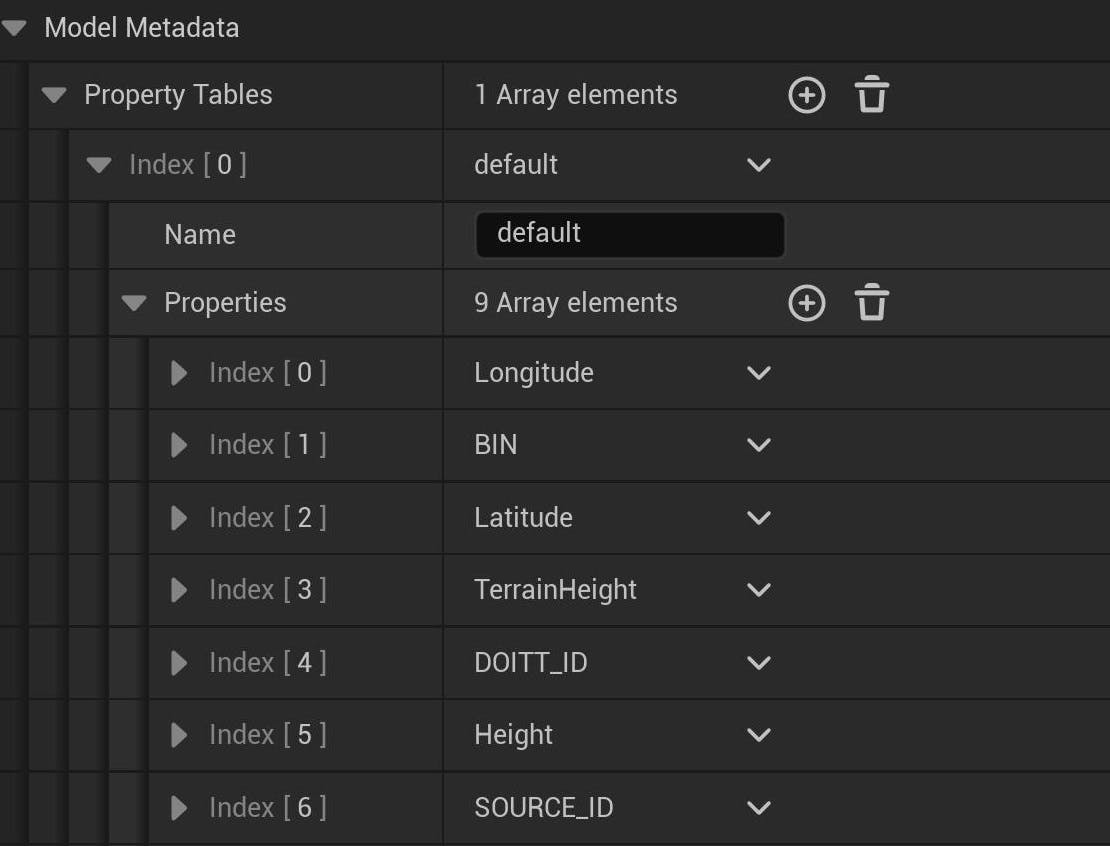
Finally, the Model Metadata drop-down displays the metadata that exists on the EXT_structural_metadata across models in the tileset. It displays the available Property Tables and Property Textures in the extensions, as well as their properties.
For this tutorial, you need to pay attention only to the Feature ID Sets and Property Tables arrays. New York City 3D Buildings is an older dataset that contains legacy Batched 3D Model content with batch IDs and batch tables. These will be converted at runtime to feature ID attributes and property tables respectively.
2In the Editor Viewport, move the camera so that a substantial portion of your tileset is visible. Then, click on Auto Fill in the CesiumFeaturesMetadata component Details. This will search all currently visible tiles for any available features and metadata information. If any properties are found, they will be automatically added under the appropriate lists in the component.
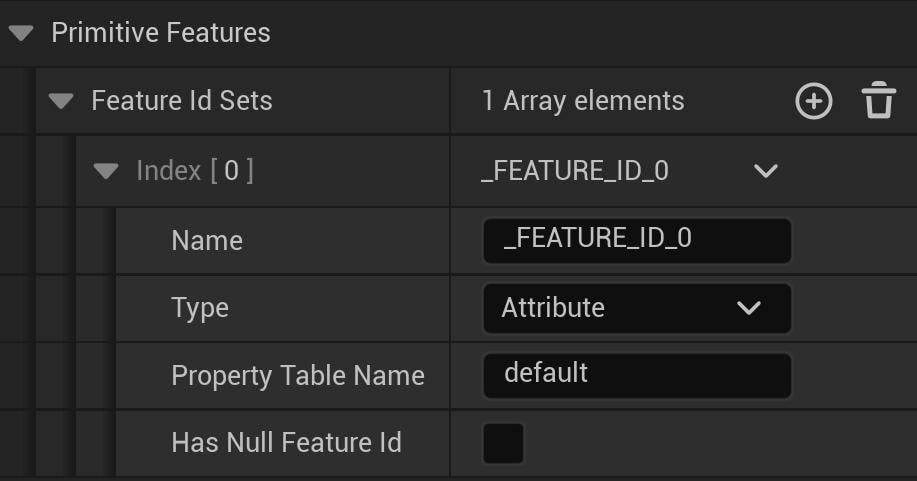
If you are using New York City 3D Buildings, you should see one feature ID set listed under the Primitive Features…
…as well as one property table with several properties under Model Metadata.
Each of these metadata properties can be expanded to view their Property Details. These details describe type information of the property and whether it has any transformations (e.g., an offset or scale). For example, the Longitude property details will appear as follows:
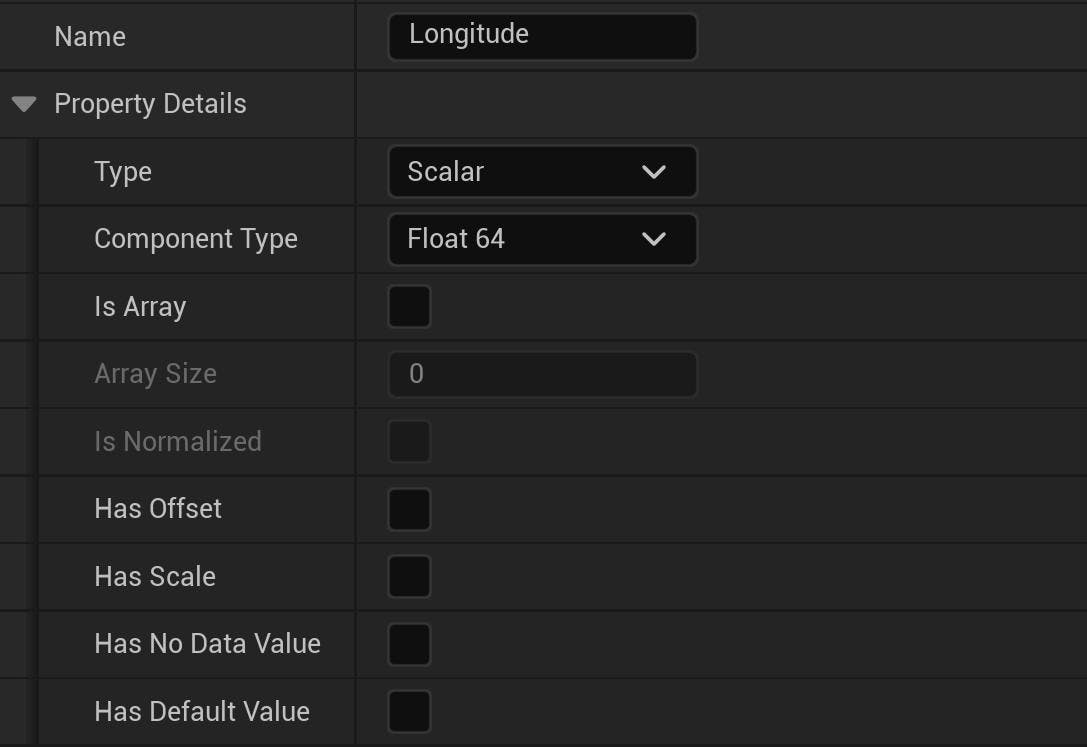
These values indicate that the Longitude property is a 64-bit floating precision scalar (aka a double).
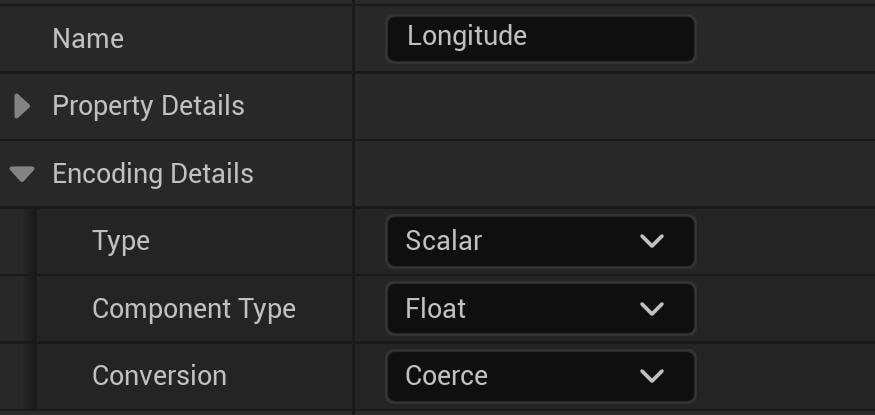
Then, each property must be encoded before it can be used for styling. Encoding refers to the process of converting metadata values to a GPU-compatible format so that they may be passed through textures in Unreal Engine materials. The Encoding Details of the property display how a property’s values will be converted, if possible. For the Longitude property, its double-precision values will be coerced to single-precision float values, since there is no universal support for double-precision textures.
Auto Fill attempts to set the Encoding Details based on property type, but, ultimately, not all types of metadata properties are supported for styling. Still, some property types may be able to conform to a supported type, using a manually selected Conversion method. For instance, a string property can be parsed for any numeric values that can be passed to the GPU. Because of such possibilities, Auto Fill displays all properties it finds even if they are unsupported, allowing users to manually configure them as they need.
PropertyDetails and Encoding Details are explained more in depth in the Features and Metadata Technical Reference.
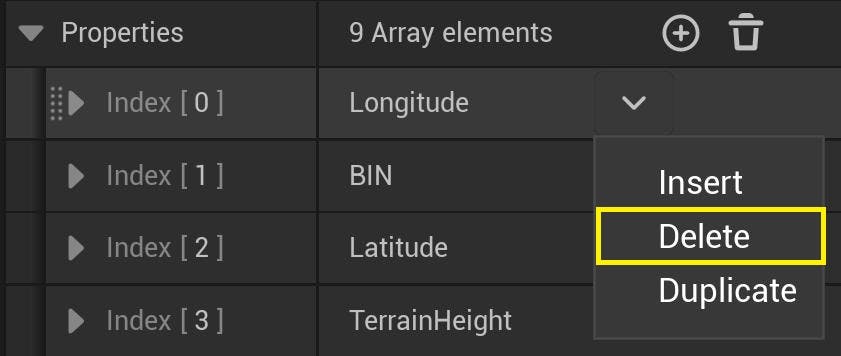
3This tutorial uses the Height and Year properties to style the New York City 3D Buildings. Delete all of the other properties by clicking on the arrow to the right of each property name and selecting Delete.
Once all unused properties are deleted, the property table should have this resulting layout.
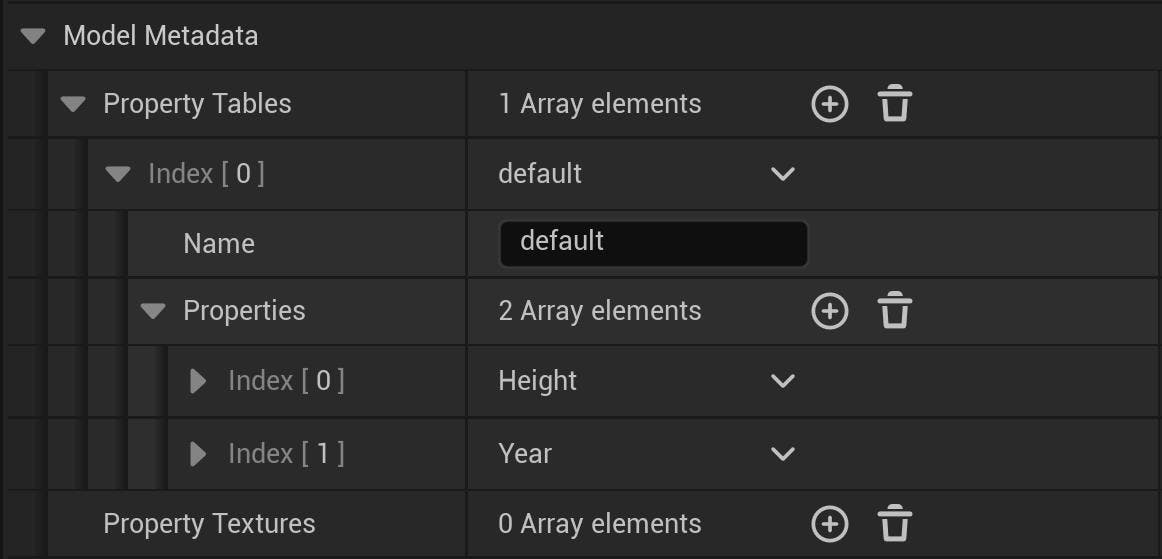
Be sure to delete properties that are not being used for styling in the CesiumFeaturesMetadata component. Leaving unused properties will impact performance and cause excessive GPU texture memory usage. Deleted properties can always be re-added using Auto Fill if needed.
4Verify that the Property Details and Encoding Details of the Height property match those below.
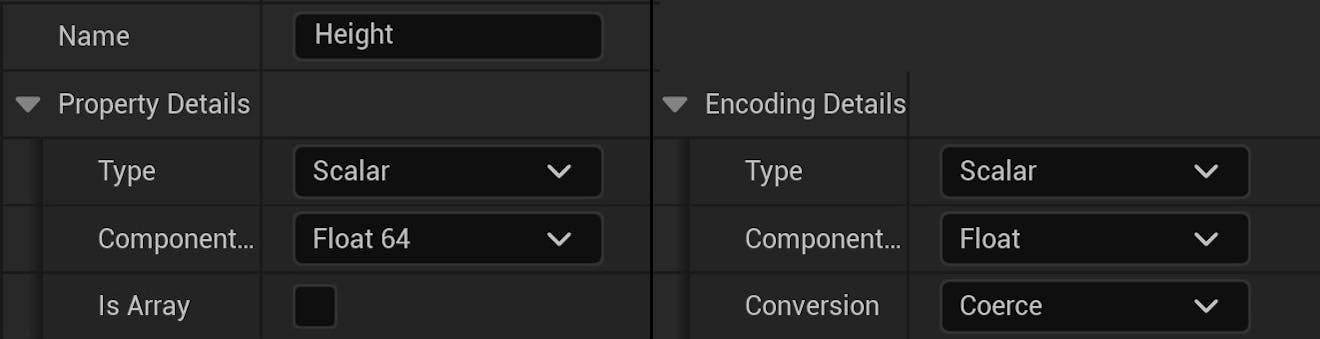
The property and encoding details of “Height” shown side by side.
The Year property may have different details depending on what parts of the tileset were discovered by Auto Fill. In New York City 3D Buildings, some tiles do not contain construction year data. Thus, the property may be treated as a String type with null values. If your Property Details or Encoding Details are different from the ones shown below, you can manually set the values so they match the image.

The property and encoding details of “Year” shown side by side.
Auto Fill records the details of only the first-discovered instance of a property. For example, even if multiple tiles in a tileset contain a “Year” property, only the first tile found will be queried for its details. Other instances will be skipped under the assumption that glTF models will have identical feature ID and metadata definitions across a tileset.
If properties of the same name differ in some way—e.g., some instances of the property having a different type—this may lead to unexpected behavior. Be mindful of if and how the chosen Conversion method can handle those unexpected cases.
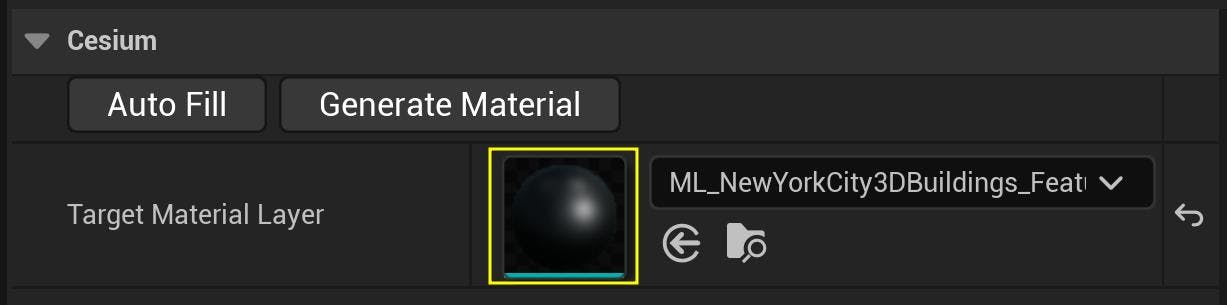
5Click Generate Material to create a material layer corresponding to the listed features and metadata properties. Once generated, an editor window will automatically open, allowing you to edit the new material layer. You can also open the window yourself by double-clicking the icon in Target Material Layer.
You will be able to see several nodes in the material layer, all of which have been generated by the component.

Starting from the leftmost nodes, this node graph can be interpreted as follows:
- This material layer uses an attribute feature ID set called _FEATURE_ID_0.
- Feature IDs are retrieved from the aforementioned set via CesiumGetFeatureIdsFromAttribute.
- The resulting feature ID is passed into Get Property Values from default, a custom function that will sample the textures containing encoded metadata values. This corresponds to the property table named default on the CesiumFeaturesMetadata component.
- The metadata values associated with that feature ID will be output to the Height and Year pins. These are the properties that you kept under the property table on the component.
In general, feature IDs are retrieved from the model before their corresponding metadata can be found. Any property table properties that you add to the CesiumFeaturesMetadata component will be made available as output pins on the auto-generated Get Property Values node.
Be careful not to edit the auto-generated nodes or their connections to each other. Any modifications may prevent the feature IDs and metadata from being properly resolved in the material.
6Connect the resolved property outputs to your custom logic for per-feature styling. In this example, New York City 3D Buildings are colored with respect to their Height in meters and their Year of construction.

Each property is normalized within a range specified on the RemapValueRangeNormalized nodes in the material graph, between the given minimum and maximum values. The output will be a three-dimensional color vector assembled by MakeFloat3. The Height of each building is used in the red color channel (X), and the Year of construction is used for green (Y). The blue color channel (Z) is set to a constant value of 1.
This material will style the buildings based on where their values fall in the entire range, resulting in a gradient appearance. Try setting your own values in the Input Low / High pins on the RemapValueRangeNormalized nodes to see how these changes affect the material.
7To see the metadata material layer in action, it must be added to a material instance. Create a custom tileset material by duplicating the MI_CesiumThreeOverlaysAndClipping material instance included in the plugin. Check out the Editing Tileset Materials tutorial if you need help with creating custom materials.
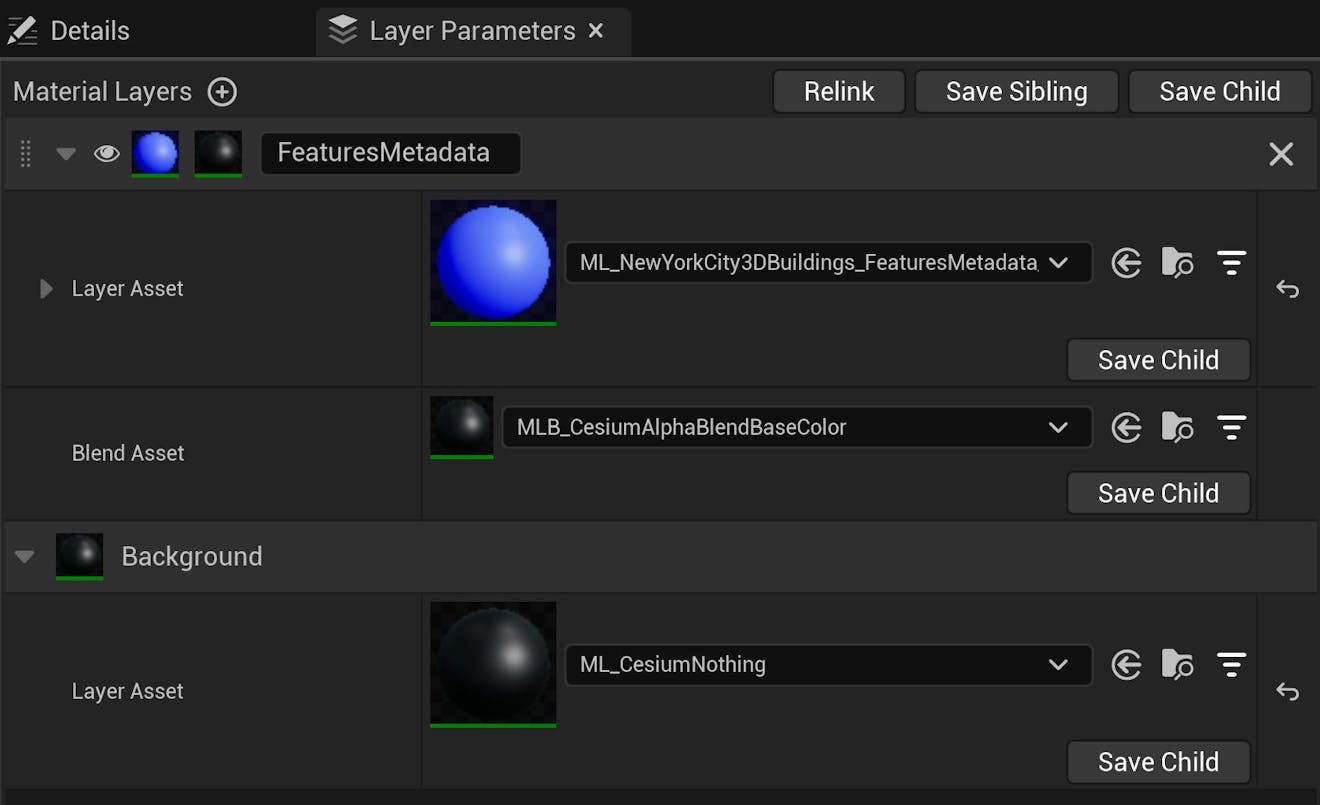
Add a material layer to your custom material by clicking the plus icon. Label it FeaturesMetadata.

You must label this material layer with the FeaturesMetadata label. This step is not optional. Otherwise, the plugin will be unable to set the required parameter values on your material layer.
8Select your material layer under Layer Asset. Finally, select a Blend Asset that is appropriate for your styling logic. This tutorial uses the MLB_CesiumAlphaBlendBaseColor blend asset, which is included in the Cesium for Unreal plugin.
9Go to your tileset’s Details panel. Under the Cesium > Rendering category, set the Material property to your own custom material.
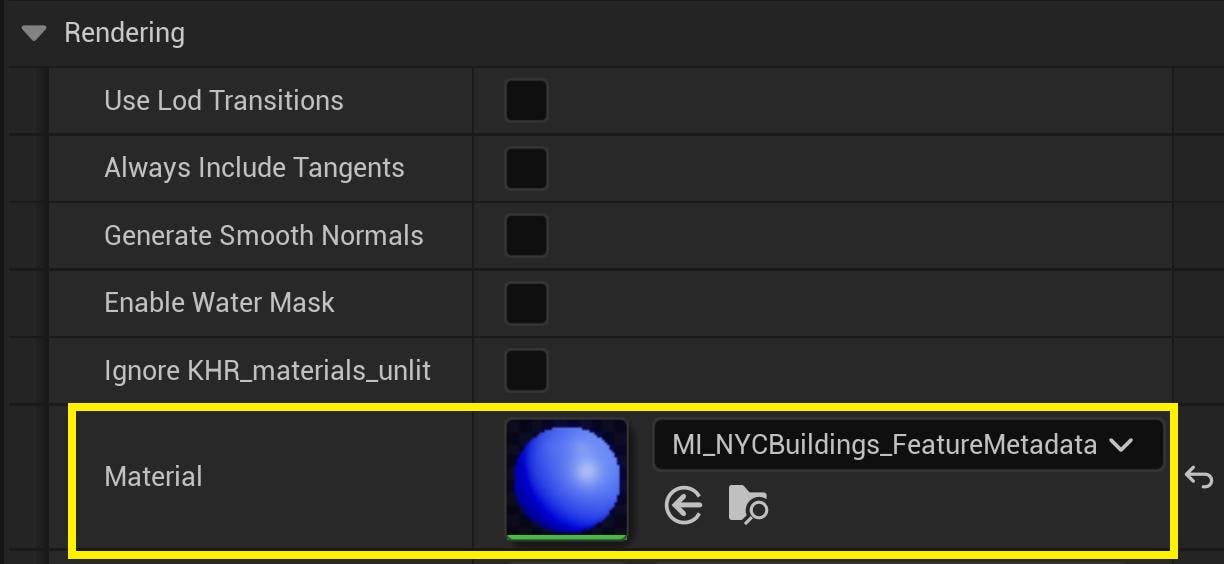
Once you add the material to your tileset, the tileset should automatically refresh, but you can also click Refresh Tileset to force the tileset to reload. After it reloads, you will be able to see your metadata styling logic as it visually transforms the dataset!

Shorter buildings appear more blue, while taller buildings are more red. The saturation of each color also varies depending on the building’s year of construction. Tall buildings that were constructed recently appear almost white. Conversely, deeper colors are indicative of shorter buildings constructed in a much earlier year.
Styling might expose areas of missing metadata in the tileset. For New York City 3D Buildings, few buildings in Manhattan were built prior to 1700, which is the low range input used by the material. Thus, bright pink or deep blue buildings are more likely to have missing values or a nonsensical value of 0 as their Year.
Cesium for Unreal will log warnings about properties that are not consistently defined throughout the dataset. For example, you may see this warning about the Year property:
LogCesium: Warning: The value type of the metadata property Year does not match the type specified by the metadata description. It will still attempt to be encoded, but may result in empty or unexpected values.
You may ignore this, as it is expected for this tutorial. In your own applications, you may see this if you have multiple definitions for a property name or if you have purposefully overridden the expected property types. This warning will not prevent the application from running, but the property’s values may be empty or not passed as expected to the material.
10If you’d like to add other metadata properties to the CesiumFeaturesMetadata component, you can use Auto Fill again (and delete the unwanted properties). You can also manually fill out the descriptions if you are familiar enough with the properties in the dataset. To update the material layer with your changes, make sure the Target Material Layer is set to that same layer, and then click Generate Material again.
Regenerating a material layer will not remove nodes that you have manually added to the material graph. However, if you remove properties that are actively being used in the material, any nodes that are connected to those properties will be disconnected.
If you added new feature ID sets or metadata properties, you may also have to click Refresh Tileset. Feature ID sets and metadata values are handled only as tiles load and cannot be encoded afterwards. Thus, refreshing the tileset is necessary for the new property values to be properly passed to the material layer.
Try experimenting with the material on your own. Some ideas to get you started:
- What happens if you change the range limits or swap the color channels?
- How would you style the buildings by their latitude and longitude?
- How would you highlight only buildings constructed after 2000?
- Try making a material that styles buildings based only on feature ID. For example, use two different colors to distinguish buildings with odd versus even feature IDs.
Now your tileset is colorfully styled using features and metadata! Styling can be used to visualize information across the dataset as a whole. However, it may not be able to convey the exact metadata values of each building. To address the latter concern, this tutorial will add metadata picking functionality to the application.
Step 3 and Step 4 contain detailed instructions to build the Blueprint for the level. If you just want to see the final Blueprint, or if you want to reference it as you follow the steps, skip to the end of Step 4.
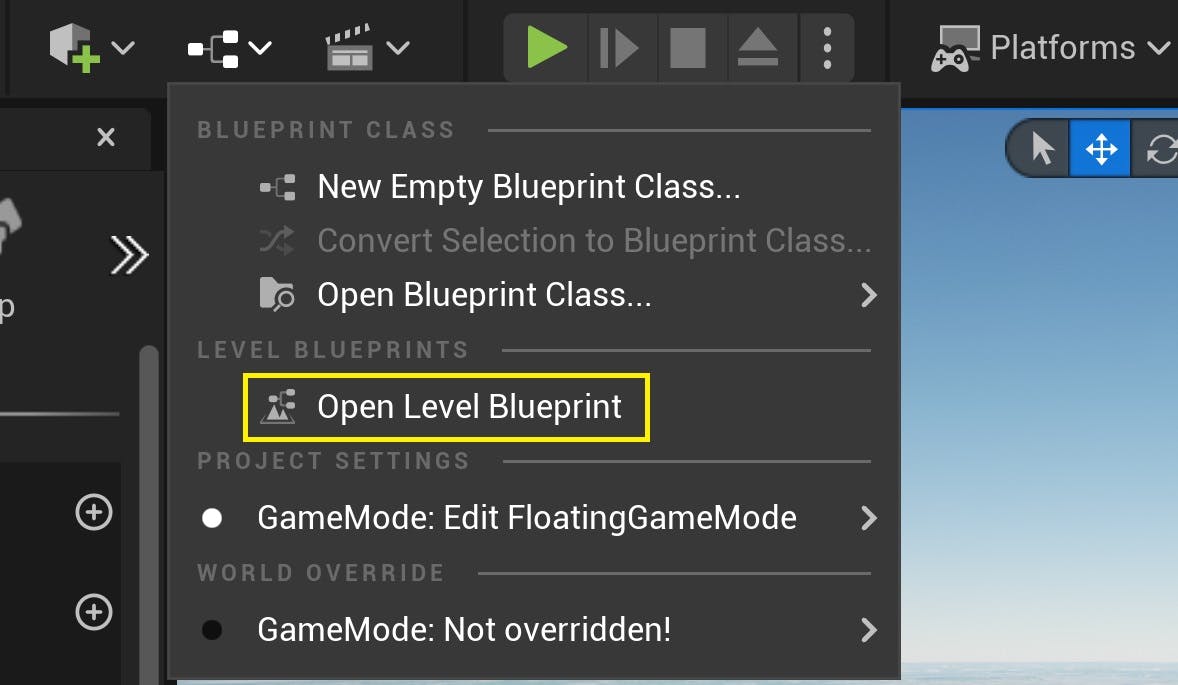
1Under the Blueprints menu, select Open Level Blueprint.
2Right-click in an empty space on the graph to bring up a Blueprint search menu. Type “Left Mouse Button” in the search bar, and click Left Mouse Button in the results to create a node for the corresponding input.

3Click and drag the DynamicPawn actor from the World Outliner to the Level Blueprint graph. This will create a reference to your DynamicPawn in the Level Blueprint.
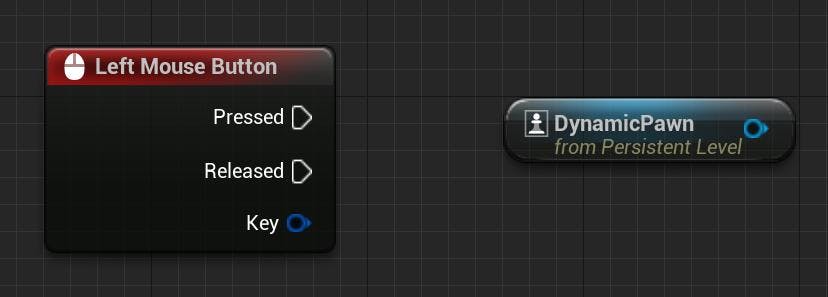
The Left Mouse Button and Dynamic Pawn nodes created in the previous two steps.
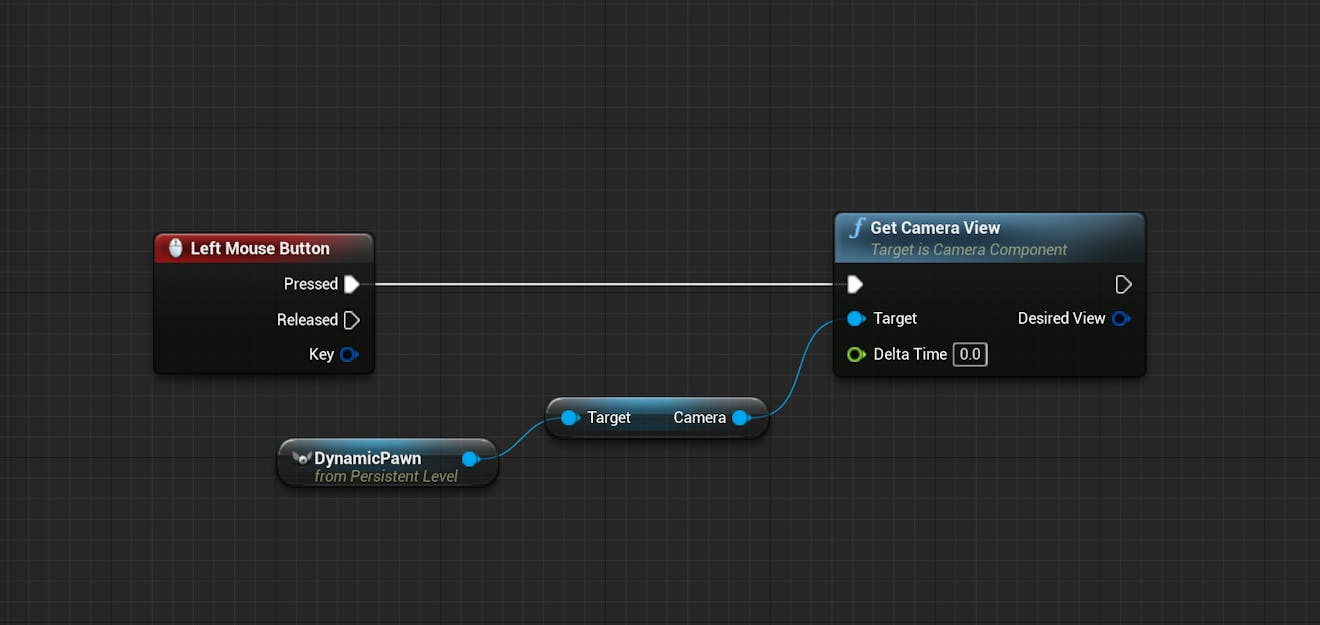
4Click on the blue pin of DynamicPawn and drag it out to an empty spot on the graph. Release the mouse to bring up another menu. Search for and create a Get Camera View node.
5Connect the Pressed pin from Left Mouse Button to the execution pin on Get Camera View. Now your Blueprint can obtain the camera view from the Dynamic Pawn whenever the left mouse button is pressed.
6From the right execution pin of Get Camera View, drag and release the mouse. Then, search “Line Trace By Channel” in the menu to create a Line Trace By Channel node.
7For our purposes, the line trace should start from the middle of the camera and go out into the environment. From the blue Desired View pin of Get Camera View, drag and release the mouse again, then select Break MinimalViewInfo from the context menu.
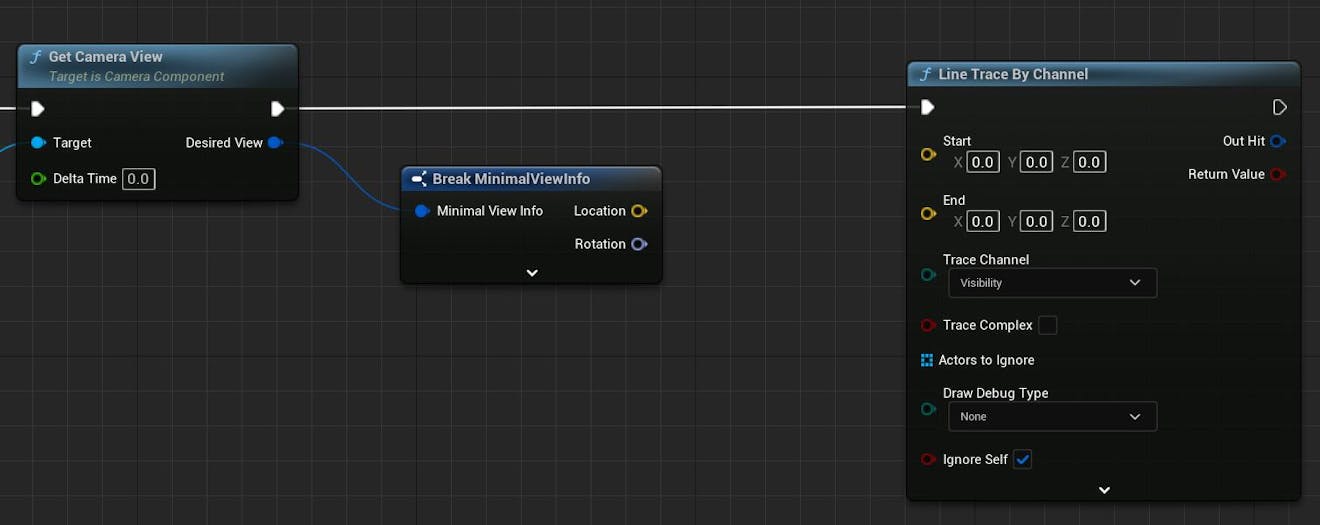
Connect the yellow Location pin of Break MinimalViewInfo directly to the Start pin of LineTraceByChannel.
8The End location should extend out from the Start position into the world. To help us compute this, create a Get Rotation X Vector node from the Rotation pin of Break MinimalViewInfo. Then, create a Multiply operator node.
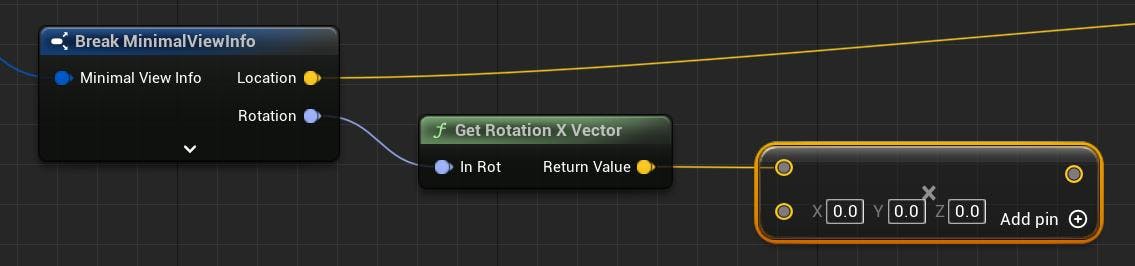
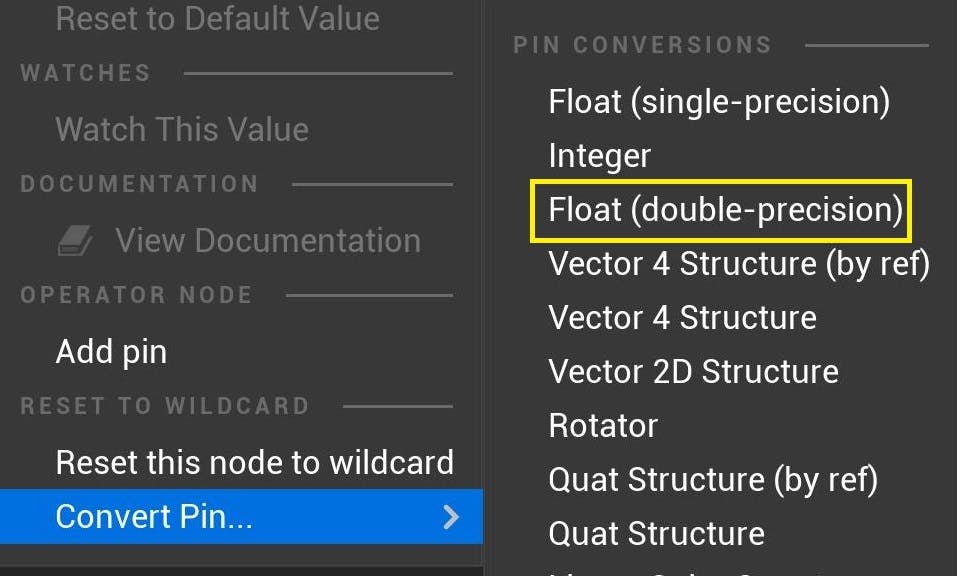
Right-click the bottom-left pin of the Multiply node to convert it to a Float (double precision).
Then, set the B value on the Multiply node to 500,000. This will scale the RotationXVector such that the line trace is 500,000 units long.
Finally, create an Add operator node to add the result of the Multiply node to the original Location. The level Blueprint should now look like this:

You can adjust the multiplier of the Rotation X Vector depending on the context of your application.
9Return to the LineTraceByChannel node. Change the Draw Debug Type to For Duration.
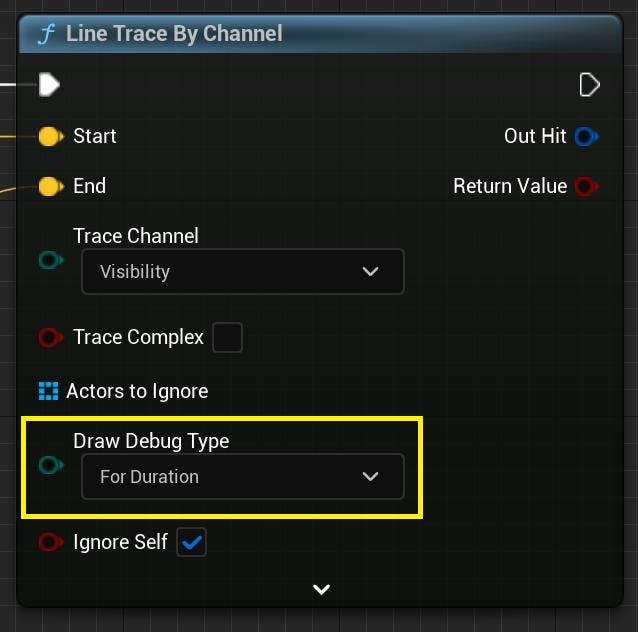
Now, you’ll be able to see your line traces in the world as you click. If you wish, you can also change Trace Color and Trace Hit Color on the node. If you don’t see these options, click the arrow at the bottom of Line Trace By Channel to expand the pins.
10Save and compile the Blueprint. Now you should have a Blueprint that traces a line from the center of your screen that can collide with the world. You can test it out by playing your level in the editor, then left-clicking to cast a ray from the center of your screen.
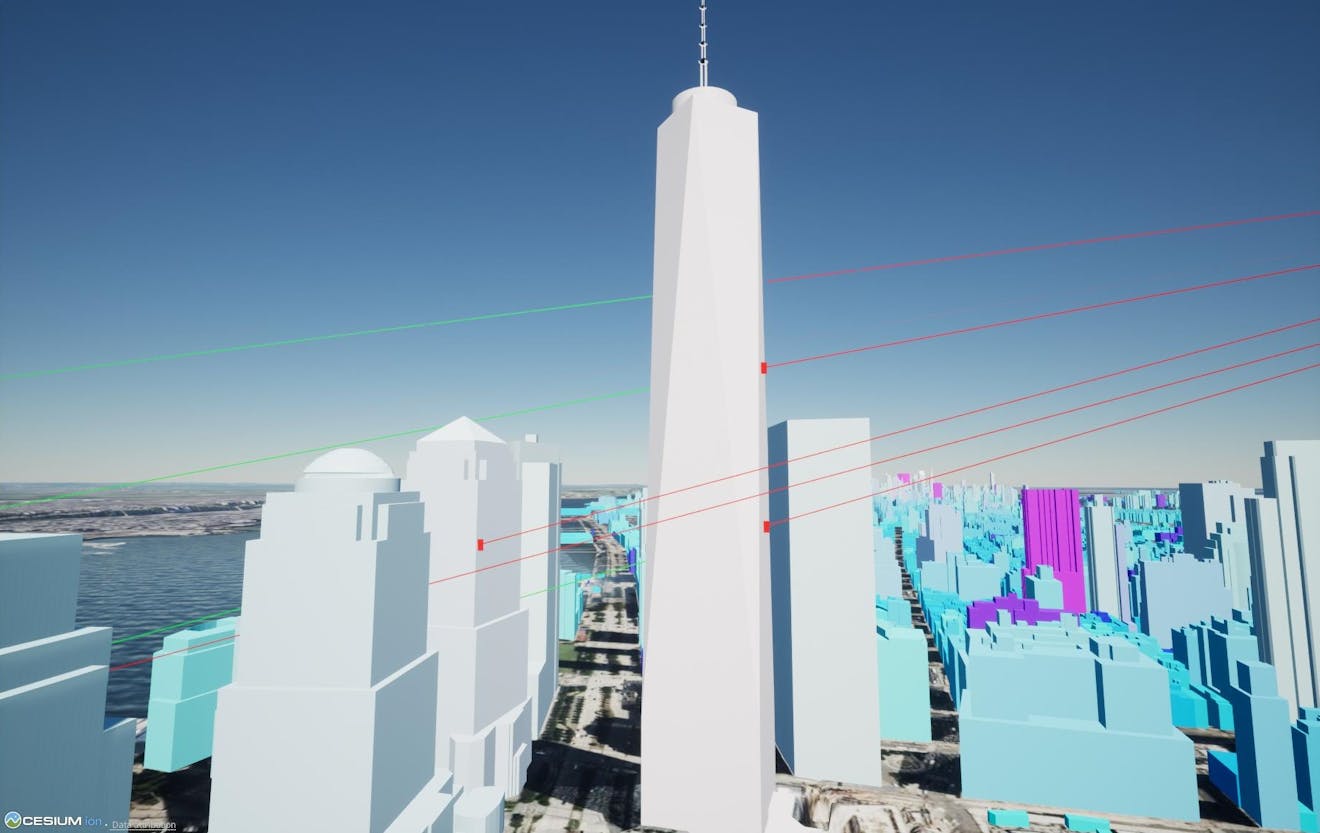
Right now, nothing happens when the line trace hits a building, but you can build upon this interaction by following the next step.
Once you have a working line trace mechanism, you can check if the line trace intersects a feature in your tileset. If so, you can identify that feature and retrieve any metadata that is associated with it.
In Cesium for Unreal, metadata can be conveniently retrieved from a line trace hit with a single Blueprint. However, there are many other Blueprint nodes that can accomplish the same functionality when used together. If you need more control over your metadata picking logic, check out the Features and Metadata Technical Reference for the full Blueprints API.
1From the Out Hit pin of Line Trace By Channel, create a Get Property Table Values From Hit node.
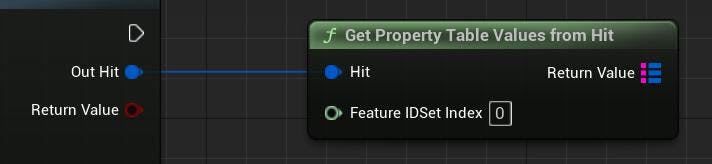
Whenever a line trace successfully hits a model in the scene, it outputs additional information from the intersection via Out Hit. The Get Property Table Values from Hit Blueprint can take this hit information, determine which feature was selected, and then retrieve its metadata on the user’s behalf.
You may have noticed that this Blueprint provides a numeric parameter, Feature ID Set Index. This is the index of the target feature ID set with respect to the array of sets in the EXT_mesh_features extension. The New York City 3D Buildings dataset only contains one feature ID set, so for this tutorial, keep the Feature ID Set Index set to 0.
2From the Return Value pin on the Blueprint you just added, find and create a Get Values As Strings node.
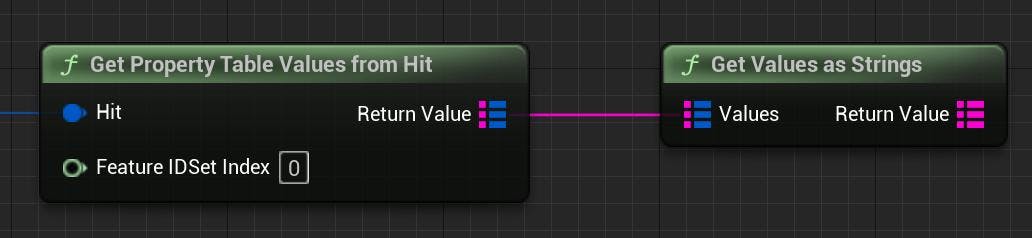
Metadata values from Get Property Table Values from Hit are provided in a Blueprint Map, where each value is mapped to the name of its corresponding metadata property. Values are stored in instances of the CesiumMetadataValue struct, which can be used to apply the same functionality to multiple metadata values, regardless of their underlying type.
The Get Values As Strings Blueprint converts each CesiumMetadataValue in the input map to its representation as a string. It is still mapped by property name, but now the map holds entirely string values.
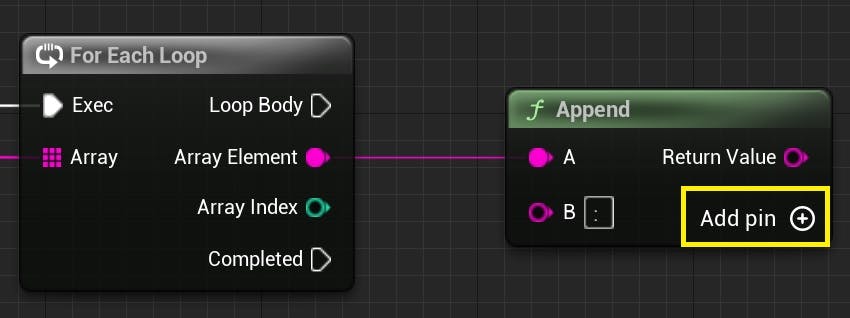
3From the Return Value of Get Values As Strings, create a Keys node, which returns an array of every string key in the map. Then, create a For Each Loop node to loop through that array. Make sure to connect the execution pins of these new nodes.

4To view the metadata in an easily readable format, this tutorial will display the values by joining the string keys of the map—the property names—to their values, with a colon and space in between.
First, right-click and search “Append”, and locate the String > Append node in the context menu. Create an instance of this node; then drag the Array Element pin from For Each Loop to the A pin of the Append node.
In the B pin, type a colon and a space (“: “). Click Add pin on the Append node to add a third input.
5From the output of Get Values As Strings, create a Find node. Connect the Array Element from For Each Loop to the empty pin on the Find node. Finally, connect the output of Find to the C pin of Append.
Now, all you have to do is print the result. Create a Print String node that connects to the Loop Body of For Each Loop. Finally, connect the Return Value of Append to the In String pin.

You can view the final Level Blueprint in its entirety below.
This is an interactive node graph. Right-click and drag to pan around the graph. To zoom in or out, press control/command and scroll with your mouse. You can also copy and paste nodes from this graph directly into your own Blueprint.
6Be sure to compile and save your Blueprint. Then, play your level in the Editor and test it out! When you select a building with the mouse, you should see the metadata properties associated with that feature in the top left corner.

Depending on your dataset, some models may be missing metadata values. You may not see a value for a printed property. If you’d like, you can modify the Blueprint to exclude the property if its value is empty.
You can edit the Print String node to change the color of the text or adjust the duration that it stays on screen.
Now that you've learned to access mesh features and metadata in 3D Tiles, use them however you wish in your application! In Cesium for Unreal Samples, Level 6 contains an example UMG widget that neatly displays these properties on the screen. You can use and modify that widget for your projects by downloading the Cesium for Unreal Samples.
For more information on Cesium for Unreal’s features and metadata API, check out the Features and Metadata Technical Reference.
How are you using mesh features or metadata in your Cesium for Unreal projects? Share your creations with us on X (formerly Twitter) and LinkedIn!