Using a Geospatially Accurate Sun
This tutorial will show you how to use the CesiumSunSky actor in your scenes. Along with providing a sun and sky system, CesiumSunSky can enhance the realism of your project by ensuring geospatial accuracy. The real-world position of the sun is an important factor in industries like aerospace, simulation, urban planning, and AEC.
The first three sections of this page show the process for setting up a level and ensuring geospatial accuracy with CesiumSunSky. The sections afterward contain additional examples and a reference section for CesiumSunSky. To get straight to the reference, click the CesiumSunSky Reference header in the left sidebar.
You’ll learn how to:
- Understand the CesiumSunSky Actor and how it interacts with the Georeference
- Create a scene with a geospatially accurate sky
- Modify the time of day with Blueprints and change time of day during play
- Use emissive materials with physically-accurate lighting
- Unreal Engine (at least 4.26 or later) and the Cesium for Unreal plugin are installed.
See the Cesium for Unreal Quickstart to learn how to install Cesium for Unreal and connect it with Cesium ion.
The CesiumSunSky actor is derived from the Sun Position Calculator plugin. The documentation page on the Sun Position Calculator explains many of the features of this actor.
This tutorial assumes you already have a level with Cesium World Terrain or other 3D Tilesets. For instructions on creating a basic level with Cesium World Terrain, see the Quickstart.
1Add a CesiumSunSky actor to your level. You can quickly add this actor with the Quick Add Basic Actors section of the Cesium panel.
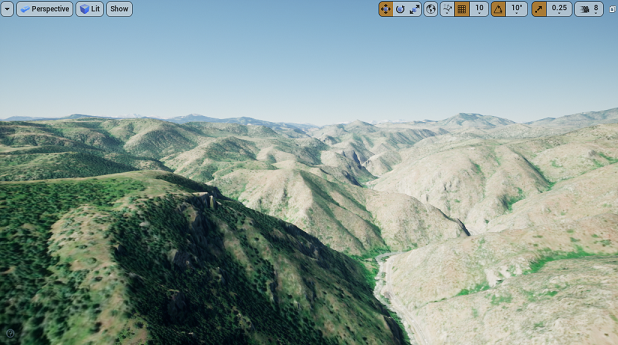
CesiumSunSky will create a realistic-looking sky with sun and atmosphere in your scene.
Is your scene still dark after adding the CesiumSunSky actor? If so, don't worry - it's likely just night at your scene's location. You'll adjust the time settings in the next few steps.
Is your scene bright white after adding the CesiumSunSky actor? If so, open your Project Settings. Search “Extend default luminance range”. You’ll want to ensure the “Extend default luminance range in Auto Exposure” option is checked. To learn more about why this happens and the implications, visit the Sun intensity and emissive materials section below.
The sun's apparent angle in the sky varies between geographic locations. Therefore, a geospatially accurate sun system must take the position of the viewer into account. CesiumSunSky automatically connects to the main Georeference in your scene in order to calculate the correct sun position. If the Georeference Origin changes, CesiumSunSky will update accordingly.
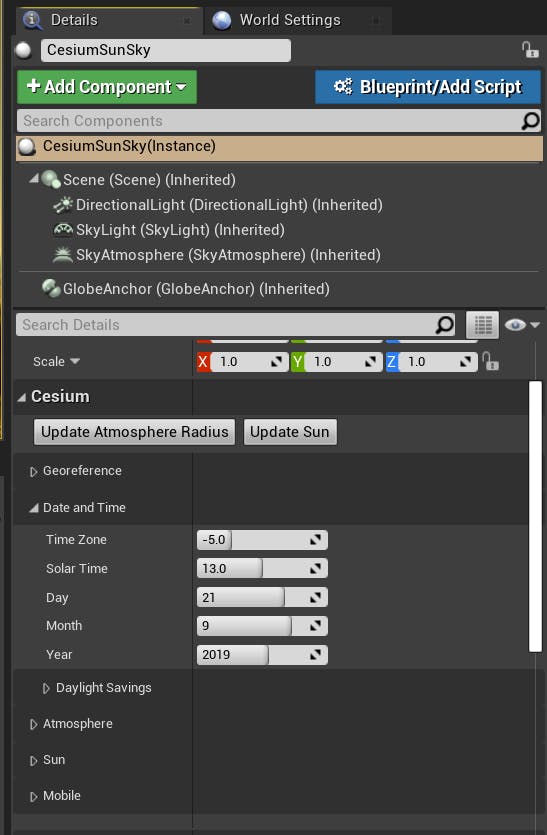
2Select the CesiumSunSky actor. In the Details panel, under the Cesium section, you’ll see CesiumSunSky's configuration options.
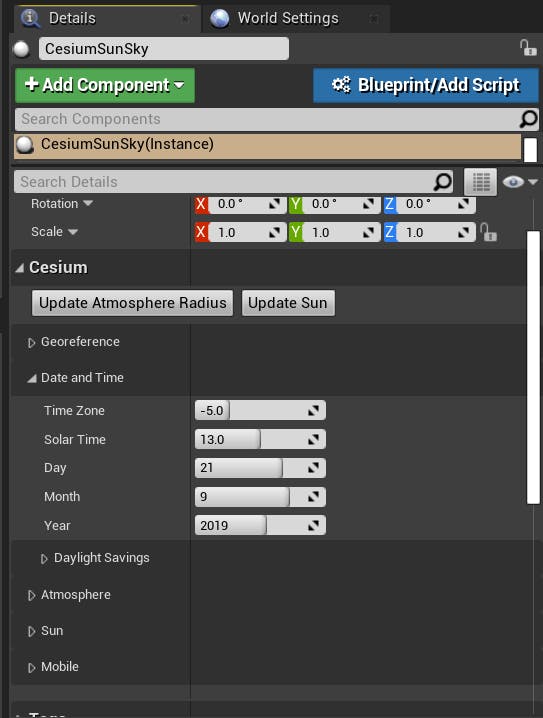
3Find the Solar Time parameter. Click and drag on the input field to change the time of day.
You may notice that the Solar Time value doesn't quite line up with expected sunrise and sunset times. Even if the sky looks good, it's not necessarily fully accurate. In the next section, you'll ensure that the Solar Time corresponds correctly to the sun angle.
1Make sure the Solar Time parameter is set to the default value, 13.0.
2The first setting in the Date and Time category is the Time Zone parameter. This parameter represents the time offset from Greenwich Mean Time (GMT).

The Time Zone parameter impacts the accuracy of the Solar Time setting. Take care to set the Time Zone to an appropriate value for your scene's location. Even if you do not need full accuracy, setting this will be helpful when changing the time of day.
If your scene was previously dark, setting the Time Zone should change the scene to daytime.
Q: Why isn't the Time Zone set automatically?
Even though CesiumSunSky uses longitude and latitude, it can not automatically calculate the correct time zone. Time zones are not always the same along a given longitude, and may be different for geopolitical reasons such as Daylight Savings.
3Below the Time Zone parameter, you’ll see Day, Month, and Year parameters. The default date is September 21, 2019. These parameters can be changed to represent any date.
When setting the Time Zone, keep in mind that the month and day may impact the correct value.
4Click on the Daylight Savings section header to see additional options for Daylight Savings.
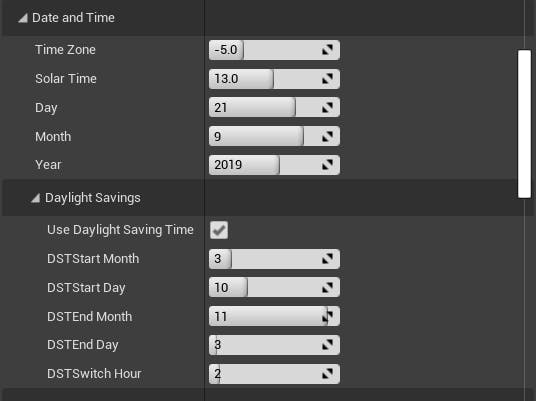
The expanded Date options.
The SunSky will handle Daylight Savings Time switches automatically as long as the Use Daylight Saving Time parameter is checked. If you are using Daylight Savings, ensure the values for DST Start Month, DST Start Day, DST End Month, DST End Day, and DST Switch Hour are correct for your location.
5Now that the time and date options are set, you can use the Solar Time parameter to change the time of day accurately.
When your scene's Georeference Origin changes, CesiumSunSky will automatically account for the new location. However, it will not automatically update the Date and Time settings, which means the sun direction relative to the globe will not change. If your new location is far from the old, it may appear dark.
If this is not desired for your application, adjust the Time Zone parameter when you change locations. This can be done in editor using the Details panel. During play, the Time Zone parameter can be set through C++ or Blueprints. After changing the Time Zone, you must call the Update Sun function to recalculate the sun angle.
An example blueprint demonstrating how the sun's position doesn't change when flying between locations, and how changing the Time Zone parameter will impact the sun's position and apparent time of day.
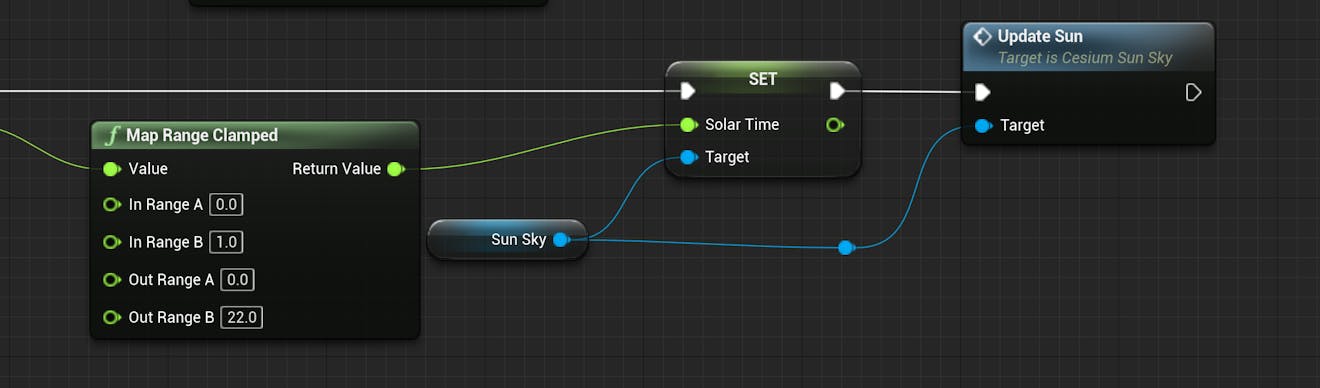
You can also change the time of day at runtime with C++ or Blueprints. This requires a reference to the instance of CesiumSunSky in your level.
The image below shows an example Blueprint to change the time of day. First, you must set the Solar Time variable on CesiumSunSky with a float in the range from 0.0-24.0. Then, you must call the Update Sun function on CesiumSunSky.
Many of CesiumSunSky's parameters can be hooked up to on-screen widgets that users can interact with during play.
You have completed the primary tutorial on this page. There are two additional short tutorials below with supplementary information about CesiumSunSky features. You can also jump straight to the Reference to learn more about CesiumSunSky.
This section is optional, and is not part of the main tutorial.
Cesium for Unreal's DynamicPawn comes with a Widget to change the Solar Time during play. The following steps will demonstrate how to use this widget in your scene.
1In your scene, open the World Settings window.
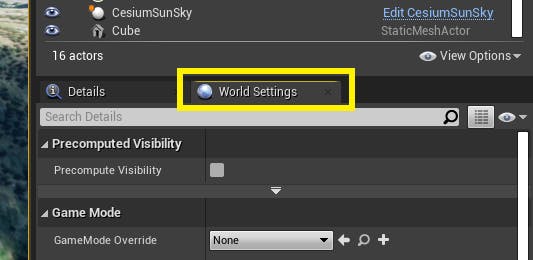
2Locate the setting GameMode Override.
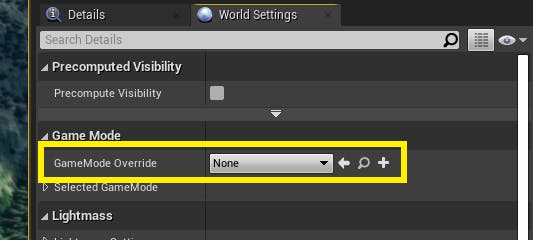
3Select the dropdown and change the GameMode Override from None to FloatingGameMode.
4Press the Play button.
5In game, press the T key on your keyboard to pull up the Time Of Day widget. This widget is a slider that can be used to change the Solar Time of Cesium SunSky.
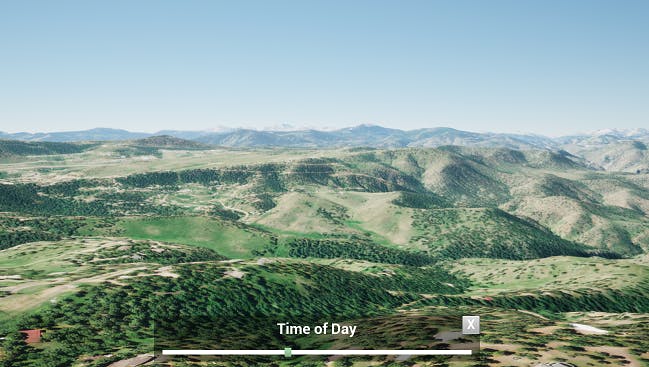
6Pressing T also unlocked the mouse cursor. Click and drag the green button on the Time of Day slider and see how the sun changes. To close the Time of Day widget, press T again or use the X button on the widget.
If the Time of Day slider doesn’t align properly to a full sunrise-to-sunset range, make sure the Time Zone of the CesiumSunSky is set correctly.
This section is optional, and is not a part of the main tutorial.
In some situations, you may prefer to use a Directional Light actor that is placed in the scene as the sun, rather than the Directional Light within CesiumSunSky. You can instruct CesiumSunSky to use an alternative light by following the steps below.
1If you do not already have an alternative Directional Light in your scene, create a new Directional Light actor.
2With the alternative Directional Light selected, open the Details panel. In the Transform section, set the Mobility to Movable.
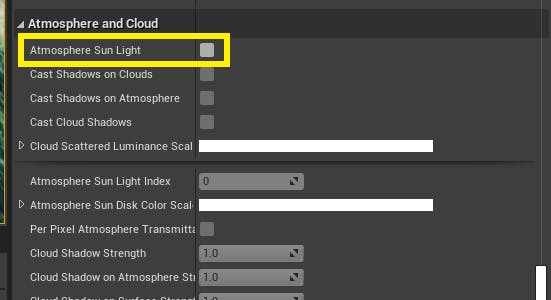
3Scroll down in the Details panel until you find the Atmosphere and Cloud section. Check the box Atmosphere Sun Light. This will ensure that the alternative Directional Light can be drawn in the atmosphere.
4Find the Sun section in CesiumSunSky's Details panel. Set the Level Directional Light parameter to your alternative Directional Light.

5Enable the Use Level Directional Light parameter. If the new light is less intense, the scene will temporarily go dark as the camera adjusts to the lower luminance.
The Use Level Directional Light parameter will allow you to toggle between the two lights. It will disable the light that is not being used.
The level Directional Light’s Light Color has been set to pink for demonstration purposes.
This section will help you understand the options available to you in CesiumSunSky's Details panel.
The Georeference section is a part of the actor's Globe Anchor component. You do not need to modify any of the parameters in the Georeference section.
Date and Time
These settings are used to simulate an accurate sun angle for a location, time, and date.
- Time Zone
The Time Zone parameter provides context for the Solar Time parameter. If the Time Zone is incorrect, the Solar Time parameter will no longer align with the sun position and light level. This parameter's value represents the time offset from Greenwich Mean Time (GMT). - Solar Time
Sets the sun's height and light level. This parameter is impacted by all other Date and Time settings. - Day, Month, and Year
Can be used to simulate the sun's position on any date. - Daylight Savings
If Use Daylight Saving Time is checked, the SunSky will automatically take Daylight Savings time changes into account when calculating the sun's angle. If Use Daylight Saving Time is unchecked, the rest of the parameters in the Daylight Savings section will not be used.
Atmosphere
The settings in this section impact the atmosphere radius during play to avoid rendering artifacts.
- Update Atmosphere at Runtime
If this setting is enabled, CesiumSunSky will use the player's height above the terrain to set the atmosphere radius. This is mainly used to avoid visual artifacts in the atmosphere when moving between the Earth's surface and space. - Inscribed Ground Threshold and Circumscribed Ground Threshold
The upper and lower bounds (in kilometers above the Earth's surface) for the atmosphere radius adjustment. If Update Atmosphere at Runtime is not enabled, these settings will have no effect.
Sun
These settings allow you to select an alternate directional light from your scene instead of CesiumSunSky's directional light component, as detailed in the Use an alternative directional light section.
Mobile
Mobile platforms do not currently support the Sky Atmosphere class that CesiumSunSky uses. If you are developing for mobile, you can still utilize the sun position calculations and settings provided by CesiumSunSky with the settings in this section.
- Use Mobile Rendering
Whether or not to replace CesiumSunSky's SkyAtmosphere component with a mobile-friendly sky sphere. This setting must be enabled prior to building your application. - Sky Sphere Class and Sky Sphere Actor
The Blueprint class or actor to use for mobile rendering. Cesium for Unreal comes with a MobileSkySphere blueprint class that can be used for this purpose, or you can make your own. The class must be derived from the engine BP_Sky_Sphere class. - Mobile Directional Light Intensity
The intensity of the mobile sky sphere's directional light.
At the very top of the Details panel, you’ll see a section showing the components of the CesiumSunSkyBlueprint.

SunSky has three major visual components - SkyLight, DirectionalLight, and SkyAtmosphere. The SkyLight has not been modified from the base SunSky actor in CesiumSunSky, and won’t be detailed on this page. However, it is still an important component for realistic lighting.
The actor also has a GlobeAnchor component to help position the actor correctly and calculate the sun angle.
You can edit each component directly by clicking on it in the components list.
The Directional Light component represents the sun. The angle of the Directional Light component is set automatically by the CesiumSunSky blueprint, based on the Solar Time value. There are many settings that can be tweaked on the Directional Light. The following sections will explain some of the most common ones that you may need to change, but does not cover every setting. For more information on directional lights, visit the Unreal Engine documentation page.
The Directional Light on CesiumSunSky is set to Movable, and is a fully dynamic light. Movable lights have a high performance cost. If your level never requires the Georeference Origin or the Time of Day to change, consider creating a new Static or Stationary Directional Light, Sky Atmosphere, and Sky Light and assigning them the same values as the CesiumSunSky components, then removing CesiumSunSky from the level.
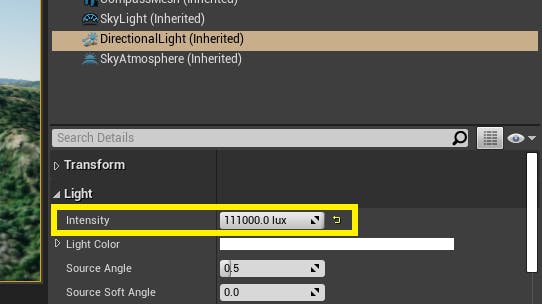
Take a look at the Intensity parameter on the Directional Light component. By default, this is set to 111000 lux - the approximate intensity of bright sunlight. Depending on the weather conditions and time of day of your project, you may wish to change this to a higher or lower value. However, for physically-accurate values, it’s best not to set this value above 120,000 lux.
The default intensity value for a directional light in Unreal Engine is 10.0. A value of 100,000+ is significantly larger, and as a result some assets may not behave as expected. Notably, unlit materials will appear dark when used in a scene with a physically-accurate sun intensity. If your project makes use of unlit or emissive materials, you’ll need to take additional steps to ensure these materials will render correctly.
Option 1: Raise values of emissive materials
If physical accuracy of your lighting is a priority, you can increase the intensity of emissive and unlit materials. Because the light intensity is about 10,000 times brighter than expected, emissive materials will also need to be about 10,000 times brighter in order to render as expected. This can be controlled by multiplying the emissive value of a material in the Material Graph.
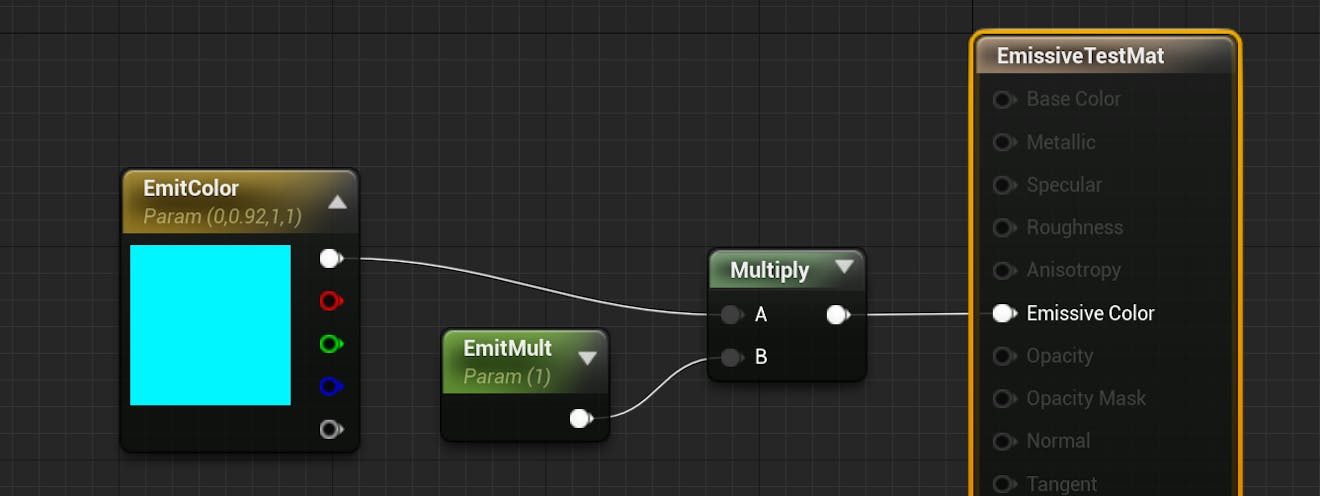
An example material setup using the Unlit shading model.
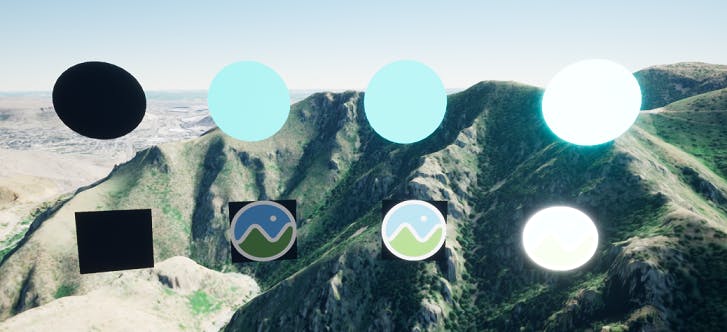
Emissive multipliers from left to right: 1.0, 1110.0, 11100.0, 111000.0. The directional light intensity is 111,000.
Option 2: Lower the light intensity
If physically-accurate lighting is not a priority, it may be simpler to reduce the directional light intensity. Setting the Intensity of the Directional Light component to 10.0 will cause emissive and unlit materials to render as they would with a default Directional Light. However, the lights in your scene will no longer be physically accurate.
Did your scene go black when you reduced the Intensity of the Directional Light, or bright white when you changed it back? The camera’s Auto Exposure takes a few seconds to adjust between the two luminance ranges. If you need to speed up this adjustment period, create a Post Process Volume.
In the following image, the emissive material property is using a multiplier of 1.0.
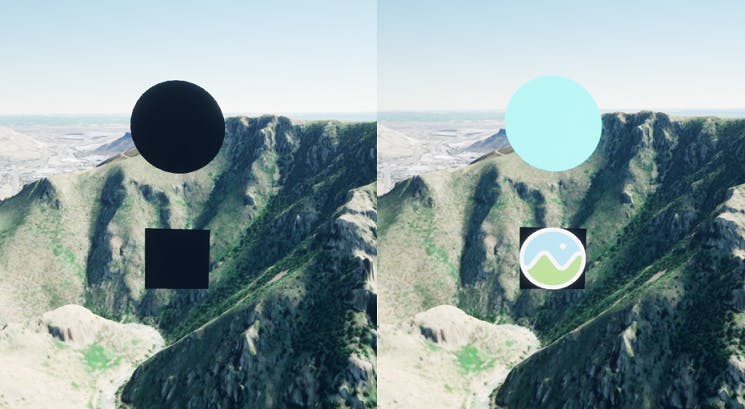
Left: Directional light intensity of 111,000. Right: Directional light intensity of 10.
If you decide to reduce the directional light intensity, keep in mind that it may be more difficult to maintain lighting accuracy when adding other light sources.
To learn more about physically-based light units in Unreal Engine, visit the documentation.
Right below the Intensity parameter is the Light Color parameter. Double-clicking on the white bar will open a color picker.
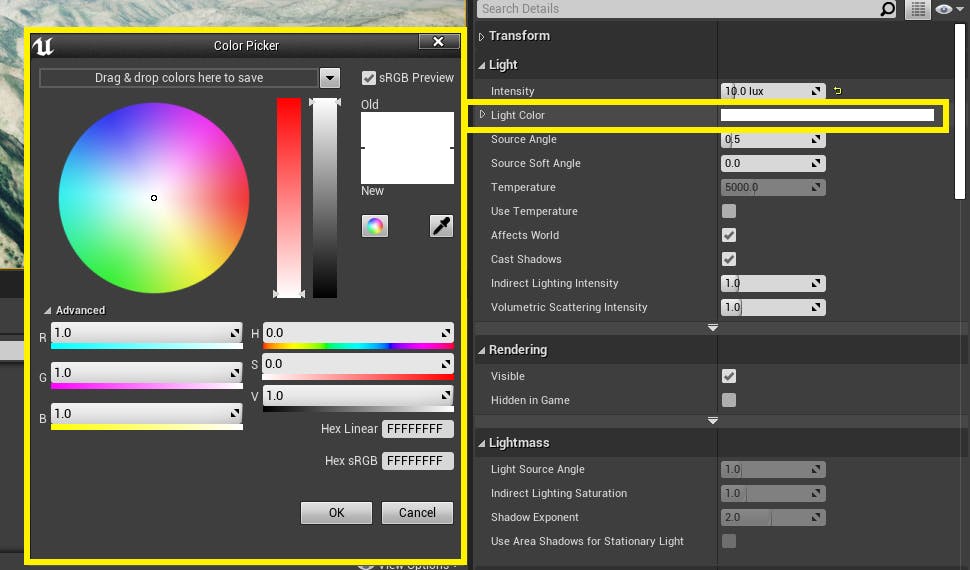
Using this parameter, you can adjust the hue of the sun. Changing this value will not result in a physically-accurate sun, but this setting can be used to achieve various artistic effects.
Alternatively, you can use the Temperature value to set the color temperature. This setting is found below the previous settings, and the Use Temperature box must be checked in order to change the Temperature value.
Using Temperature instead of Light Color can help maintain a realistic look when changing the hue of the directional light.
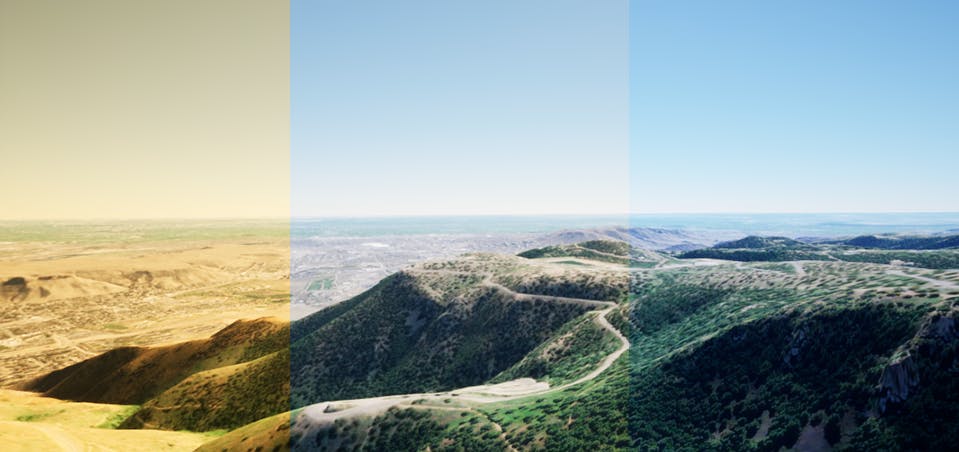
Temperature of light from left to right: 3000, 6500, 12000.
You can control the shadows cast by CesiumSunSky through its DirectionalLight component.
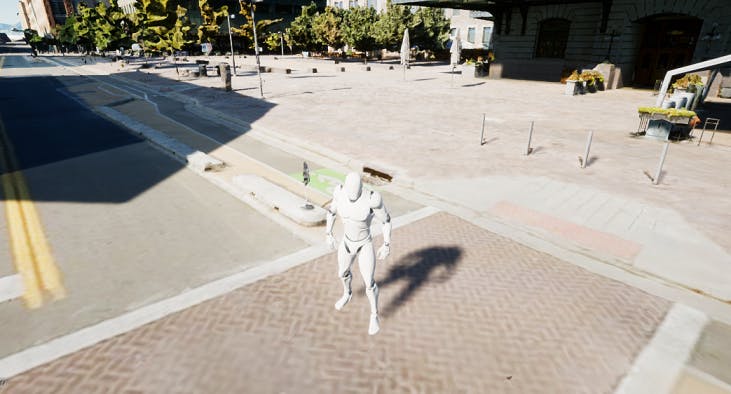
As you explore the world, you may notice that objects don’t appear to cast shadows until you are near to them. This allows for higher performance, but your project may require shadows at greater distances.
You can control the distance at which to draw shadows using the Dynamic Shadow Distance MoveableLight parameter in the Cascaded Shadow Maps section on the Directional Light component. Use the search function in the Details panel to quickly find this parameter.
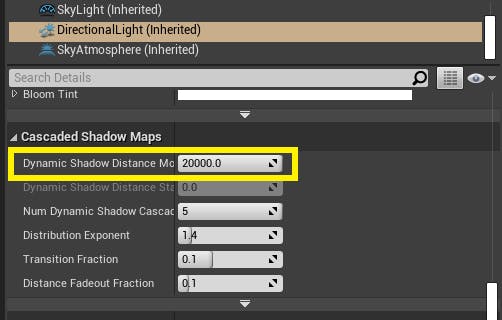
Changing this value from 20,000 to 200,000 will result in shadows that are visible from a much greater distance. Bear in mind that this may come with performance drawbacks. 20,000 is the maximum value available on the slider, so higher values will need to be manually typed in.
While increasing the shadow distance helps with faraway shadows, it means that the shadows are lower resolution. If you are building a human-scale experience, a larger shadow distance may not be the best choice.

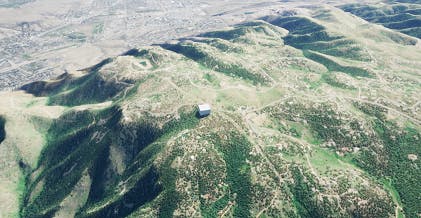
Top: Dynamic Shadow Distance 20,000. Bottom: Dynamic Shadow Distance 200,000.
If you require distant shadows and higher quality shadows up close, you’ll find the setting Num Dynamic Shadow Cascades under the Dynamic Shadow Distance. By default, this parameter is set to 5.
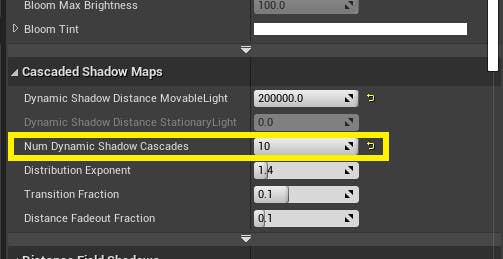
Raising this setting will allow higher resolution shadows, but will have a negative impact on performance. In addition, even with additional shadow cascades the shadows may not be as high-resolution as they would be with a lower Dynamic Shadow Distance.
Num Dynamic Shadow Cascades raised from 5 to 10.
Alternatively, you can raise the Cascade Distribution Exponent. This produces higher quality shadows near the camera, at the cost of faraway shadow quality.
To learn more about dynamic shadows, visit the Unreal Engine Documentation.
The other major component of CesiumSunSky is the SkyAtmosphere component. Sky Atmosphere creates the appearance of an atmosphere and allows control over scattering and other density settings. This component is also responsible for drawing the sun in the sky.

With and without Sky Atmosphere enabled.
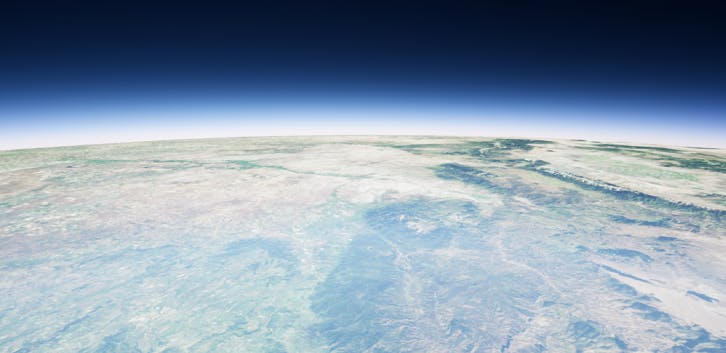
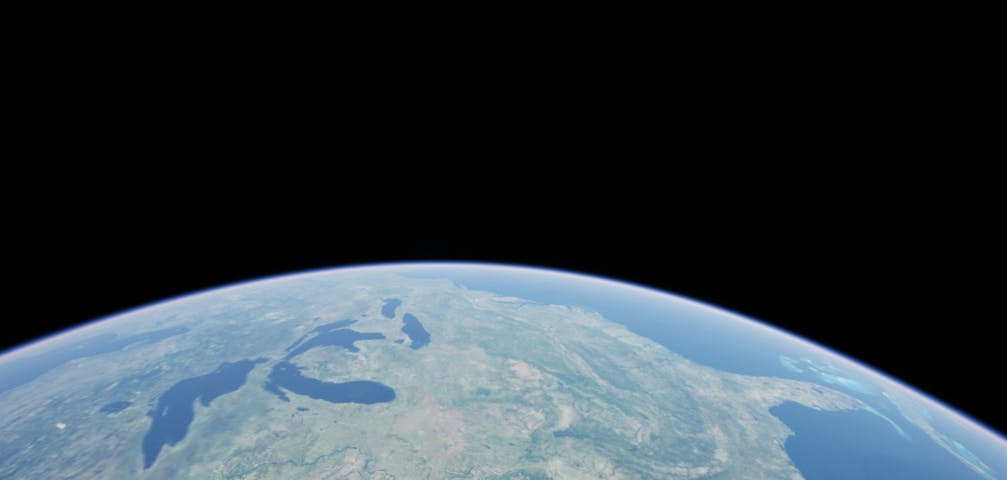
In CesiumSunSky, the Transform Mode of the component has been set to Planet Top at Component Transform in order to work properly with the Georeference. This setting, along with the fact that the atmosphere is set to movable, prevents the horizon line of the atmosphere from being too high and causing black bars on the horizon.
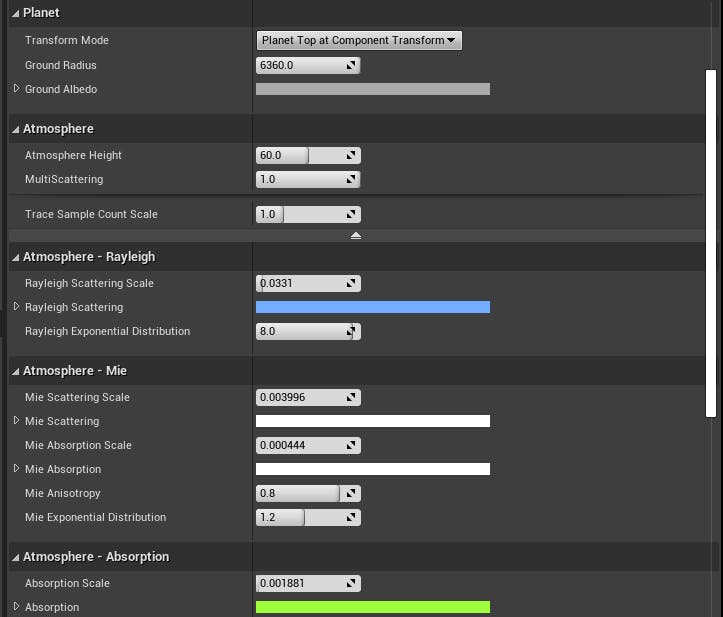
Like the Directional Light, the Sky Atmosphere has many parameters that can be adjusted to achieve different effects. Some of these settings are pictured above.
For a full summary of the Sky Atmosphere options, visit the Unreal Engine Documentation.
You may notice a hitch or sudden change in the atmosphere appearance while moving between a ground view and a space view. This is caused by an optimization in the Sky Atmosphere actor. If this is an issue in your project, you can disable it by opening the console and setting the following CVars:
r.SkyAtmosphere.FastSkyLUTr.SkyAtmosphere.AerialPerspectiveLUT.FastApplyOnOpaque
Visit this page to learn more.
These Unreal Engine documentation pages may be helpful when using CesiumSunSky.