Vignettes
If you’ve used VR applications and games, you’ve probably experienced occasional motion sickness. Not only can this be uncomfortable for players, it can also hinder adoption and retention of a game. Even experienced players and super users of VR find themselves unable to engage with a VR application for an extended period of time.
It only takes one uncomfortable movement to trigger motion sickness, and it can take several hours for players to recover. Combined with proper movement strategies outlined in the previous tutorial, vignettes — a fading and darkening of the outer edge of the view — can provide a more comfortable experience for players to broaden the user base and prolong application play time.
This tutorial assumes you have a basic understanding of Unreal Engine and Blueprints. We recommend reading the Getting Started series and Building a VR Application tutorial prior to this series.
You’ll learn how to:
- Implement vignettes in VR to reduce motion sickness
- Create a material and set its properties at runtime
- Manipulate a post process component
- Automatically set vignette strength based on player velocity
- Unreal Engine 5
- Cesium for Unreal
- Basic understanding of Blueprints and Unreal Engine
Clone or download the project files here to get a more in-depth look at the project and solutions provided. Refer to the README for more information on the blueprints and levels corresponding to this tutorial, as well as headset compatibility.
Vignettes require a post process material to be manipulated at runtime in order to apply the vignette fade over the entire VR HUD. As a post process, we can be assured that any HUD-mounted graphics or UI in world space will not conflict with the vignette fade.
The vignette control also needs to be accessible from any component, and calling the vignette from multiple sources should not incur competing calls. If this is not accounted for, then we could see unexpected or inconsistent results.
Another important design challenge to reducing motion sickness is to ensure that the player moves in an expected manner. Strategies for proper movement can be found in the previous tutorials on Teleportation and Movement.
The vignette is best accessible as a component on the pawn with the ability to drive a UPostProcessComponent and to receive function calls from other components. The post process component manages a post process material in order to render the vignette. For more information about the UPostProcessComponent see here.
The vignette strength is set on the BP_Vignette component externally from other components, with the highest value prevailing as this frame’s vignette setting. This way it ensures that a component requesting a higher vignette strength is satisfied and motion sickness is deterred. To sustain the vignette, components need only to set the vignette strength every frame.
Setting the strength of the vignette also sets the visual size of the vignette. With the fade time passed as well, a decay value is calculated on the vignette component. This value causes the vignette strength to reduce with every frame, unless another component sets its strength. This gives the impression that the vignette slowly goes away without requiring complicated animations.
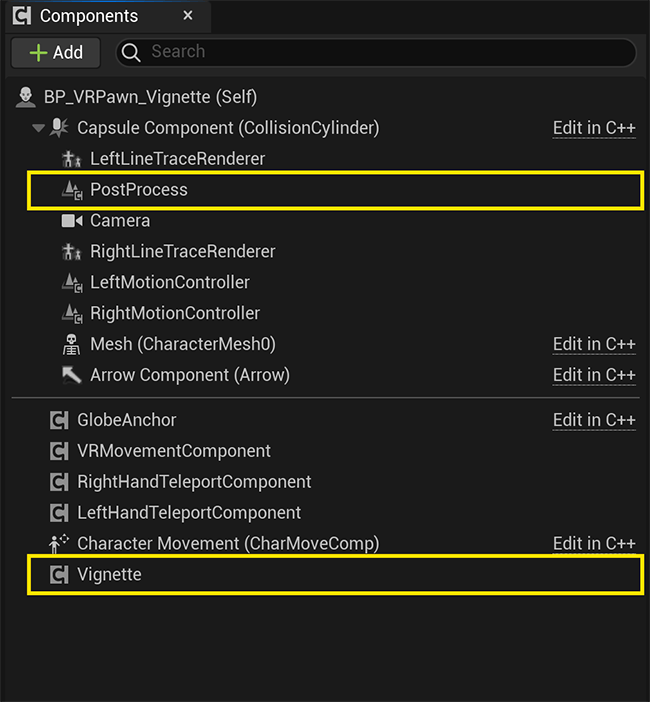
The pawn setup with a vignette component
The first step to visualizing the vignette is to create a post process material that we connect to the UPostProcessComponent located on our pawn. The material is set up as a post process material in the details panel.
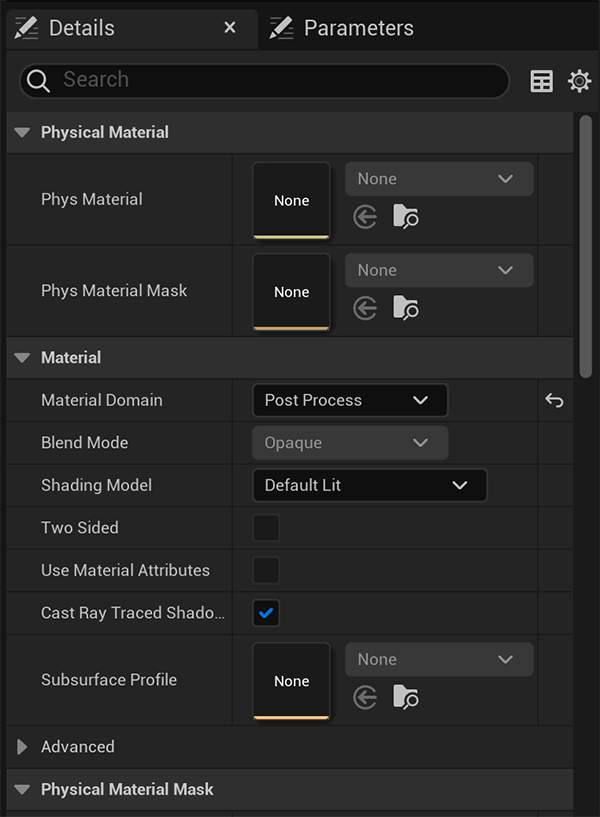
The details of the vignette post process material
Vignette > Materials > M_Vignette
If you are unfamiliar with creating or editing materials, see here for more information.
We then assign the material to the UPostProcessComponent via the setup function on the BP_Vignette blueprint. Setup is called last from the Pawn’s BeginPlay event after other miscellaneous setup functionality has been called. The other setup functions facilitate movement and teleportation, which is related to vignettes because those interactions will also drive the vignette as needed.
Vignette > Blueprints > BP_VRPawn_Vignette > EventGraph graph
In the setup function, a reference to the UPostProcessComponent is cached for the BP_Vignette blueprint, and a dynamic material instance is created and added as a blendable object to the UPostProcessComponent. This is a required step in displaying the vignette on the HUD. Lastly, we also want to store a reference to an ACharacter, which our custom blueprint pawn derives from, so that velocity can automatically be incorporated into vignette strength.
Vignette > Blueprints > BP_Vignette > Setup function
External components that perform an action moving the pawn benefit from setting the vignette after the event. For example, when the user rotates or teleports to a location, SetVignette is called with a normalized strength of the vignette with a value of 1 — nearly covering the entire screen. A fade time is also passed that determines how many seconds after the call will the vignette fade out.
Vignette > Blueprints > BP_VRPawn_Vignette > Input graph
When a feature executes an action that moves the user or changes their view, external components can call the SetVignette function on the BP_Vignette Blueprint. While passing in a strength and fade time, the strength of the vignette is set to the highest value passed in this frame. A decaying factor is also calculated based on the strength passed in and the fade time.
Vignette > Blueprints > BP_Vignette > SetVignette function
On tick of the BP_Vignette Blueprint, the vignette is set based on velocity so that any automatic movement is taken into account. It can be assumed that, if the user is moving through physics forces or movement components, the vignette would aid in reducing any motion sickness. After this calculation is made, we run the final render function.
The tick of the BP_Vignette occurs post update so that other components have a chance to set the vignette first before determining the final strength of the vignette. See here for more information about actor ticking and tick groups.

The details of the vignette component’s tick settings
Vignette > Blueprints > BP_Vignette > EventGraph graph
The velocity of the Pawn is then used to calculate the vignette strength that would be adequate enough to deter motion sickness. The MaxVignetteStrength and MaxVignetteAtSpeed variables exposed on the BP_Vignette Blueprint have been set through trial and error but can be adjusted to fit your needs. This method still accesses the same SetVignette function above, so the same conditional logic applies to the velocity setting as it does to any external component.
Vignette > Blueprints > BP_Vignette > SetVignetteFromVelocity function
Finally, after all external components have had a chance to set the vignette and the velocity is incorporated, the RenderVignette function sets the vignette strength on the post process material and the current vignette strength decays every frame to fade the vignette out.
Vignette > Blueprints > BP_Vignette > RenderVignette function
Motion sickness can ruin a player’s experience with an otherwise great VR application. Using vignettes will make your VR applications and games more accessible to everyone.
In the next tutorial we will cover how to build your VR application for the Meta Quest.