Free Movement
Freedom of movement is an excellent way to enhance navigation in 3D applications and games. Unlike guided navigation systems or teleportation, moving gradually can feel more natural for players and allows them to precisely place and adjust their location.
Flying across Cesium World Terrain is an immersive way to see the earth, not to mention how it feeds into our desire for supernatural and augmented experiences.
This tutorial assumes you have a basic understanding of Unreal Engine and Blueprints. We recommend reading the Getting Started series and Building a VR Application tutorial prior to this series.
You’ll learn how to:
- Move the player at varying speeds across the globe
- Rotate the player
- Change actions on the same input
- Unreal Engine 5
- Cesium for Unreal
- Basic understanding of Blueprints and Unreal Engine
Clone or download the project files here to get a more in-depth look at the project and solutions provided. Refer to the README for more information on the blueprints and levels corresponding to this tutorial, as well as headset compatibility.
We discovered two main movement considerations for VR applications and Cesium for Unreal.
With VR applications, some movement methods can trigger motion sickness. Moving the player other than in the direction they are facing can quickly cause nausea, especially if they are not given context or an indication of what direction they are moving in. Consider moving in a car with a clear forward direction, versus being pulled swiftly backwards in unpredictable directions.
Giving players the agency to move as they please will help them anticipate what kind of motion they can expect, which can reduce nausea. In this project, we will implement flight as the mode of free movement.
The nature of 3D Tiles also introduces some challenges to VR experiences. 3D Tiles are streamed into Unreal Engine as needed. To reduce the amount of data needlessly transferred, frustum culling is used to ensure that only tiles within the viewport are streamed in. (Frustum culling can be toggled per tileset under “Tile Culling -> Enable Frustum Culling”.) While frustum culling helps with performance, it can introduce problems if the player looks away from a tile that is needed. For example, when a player in VR looks up, the ground below their feet will disappear, and if the pawn responds to gravity, it can fall below the surface.

Tiles are streamed based on the player's view, or frustum.

With a virtual camera projected downwards, the CesiumCameraManager will ensure that the tile below the player is streamed.
To solve this, we will implement an additional CesiumCamera to make sure that the tile beneath the player is always loaded.
The default ACharacter class is equipped with the UCharacterMovementComponent, which conveniently comes with movement modes and other settings to determine the player's speed against the world using physics. We have adjusted certain parameters on the player character so that the experience is comfortable. The Oculus VR Best Practices Guide and the VR Locomotion Design Guide are good starting points for understanding what to avoid when designing interactions.
Below is the component setup of the pawn for this tutorial. All of the pawns in each tutorial of this series derive from ACharacter.
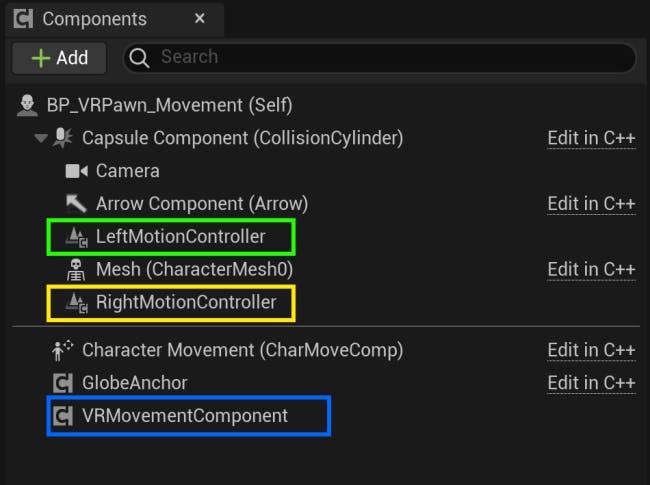
The VR Pawn component setup
The UCharacterMovementComponent located on the ACharacter also needs default configuration in order to function properly. All acceleration regardless of mode will be clamped by the MaxAcceleration setting, so we are going to set it to a large number since our acceleration is changed dynamically. The DefaultLandMovementMode is also set to Flying because that is the mode we remain in for all motion.
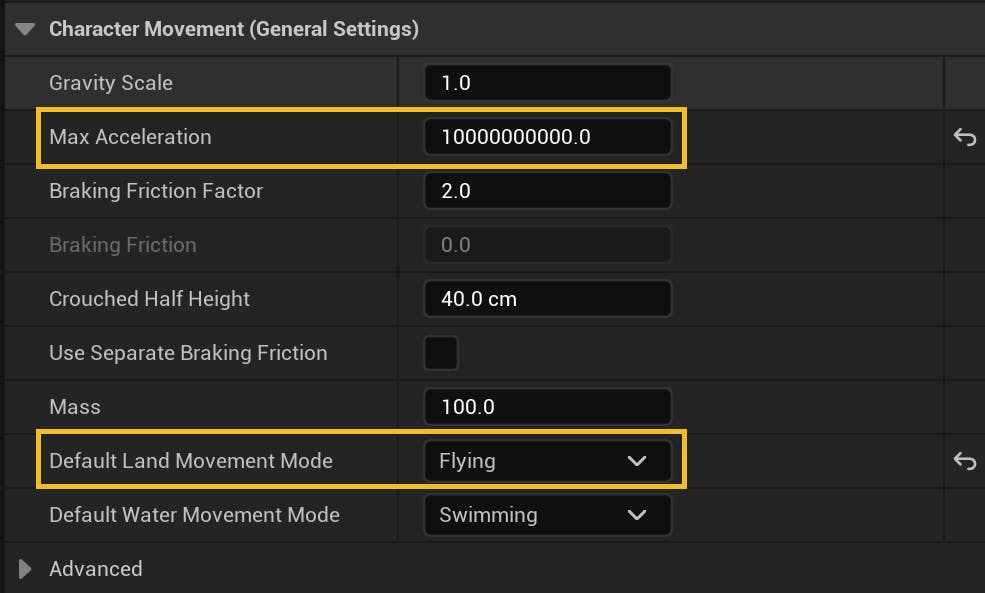
Character movement settings
To handle all of the movement logic going forward, we set up a Blueprint called BP_VRMovementComponent and attach it to the BP_VRPawn_Movement.
In this section, we'll make sure the tile below the player is loaded. We will also query the distance between the player and the ground, which will be useful for other movement functionality.
To start, a new CesiumCamera is created and registered to the CesiumCameraManager, and a reference to the manager and camera ID are stored. These references will be used later to cast a virtual camera downwards and ensure the tiles below are present.
Movement > Blueprints > BP_VRPawn_Movement > EventGraph graph (begin play)
In the ShowTileBelow function we update the CesiumCamera on the CesiumCameraManager to fetch a high level of detail on the tile below so that it remains loaded regardless of viewport direction.
Movement > Blueprints > BP_VRPawn_Movement > RenderTileBelow function
We also create two new functions on our BP_VRMovementComponent called FindDistanceToGround and SetMaxFlySpeed. These functions are called from the pawn’s Tick function.
Movement > Blueprints > BP_VRMovementComponent > EventGraph graph
We then perform a line trace on the terrain below to get the distance the player is from the ground.
Movement > Blueprints > BP_VRMovementComponent > FindDistanceToGround function
This line trace uses a custom trace channel called “CesiumWorldTerrain”, which ignores all objects besides the Cesium World Terrain 3D tileset actor. See here for more information about collision filtering.
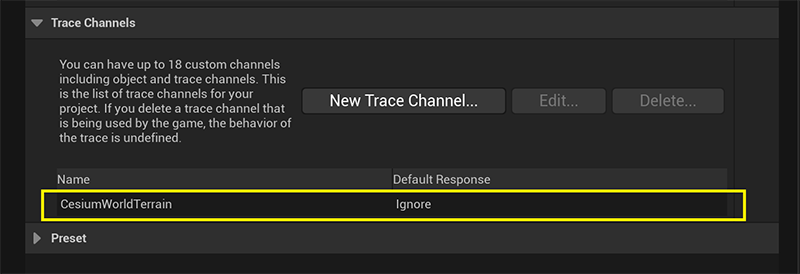
Trace channel set up within the project settings
The Cesium World Terrain actor is set to block collisions from the "CesiumWorldTerrain" trace channel.
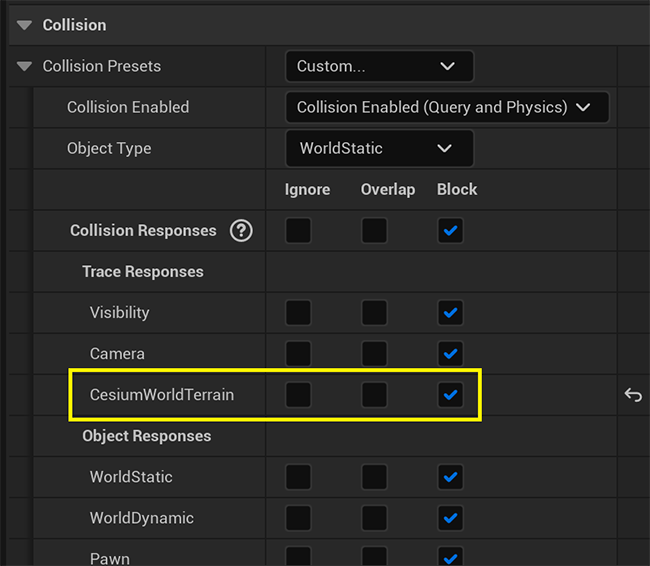
The collision settings on the Cesium World Terrain actor
We can use the player's distance from the ground to adjust their flight speed accordingly. If players are close to the ground they would expect to move slowly over the surface, as they would in real life. When they are far above the ground, that same slow speed would feel much slower, so faster movement is preferable. We set their flight speed in the SetCurrentSpeed function.
Movement > Blueprints > BP_VRPawn_Movement > SetMaxFlySpeed function
We use thumbstick input along the Y axis to drive forward and backward motion.

Input bindings for forward and backward movement
The input bindings in this tutorial are set up for Oculus Quest. If you are using a different device, you will need to adjust the inputs for your device. See here for more information on how to bind inputs.
Movement > Blueprints > BP_VRPawn_Movement > Input graph
After inputs are passed in, the player moves in the direction of the viewport. This reduces motion sickness and allows them to easily change direction by looking around.
Movement > Blueprints > BP_VRMoveComponent > MoveForward function
We use thumbstick input along the X axis to move side-to-side (strafe).

Input bindings for left and right movement
Movement > Blueprints > BP_VRPawn_Movement > Input graph
The player strafes in a direction perpendicular to their viewing direction, and always parallel with the ground. A strafing action that moves the player up or down is not ideal.
Movement > Blueprints > BP_VRMoveComponent > MoveLeft function
Moving up or down in a straight line grants a new way to quickly expand the player's field of view. Moving vertically will also help the player navigate difficult terrain.
Most VR controllers have access to a thumbstick press which serves as an excellent way to ascend. In order to condense inputs, a modifier input can be used to invert the action of moving up to moving down.

Input bindings for up and down movement
Movement > Blueprints > BP_VRPawn_Movement > Input graph
After inputs are received, the pawn determines if the modifier button is also down and passes in the appropriate direction to the MoveUp function.
Movement > Blueprints > BP_VRMovementComponent > MoveUp function
Another reason to measure the distance from the player to the ground is to snap the player down to the surface when they are close enough to it. Snapping them in this manner keeps the movement mode the same, so that players don’t experience any sudden falling behavior or unwanted motions.
The BP_VRMovementComponent applies a force downwards to the pawn on Tick if they are close enough to the ground.
Movement > Blueprints > BP_VRMovementComponent > EventGraph graph
This effectively simulates walking while the UCharacterMovementComponent is still in flying mode. If the player then moves upwards, they will break from the snap.
Movement > Blueprints > BP_VRMoveComponent > SnapToGround function
While players in VR can change their rotation by physically rotating their head and body, it's more comfortable to also drive rotation with the controller. However, smooth rotation can induce motion sickness, so we instead change the view rotation in set increments. We use the thumbsticks for rotation input. Since the X axis bindings are currently used for strafing, we will incorporate the modifier button. When the modifier button is pressed and the thumbsticks are moved on the X axis, the player will rotate instead of move.

Input bindings for modifying movement
Movement > Blueprints > BP_VRPawn_Movement > Input graph
Snap rotation changes the pawn’s rotation by a set number of degrees. The rotation increment should be large enough to be useful, but small enough to not be disorienting. We set the rotation degrees to 24 so that it takes 15 rotations to turn fully around.
Movement > Blueprints > BP_VRMovementComponent > SnapRotate function
Now we have a player pawn that can move smoothly across 3D tilesets, adjusting the movement speed based on their height. The pawn can also "land" when near the ground, and rotate their view.
Continue to the next in the series, Vignettes