This tutorial is for Cesium for Unreal version 1, which is now obsolete. Please see the updated version for Cesium for Unreal v2.
Building Global Scenes with Georeferenced Sublevels
The previous tutorials have covered several ways to build projects and explore 3D Tiles tilesets with Cesium for Unreal. However, up until now you have been limited to building Unreal scenes centered around only one location on the globe at a time. In this tutorial, you'll learn to use georeferenced sublevels to build scenes in multiple locations, and ensure your placed actors stay where they belong—even when you're on the other side of the world.
Build sublevels across the world and seamlessly explore them.
- Know how to set up a basic Cesium for Unreal application. If you are new to Cesium for Unreal, check out the Cesium for Unreal Quickstart to learn how to install Cesium for Unreal, connect with Cesium ion, and create a simple world.
- Know how to place objects on the globe.
- A Cesium ion account to stream real-world data into Unreal Engine.
- A project with the Cesium for Unreal plugin installed.
This tutorial was written for Unreal Engine 4. Unreal Engine 5 supports double precision and large worlds. If you are using UE5, some elements of this tutorial may not apply.
The levels you have built in previous tutorials have centered around a single location on the globe. This central location is determined by the CesiumGeoreference actor. The job of the CesiumGeoreference is to put this “central location” at the Unreal origin (0,0,0). As you get further away from this origin, things will get weird fast. The down-direction used to determine gravity will become incorrect, physics will become jittery, and exact placement of Unreal objects will become less precise.
While georeferenced objects (such as 3D Tilesets, the DynamicPawn, and actors with a CesiumGlobeAnchorComponent) are designed to work around this, many built-in Unreal tools like the physics engine and object placement will fall apart once you are sufficiently far from the origin.
This tutorial will introduce you to georeferenced sublevels to help overcome the above limitations. Creating georeferenced sublevels allows us to specify a unique “central location” per sublevel. Each sublevel can then support all the physics, foliage, and game-logic you need for your application.
After this tutorial you will be able to:
- Create a persistent global level
- Create and manage georeferenced sublevels within the persistent level
- Fill each sublevel with assets and game-logic using your typical Unreal workflow
- Understand tips and tricks for using georeferenced sublevels
Setting up georeferenced sublevels requires some extra preparation steps that are not covered in the Quickstart tutorial. This tutorial assumes you have already created an Unreal Engine project and installed and enabled the Cesium for Unreal plugin.
1Create a new completely empty level (File>New Level>Empty Level).
2In the Content Browser, create a new folder within your project’s Content folder called "World".
3Save the empty level inside the new World folder. Name the level "Globe". This will be the Persistent Level going forward.
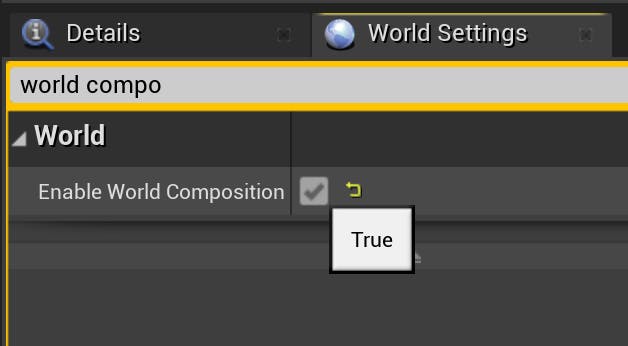
4Go to the Settings icon in the toolbar and click World Settings.

5In the World Settings panel, search for and change the following settings:
- Enable Enable World Composition. This is the setting that enables the sublevel functionality.
- Disable Enable World Bounds Check. Objects may move very large distances in the global-scale world of Cesium for Unreal, and by default Unreal Engine will remove faraway objects during play. Disabling this setting ensures that objects far from the origin will not be deleted.
6Open the Levels panel (Window>Levels).
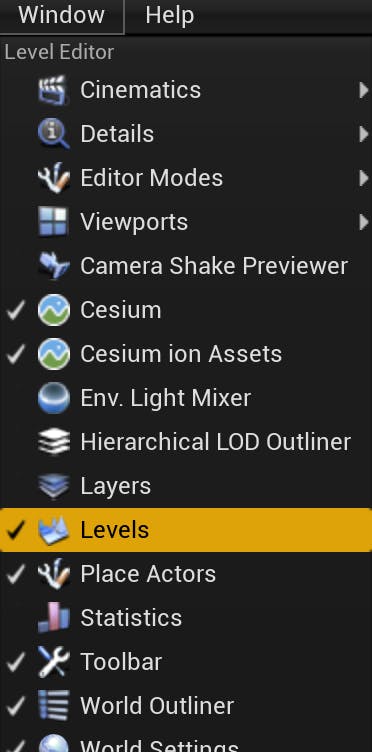
7In the Levels panel, click Summon World Composition.
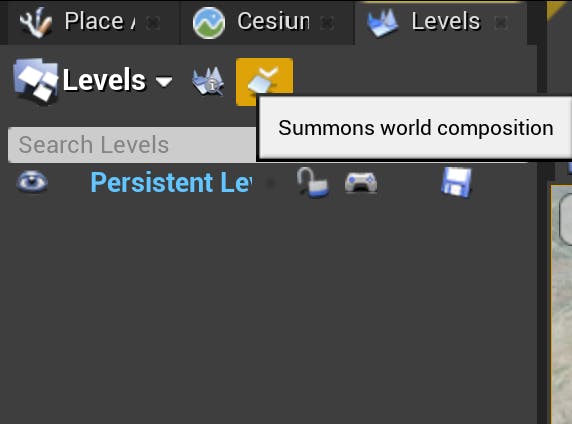
8In the World Composition window that was just opened, create a new layer. Apply the following settings:
- Disable Streaming Distance. The CesiumGeoreference actor will take care of deciding when to load sublevels.
- Name the new layer "CesiumLayer".
If you accidentally leave Streaming Distance enabled, you will have to create a new layer. Currently, there is no way to edit a layer’s settings once it has been created.
If you have been going through the Cesium for Unreal Getting Started Tutorials in order so far, everything in Step 2 should be familiar. If anything is unexpected or confusing, follow the links provided for more detailed instructions.
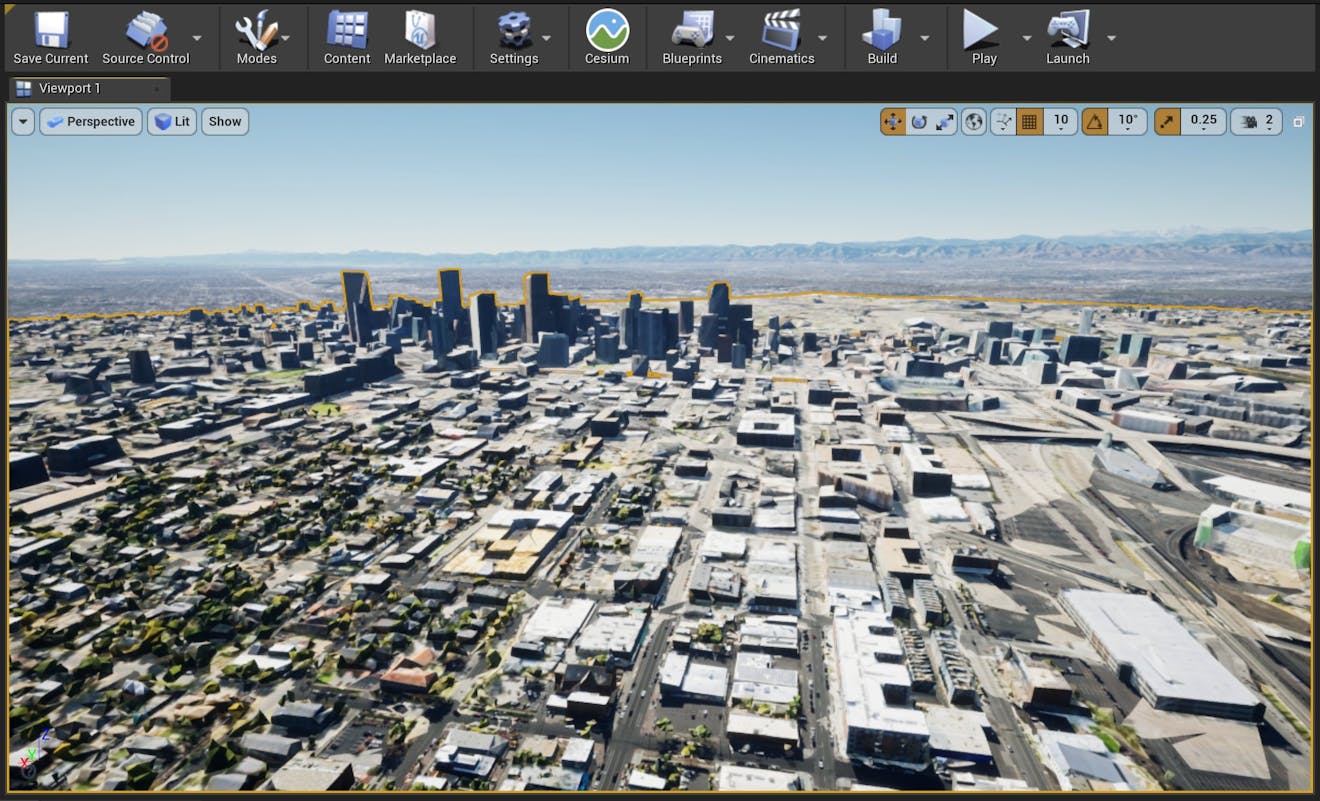
1Now that the project is set up, it’s time to fill the persistent global level with real world data from Cesium ion. First add Cesium World Terrain With Bing Aerial Imagery to the scene, this will be the global base-terrain with satellite imagery. If you are unsure how to do this, read Step 6 of the Quickstart tutorial.
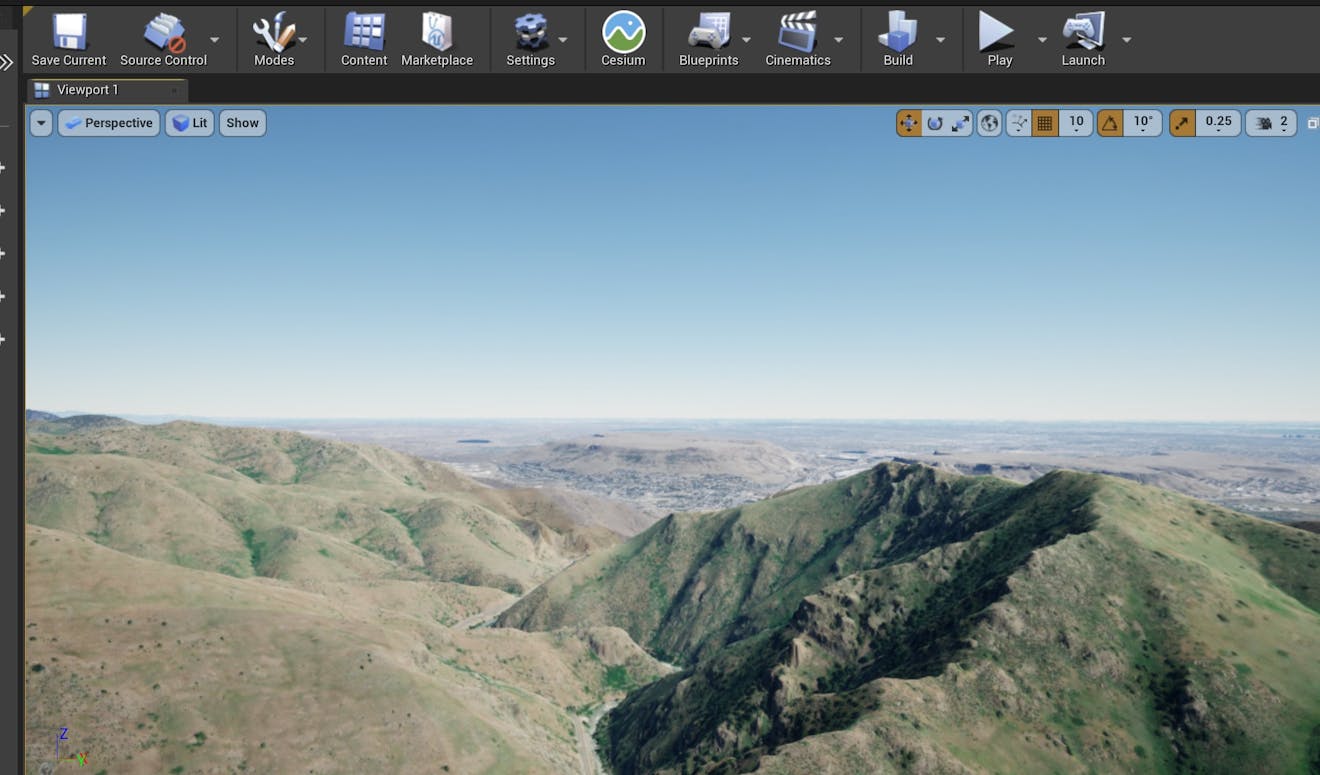
2Since the level has no lighting yet, add the CesiumSunSky actor to the scene. If you are unable to find the correct actor or your screen appears completely white, please follow the instructions in Step 3 of the Quickstart tutorial. Once the CesiumSunSky is added to the scene and the extended luminance range setting is enabled, you should be able to see the picturesque foothills of Denver under a beautiful blue sky.
3In order to set up a few detailed, real-world locations to start building sublevels on, import the Aerometrex Denver Photogrammetry and Nearmap Boston Photogrammetry 3D Tilesets. For a quick refresher on how to search for and add 3D Tilesets from Cesium ion, check out the Adding Datasets tutorial.
The Aerometrex Denver Photogrammetry 3D Tileset.
The Nearmap Boston Photogrammetry 3D Tileset.
Are either the Aerometrex Denver Photogrammetry or Nearmap Boston Photogrammetry missing from the asset list? Visit the Cesium ion Asset Depot page, find the photogrammetry tilesets, and click Add to my assets on both. Then return to Unreal Engine, close the Cesium ion Assets panel, and click the Add button again on the Cesium panel to re-open and refresh the asset list.
4In order to fly around the earth without becoming disoriented, add a DynamicPawn actor to the scene. This pawn adjusts its orientation as it is flown around the earth to always maintain the appropriate up direction. If you are having trouble finding the DynamicPawn actor, see Step 3 of the Quickstart tutorial.
1In the Levels panel, click on the Levels dropdown, then Create New... . Create a new level and name it "DenverRooftop". Make sure it is in the same folder as your "Globe" level.

Create the new sublevel.
2The new level should automatically appear in the Levels panel. Double-click on it to load it.
3Right-click on it and select "Assign to Layer" to assign it to your newly-created CesiumLayer.
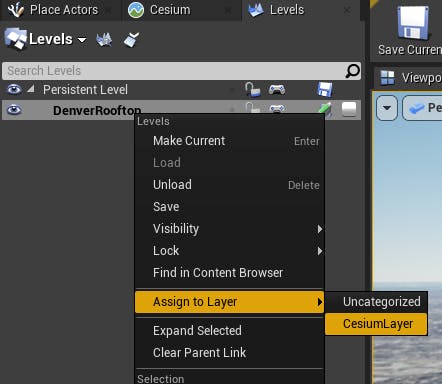
If the sublevel is not added to a levels layer with Streaming Distance disabled, you may notice the sublevel occasionally spawning very far out of place in play-mode. If you notice this at any time, check if all sublevels are properly placed in your custom levels layer and check that it has Streaming Distance disabled.
4You should now see several changes in the Viewport.
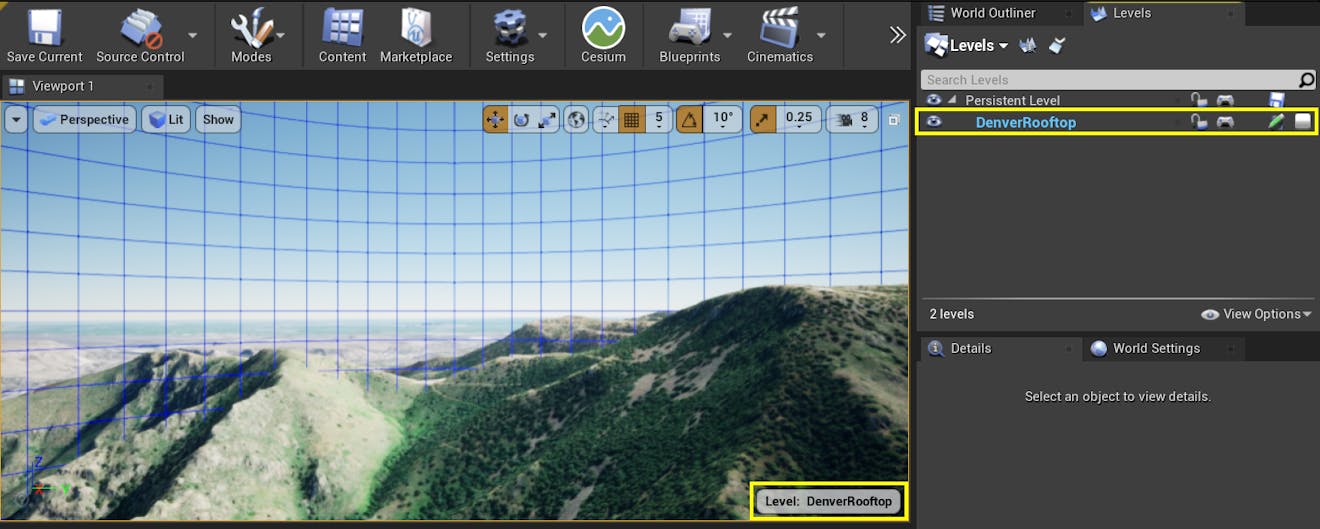
You will see a label in the lower-right corner of the Viewport. This label indicates which level is currently active. When you double-clicked on the DenverRooftop level, it changed the active level from Persistent Level to DenverRooftop. The Levels panel also indicates which level is currently active, by displaying the name in a bold blue font.
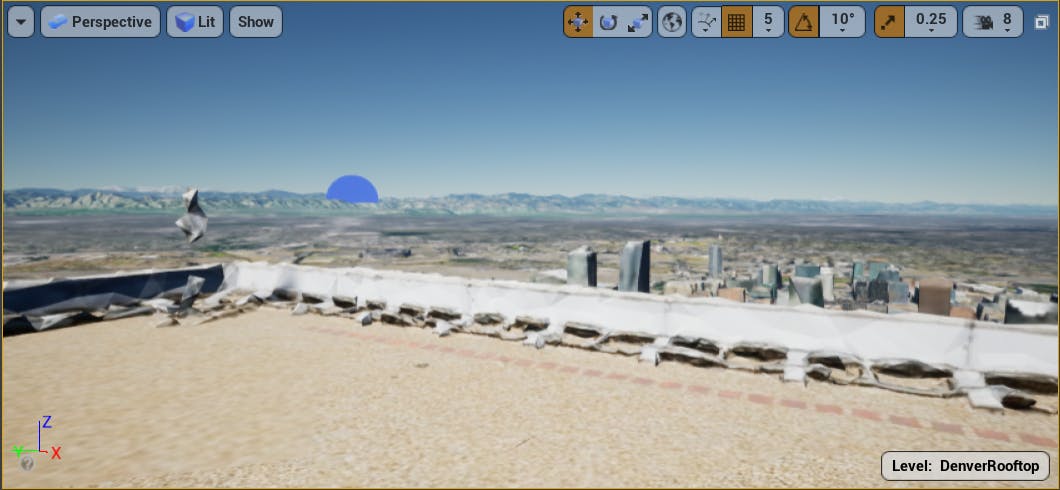
You will also see a blue wireframe sphere enclosing the area. This sphere designates the area of the sublevel. When the camera is outside of this radius, the sublevel's contents (any actors you place in it) will not be loaded. This radius can be changed on the CesiumGeoreference actor.
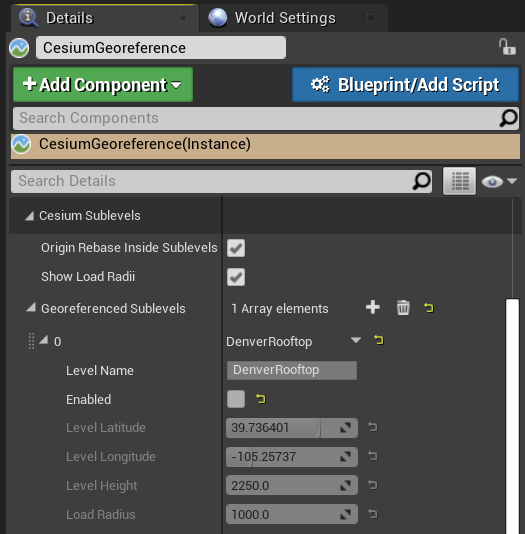
5Return to the World Outliner and select CesiumGeoreference. In the Details panel, find the Cesium Sublevels section. Your sublevel has already been added to the Georeference. By default, your sublevel is not Enabled, and the level's origin (Longitude, latitude, and height) are set to the location of the georeference origin when you first created the sublevel.

Once the sublevel is successfully georeferenced, you will see a new entry in the Georeferenced Sublevels array.
You'll also see a parameter called Load Radius, which can be used to control the radius of the blue wireframe sphere that appeared in the previous few steps.
All of these parameters are currently grayed out, but don't worry—they'll be enabled in the following steps.
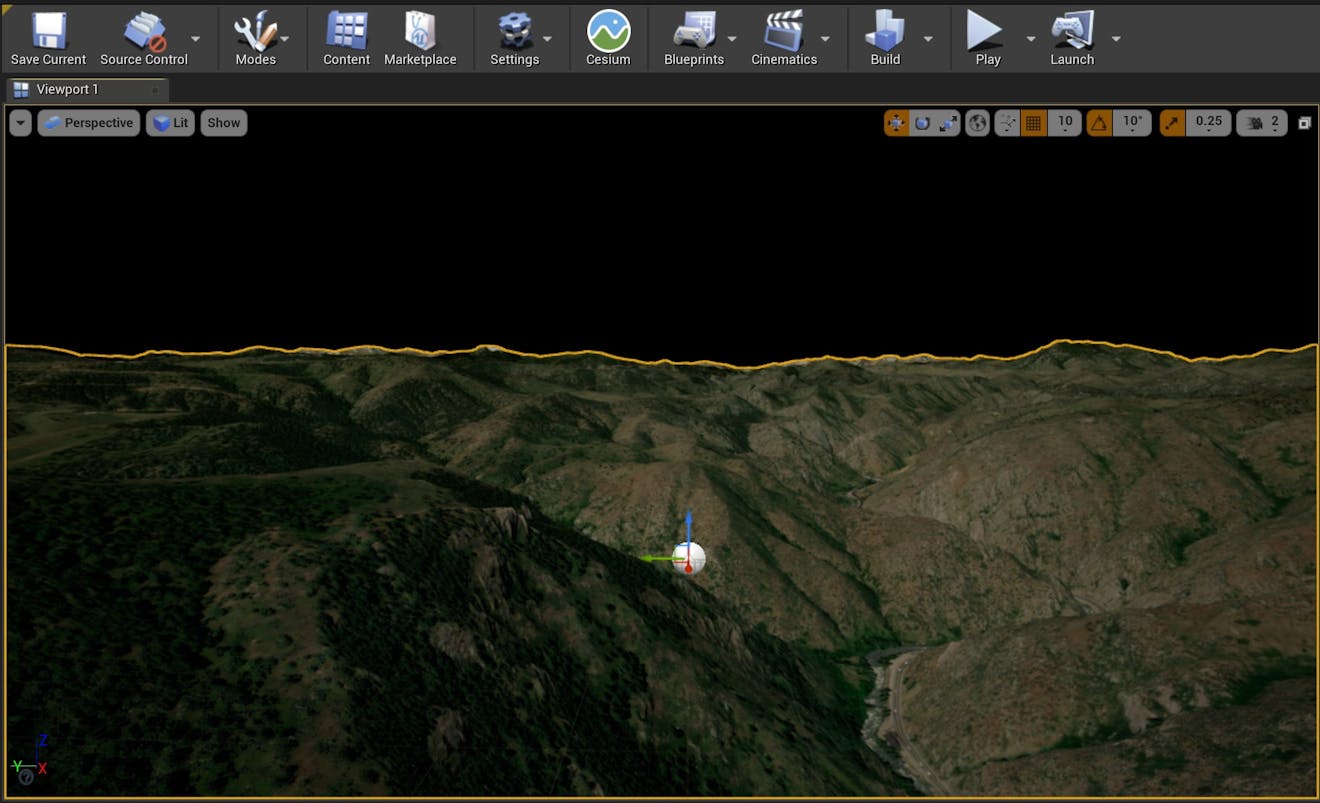
6Double-click on the Aerometrex Denver Photogrammetry tileset in the World Outliner. The view will change to center on this tileset. Using the arrow keys and the mouse, navigate to a distinctive location on the tileset. This tutorial uses the rooftop of one of the tallest buildings in the tileset. From this location, you can see the sublevel's current bounds in the distance.
Prefer not to fly? You can get to this location by entering the following coordinates on the CesiumGeoreference:
Origin Latitude: 39.743454
Origin Longitude: -104.988761
Origin Height: 1798.733479
Note that this will automatically move the sublevel.
7Press the Set Georeference Origin Here button in the CesiumGeoreference's Details panel. The level's bounds will automatically readjust to center around the new origin.

If you look again at the Cesium Sublevels section of the Details panel, you'll notice that the Enabled checkbox for the sublevel has been ticked, and the parameters below are no longer grayed out.
While a sublevel is the active level, changing the main georeference origin will enable the sublevel and also change its georeference origin.
8Save the sublevel and the persistent level by pressing control + shift + s on your keyboard, or through File->Save All.
1Create a new sublevel through the Levels panel and add it to the correct layer as described in steps 1-3 in the previous section. Name this sublevel "Boston".
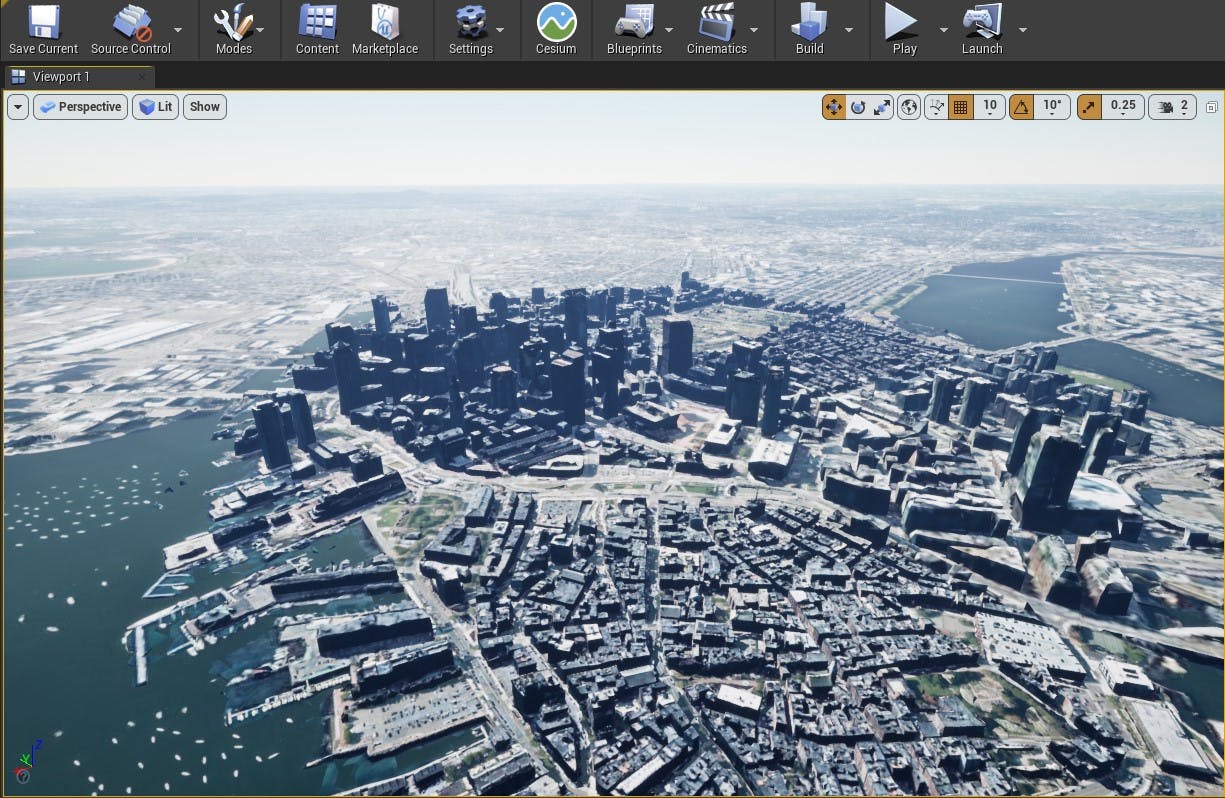
2Double-click on the Nearmap Boston Photogrammetry tileset in the World Outliner. The viewport will move to show the tileset. Find a suitable location in the tileset for your new georeference.
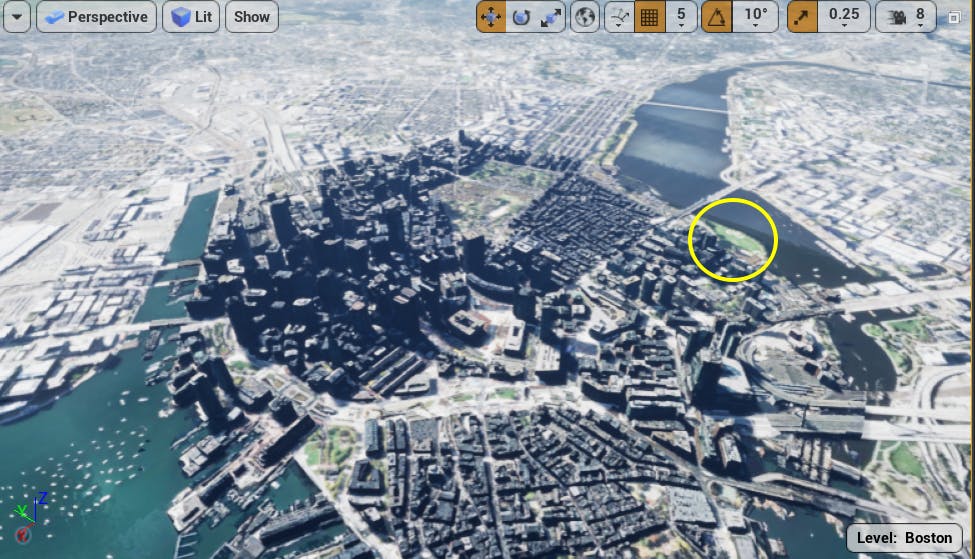
The Nearmap Boston tileset, with the site where the georeference will be circled.
3Make sure the new sublevel is the active sublevel by checking the label in the lower-right corner of the viewport. If it is not the active sublevel, double-click on it in the Levels panel. Then, set the georeference origin through the Place Georeference Origin Here button.
Alternatively, enter the following coordinates on the CesiumGeoreference:
Origin Latitude: 42.363565
Origin Longitude: -71.072255
Origin Height: -23.775415
4Save all levels.
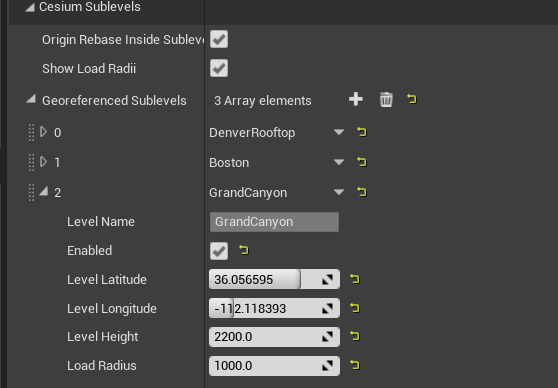
5Create one more sublevel, named "GrandCanyon". Add it to the correct streaming layer.
6This time, you'll set the sublevel's coordinates directly. In CesiumGeoreference's Details panel, find the GrandCanyon sublevel.

Tick the Enabled parameter. If the enabled parameter is grayed out, double-check that the level has been added to the correct streaming layer.
Once the level is enabled, set its Latitude, Longitude, and Height to the following:
Level Latitude: 36.056595
Level Longitude: -112.118393
Level Height: 220.0
7Unlike when you set the main georeference origin, the viewport won't change to your new location. To go to the new sublevel, double-click on it in the Levels panel.
8In the Levels panel, switch between your three sublevels by double-clicking on each one.
Notice how the georeference origin will automatically switch to the appropriate sublevel location, moving the camera with it.
Feel free to create more sublevels at locations that interest you!
The real usefulness of georeferenced sublevels becomes apparent once you build within sublevels. However, there are also some important considerations to keep in mind to avoid losing an object's position.
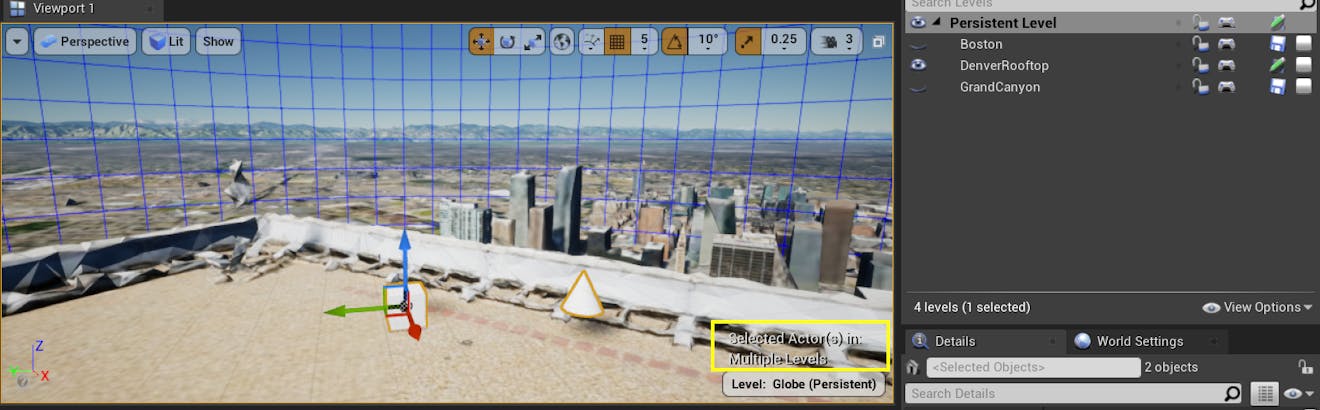
1Double-click on the Denver sublevel to activate it and move to its origin.
2From the Place Actors panel, drag a Cube into the scene.
You may see a warning when adding the actor that the actor will be placed outside the bounds of the current level. You can ignore this prompt and continue with placement. You can avoid this warning by unloading any other sublevels (Right click on the sublevel->Unload). Alternatively, the warning can be disabled in the Editor Preferences (Editor Preferences > Prompt when Adding to Level Outside Bounds).
3Switch to the Persistent Level and add a Cone. If you select both actors, it should indicate that they are not in the same level.
4Save the sublevel and the persistent level.
5Now, double-click on the Boston sublevel. You'll see that the cone has moved with you, but the cube is nowhere to be found. Because the cube was placed in the Denver level, it was automatically hidden when you switched to Boston. Objects in the persistent level, on the other hand, will follow you between locations.
6With the cone selected, right-click on the Boston sublevel. From the menu that appears, select Move Selected Actors to Level.
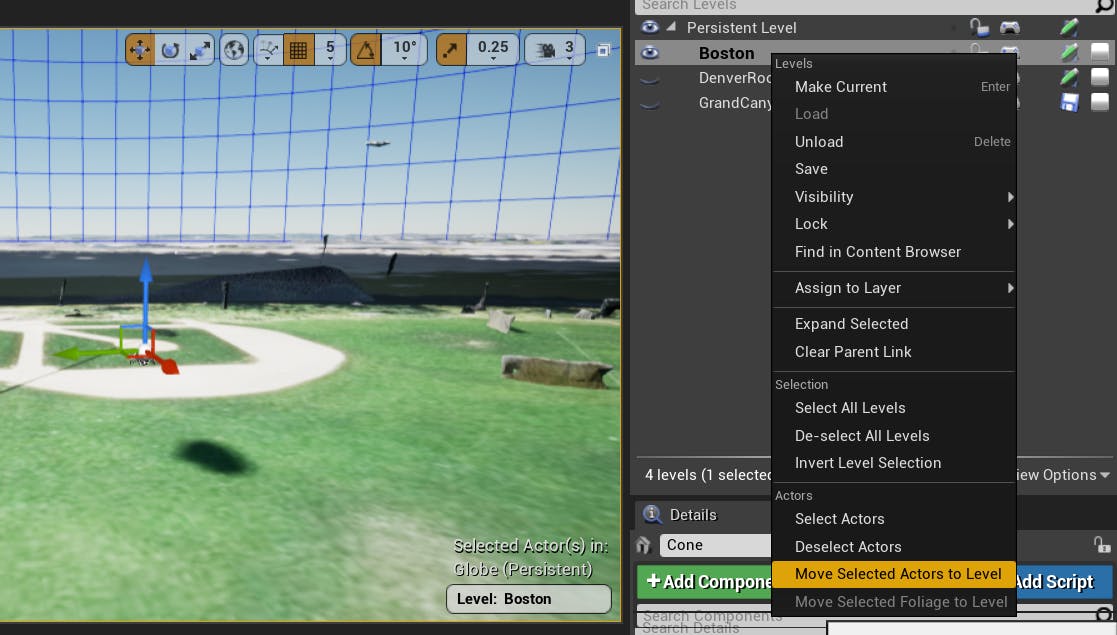
Now, if you switch back and forth between the two levels, the objects will only appear when you are in the correct level.
7Try building out each sublevel. Feel free to add your own characters, vehicles, foliage, physics objects, and game logic. Look to the Using custom controllers tutorial for some inspiration.
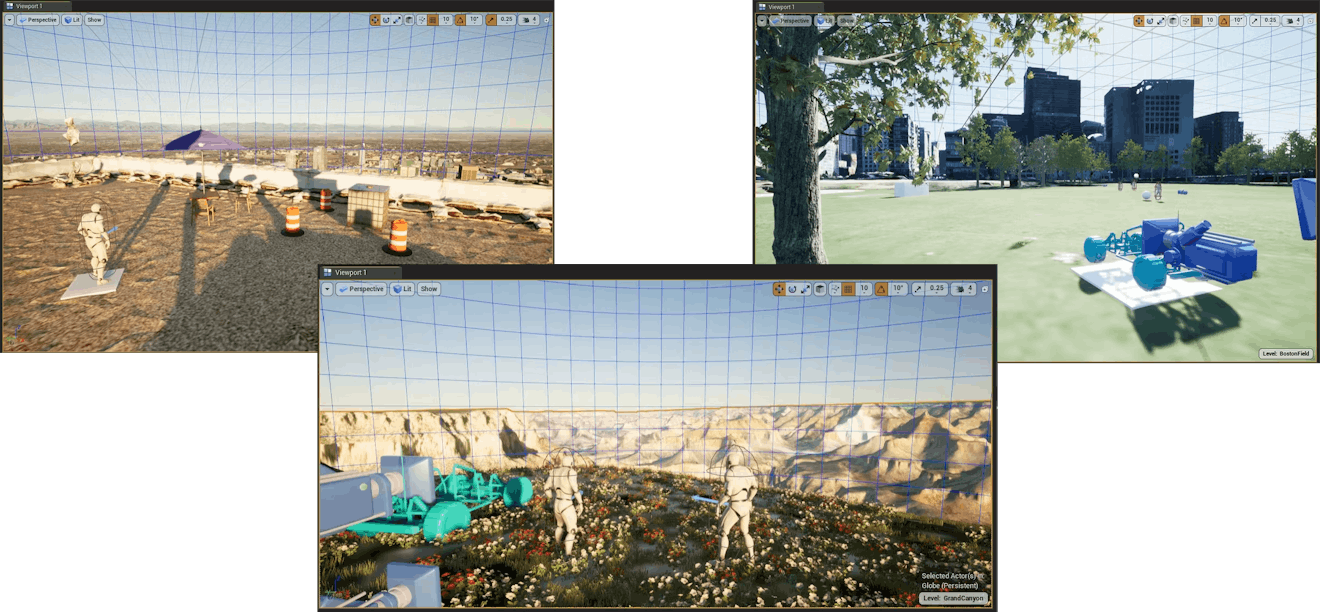
In this example, we added some props and character controllers to each of our sublevels.
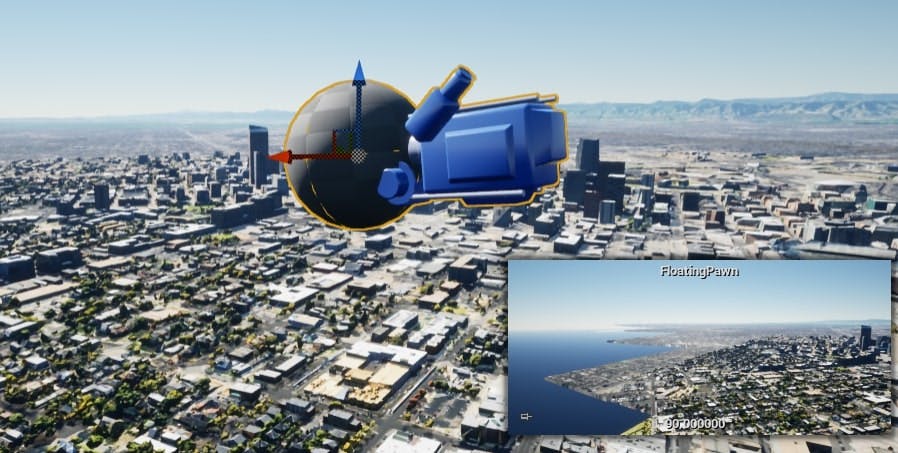
8Press Play, and try flying the DynamicPawn all the way into space and then finding your sublevels again. You may need a map!
In play-mode you can again see that the whole world is explorable. Any sublevels you create can be visited by simply flying there.
The following tips may help you as you build with sublevels.
Avoid changing the georeference origin while building inside a sublevel.
- At best, it will cause a slightly annoying sublevel misalignment which can be fixed by switching to the desired sublevel. At worst, the alignment of recently added objects will be completely lost.
If you accidentally change the georeference origin, you can use Ctrl-Z/Undo.
You can move placed assets between sublevels.
- If you find that you have placed a number of assets into the wrong level, select all the misplaced assets, right-click on the desired sublevel in the Levels panel, and click Move Selected Actors to Level.
Be careful with foliage, as it tends to add itself to the same level as the geometry it’s drawn on, which is usually the persistent global level. Since foliage actors do not appear in the World Outliner, it can be harder to move. To move foliage, switch to Foliage mode. In the foliage toolbar, under settings, use the checkbox "Place in current level".
Georeferenced sublevels are designed for non-georeferenced actors.
- The purpose of georeferenced sublevels is to georeference actor types that cannot be georeferenced in the typical ways described in the Placing Objects on the Globe tutorial. As such, you do not need to add 3D Tilesets or actors with a Globe Anchor component (such as DynamicPawn) to a sublevel.
Do not change or delete any of the sublevel georeferences in the Georeferenced Sublevels array on the CesiumGeoreference actor.
- Doing so will cause assets that were previously placed in the sublevel to no longer appear where they were originally placed.
If you wish to delete a sublevel, you can simply delete the corresponding level from the Content Browser. The entry will remove itself from the CesiumGeoreference actor.
If you wish to prevent a sublevel from being loaded during play, see the following section: Enabling and disabling sublevels.
On a sublevel's entry in the Georeferenced Sublevels array on the CesiumGeoreference, you’ll see an Enabled parameter.
This parameter allows you to ignore a sublevel during play without removing it entirely.
It also affects how the camera moves when switching between sublevels:
- If Enabled is checked on a sublevel, when you switch to that level the main georeference origin will automatically change to the sublevel’s origin, and the camera will be at the location of the sublevel.
- If Enabled is NOT checked on a sublevel, the camera and main georeference origin will not change when you double-click on that sublevel. This can be useful if you need to set a sublevel’s origin to where your camera currently is.
When the Enabled parameter is not checked, the longitude, latitude, height, and load radius of a sublevel can not be edited. However, if that sublevel is currently the active sublevel, changing the main georeference origin will change the position of the sublevel, and automatically enable it. See Changing a sublevel's georeference origin for more information.
There are several ways to change a sublevel's georeference origin.
- You can manually edit the longitude, latitude, and height of the sublevel in the Georeferenced Sublevels section of the Details panel.
Be advised that changing the sublevel’s origin manually will not change the main georeference origin, and so you will not see the camera view change until you switch to another level and back. - You can change the main georeference origin, either by manually entering the new coordinates or using the Place Georeference Origin Here button.
Changing the main georeference origin on the CesiumGeoreference Actor will always set the origin of the active sublevel, even if the Enabled parameter on that sublevel is not checked. This means it’s possible to change the location of a sublevel by mistake. If you want to avoid changing the position of any sublevels, be sure the persistent level is active before changing the georeference origin.
If you make a mistake in changing the georeference origin, you can use Ctrl-Z/Undo.
In the global-scale world provided by Cesium for Unreal, it's easy to become lost when aimlessly flying around. Fortunately, using the georeferencing system built into Cesium for Unreal, it is straightforward to not only determine your location on the globe, but also to move towards a target location. The DynamicPawn comes with built-in functionality to fly between locations.
Learn how to use the DynamicPawn’s fly-to functionality in the next tutorial.
Check out the next tutorial in the series to learn how to transition between global locations.