Optimizing 3D Tiles Streaming in Cesium for Unreal with Occlusion Culling
In order to improve 3D Tiles streaming performance in Cesium for Unreal, we have recently integrated Unreal Engine’s occlusion culling system into our tile selection algorithm.
Occlusion culling refers to the technique of avoiding the rendering of objects when they are completely obscured by other objects in the scene. In dense scenes, this allows for significant performance improvements - all without diminishing the quality of the render.
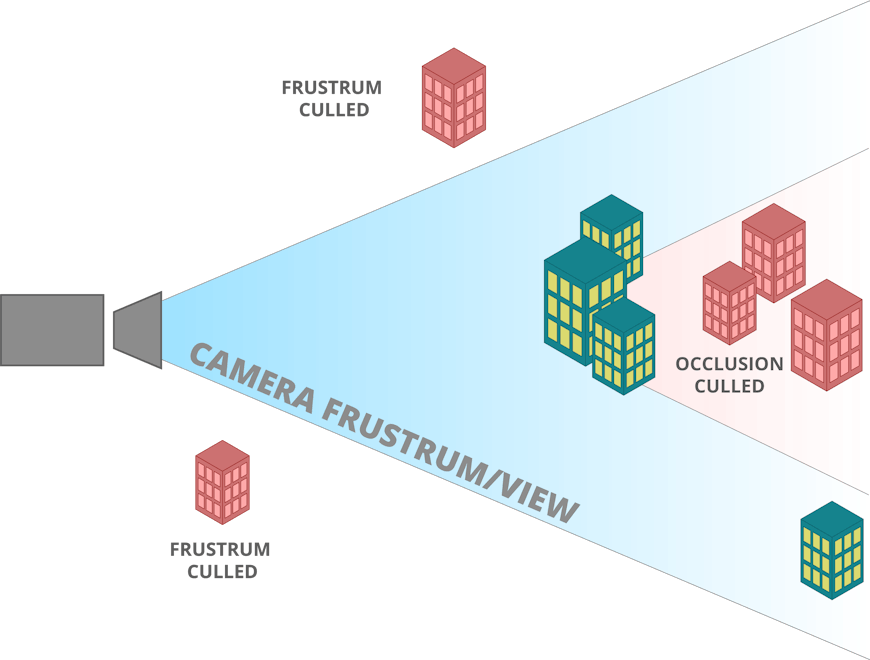
Fig 0.0: In this example, two buildings are frustum culled (since they are outside the camera’s view) and three buildings are occlusion culled (since they are blocked by other buildings).
In the above image, the green buildings (the occluders) occlude the red buildings to the right (the occludees). Since the red buildings will not be visible to the camera, they do not have to be rendered.
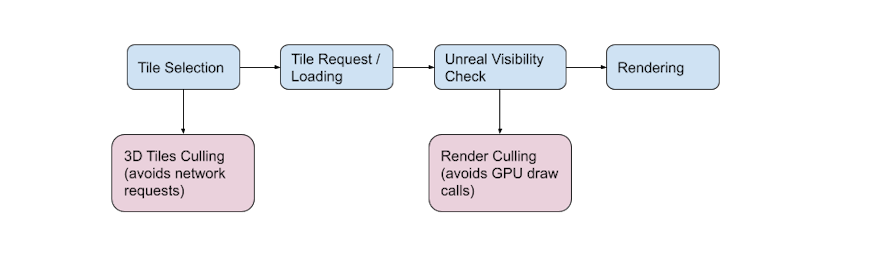
Fig 0.1: The general stages of a tile, from tile selection to rendering.
The above diagram shows the stages a tile goes through before it gets rendered on the screen. The runtime 3D Tiles selection algorithm selects and requests tiles based on the current camera view. Once the requested tiles are done asynchronously loading, the 3D Tiles meshes are handed over to Unreal Engine’s rendering pipeline.
Culling can be used in any of these stages to save computation and resources, but culling earlier is always better since it reduces unnecessary computation later in the pipeline. Unreal Engine culls tiles during the visibility check stage to avoid rendering them if they are not visible. Culling a tile during selection helps avoid requesting and loading the tile in the first place.
Cesium for Unreal has already leveraged 3D Tiles frustum culling and distance-based “fog” culling to reduce unnecessary tile requests. This post explores how 3D Tiles occlusion culling was implemented in Cesium for Unreal to save further tile requests in dense scenes.
Occlusion culling can refer to a variety of techniques. Occlusion culling approaches are usually broken down into three broad categories: precomputed, object-space, and image-space.
Unreal Engine has precomputed visibility volumes, sometimes known as potentially visible sets (PVS) outside of Unreal Engine. Each precomputed visibility volume has a corresponding set of objects. This set contains every object that could possibly be visible when the camera is within the volume. At runtime, this set is used to quickly narrow down candidate objects for rendering based on the camera position (some of these objects may still be frustum culled). As the name implies, this set must be precomputed offline. Precomputed visibility volumes are a useful optimization for closed-off parts of a game level where, for example, a player may be walking through a narrow hallway that occludes most of the outside world. However, in the context of 3D Tiles and streaming large-scale geospatial content, it becomes nearly impossible to permutate every possible layout of the geometry or potential camera positions to precompute visibility information.
Fig 1.0: Precomputed visibility volumes visualized in Unreal Engine. In this level, some sections of the cliffside may not be visible from many of the volumes along the walkway - this information can be precomputed.
Object-space approaches are another class of occlusion culling techniques where conservative, axis-aligned representations of occluder and occludee geometry are stored in a bounding volume hierarchy (BVH) - typically an octree is used. Each occluder volume casts a “visibility shadow” into the object BVH opposite the direction of the camera. The BVH has to be traversed once per-occluder to find occluded objects (objects within the “shadow” cast by the occluder). The axis-aligned representations of occluders can optionally be fused to improve the occlusion rate and reduce the number of independent BVH traversals.
Occluder fusion, axis-aligned occluder simplification, and BVH traversal are all CPU-intensive tasks. To support 3D Tiles with this method, these tasks would have to be continually performed at runtime since the set of occluders will continually change as the camera flies around the world. Overall, the object-space approach scales poorly with the number of occluders and can be overly conservative.
Fig 1.1: Here objects in the scene are stored in an octree. The red dot represents the camera. The occluder (yellow) casts a “shadow”(blue) that culls all the objects hidden behind the occluder.
Credit: “Evaluation of Object-Space Occlusion Culling with Occluder Fusion” Mattias Karlsson.
Image-space approaches are currently the most popular, scalable, and effective form of occlusion culling. These approaches leverage the GPU and are much more robust to dynamic and streamed objects, with minimal overhead. The rest of this post focuses on a specific combination of image-space techniques used in Unreal Engine and Cesium for Unreal.
To determine precisely whether an object is occluded is expensive and counterproductive to the goal of occlusion culling. Consider the analogous situation with frustum culling - it would be enormously time-consuming to check every vertex in an object to decide if all of them are off-screen. Instead, it is much faster and just as useful to check that the object’s bounding volume is off-screen. Similarly, we can test an object’s bounding volume for occlusion instead of the object’s geometry itself, which will be computationally more efficient. Crucially, our approximated occlusion results will still be conservative - we will never incorrectly assume an object is occluded.
To implement occlusion culling in practice, each object should have a precomputed, well-fit, bounding volume that contains all of the geometry. Generally, oriented bounding boxes (OBBs) fit best (e.g., buildings can often be bound tightly with OBBs). Axis aligned bounding boxes may have a slightly worse fit, but may sometimes be preferred due to easier integration into scene octrees. Bounding spheres are usually the worst fitting and lead to extremely conservative occlusion results.
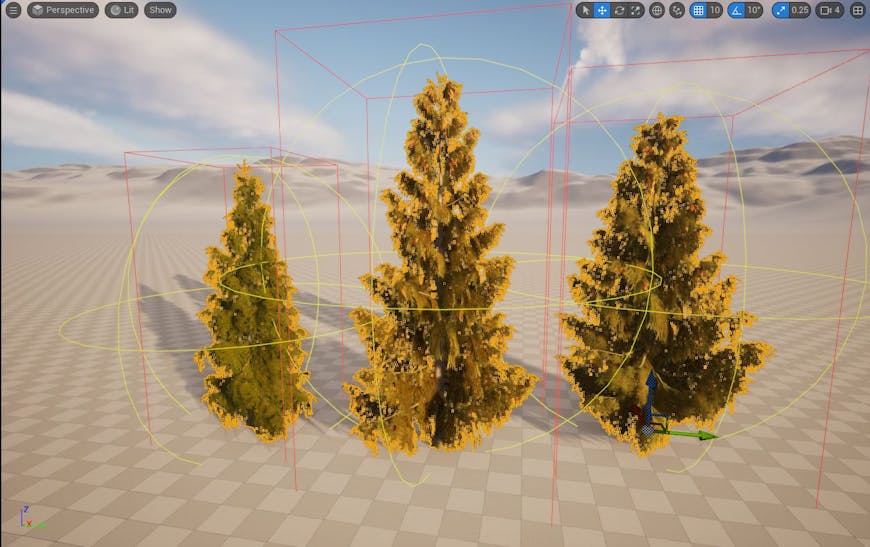
Fig 1.2: Trees with bounding spheres (yellow) and bounding boxes (red) are shown. Note that the bounding spheres are generally less tightly fitting than bounding boxes. Unreal Engine uses axis-aligned bounding boxes for occlusion culling.
Depth buffers are single-channel images where each pixel represents a distance from the camera. A depth buffer for the current view with all possible occluders in the scene should be drawn in a prepass. As an optimization, the depth buffer from a previous frame can be considered for use instead, but this will cause slight inaccuracies in the occlusion results depending on the amount of motion between frames.
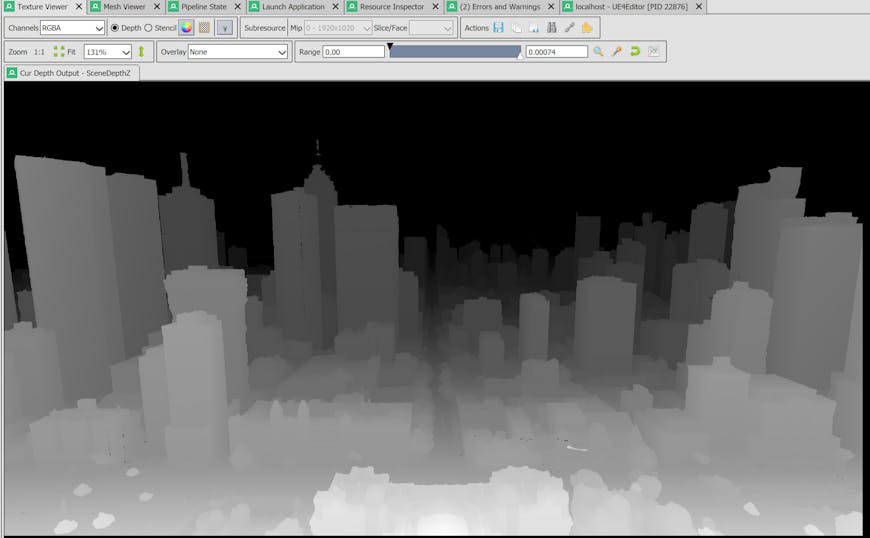
Fig 1.3: Unreal Engine uses a depth-only prepass of all visible occluders to create a depth buffer before the occlusion tests pass. This is taken from a RenderDoc frame capture of Unreal Engine.
To check if an object is occluded, draw the object’s bounding volume into the depth buffer and check how many pixels were modified. Modern graphics APIs usually expose efficient, hardware-optimized functionality to count the number of pixels rasterized in a draw call.
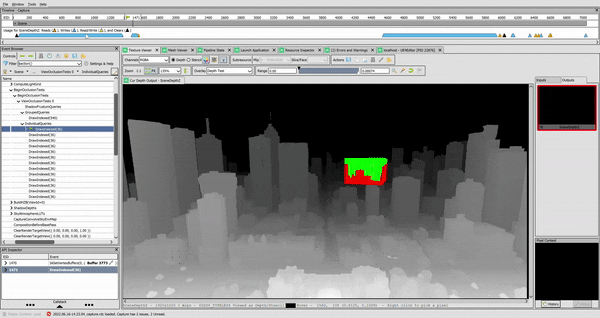
Fig 1.4: The bounding volumes are drawn into the depth buffer to test for occlusion. A non-zero number of green pixels indicates that the corresponding object is visible.
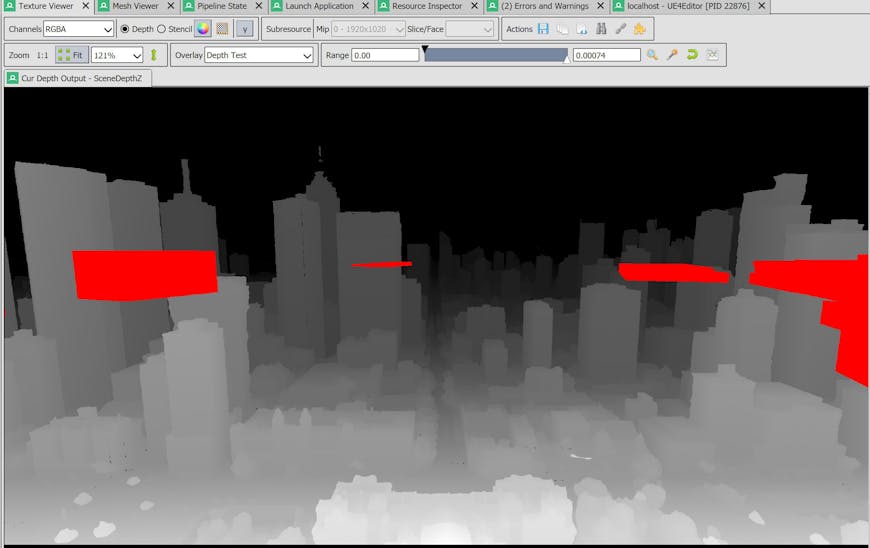
Fig 1.5: In Unreal Engine, previously occluded objects are batched together into grouped occlusion queries in subsequent frames. This is an optimization to reduce the number of occlusion queries for continually occluded objects. In this case, all the objects in the batch remain occluded.
If no pixels were rasterized, it means the entire bounding volume was hidden by existing geometry in the scene. Therefore, the object is occluded and does not need to be rendered.
The occlusion results need to be reflected back to the CPU before they can be used for culling. In practice, this requires careful pipelining to avoid introducing bottlenecks around GPU - CPU synchronization. Most implementations have to settle for a 2-3 frame delay in receiving occlusion results. They use occlusion results from several frames ago to determine what to cull in the current frame, even though the scene may have changed in the meantime. Notably, this breaks the conservativeness assumption of occlusion culling - newly unoccluded objects may appear invisible for up to 2-3 frames.
3D Tiles is a hierarchical, spatial indexing standard for streaming massive-scale real-world 3D content. In 3D Tiles, 3D content is organized into a hierarchical level of detail (HLOD) where each tile has an associated bounding volume. The original, full-resolution geometry is spatially subdivided into leaf tiles. Inner tiles of the hierarchy are populated with progressively lower LOD (level-of-detail) representations of the original content. This HLOD organization allows the tile selection algorithm to choose the ideal LOD based on distance from the viewer. Instead of traditional zoom levels, 3D Tiles are based on a geometric error LOD selection to allow multiple levels in the same view.
The 3D Tiles hierarchy is defined using a tileset, which contains the pre-computed information about the bounding volume of each tile.
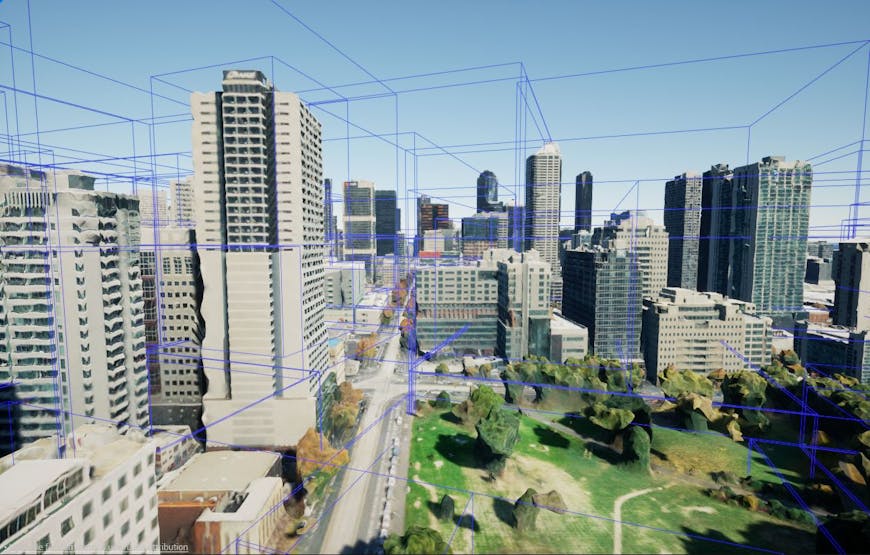
Fig 2.0: A 3D tileset with visualized bounding volumes is shown in Cesium for Unreal. 3D Tiles allows high-detail models to be expressed hierarchically for efficient streaming.
3D Tiles that are rendered in Cesium for Unreal automatically make use of Unreal Engine’s built-in occlusion system. In Cesium for Unreal, the streamed-in 3D Tiles get turned into static meshes at runtime. These meshes usually represent terrain, buildings, and other stationary geometry, so the movability settings of these meshes can be set to “static.” Unreal Engine takes these static meshes and applies occlusion testing as needed to determine which ones to draw in its rendering pipeline. By setting the objects to static, we enable the engine to make further optimizations such as batching occlusion queries for previously occluded meshes.
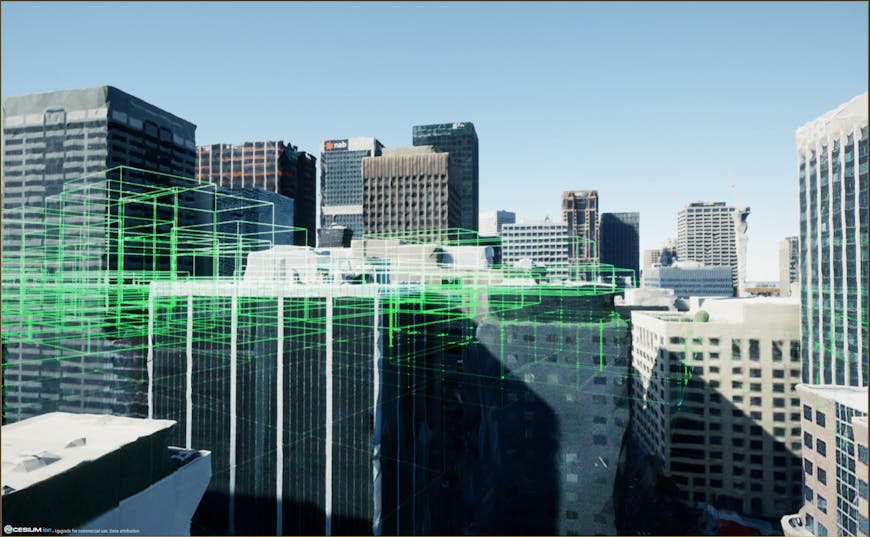
Fig 2.1: Renderer-level occlusion culling employed by Unreal Engine on the streamed meshes created by Cesium for Unreal. Each green bounding box represents an occlusion culled mesh in the background that is hidden behind the visible buildings in the foreground.
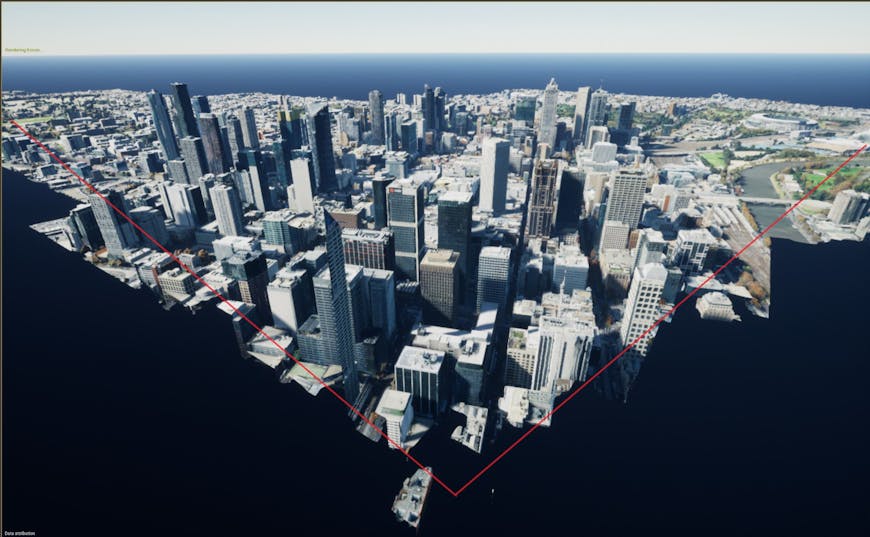
Fig 2.2: Here, the camera view from Fig 2.1 is frozen and the scene is viewed from above. The red lines roughly indicate the position and field-of-view of the frozen camera. This is how the scene looks with only frustum culling and no occlusion culling - 192 primitives are being rendered. Note that a tile may have multiple primitives.
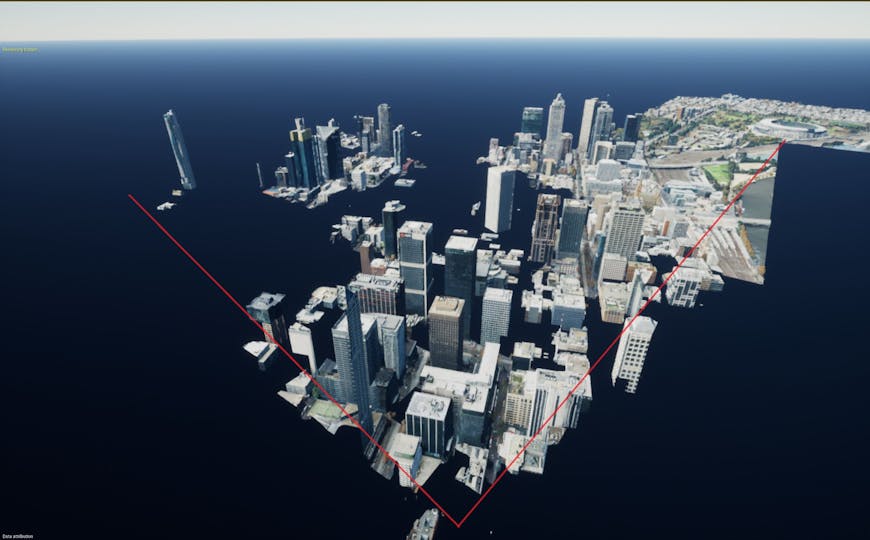
Fig 2.3: Here is the same frozen view with both frustum culling and occlusion culling turned on - only 96 out of the original 192 primitives are being rendered. Notice all the primitives that are missing in this picture that are visible in Fig 2.2. Unreal is saving nearly 50% of the original rendering cost by culling sections of the scene that are deemed to be occluded.
Unreal Engine’s occlusion system does not actually start culling these tiles until Cesium for Unreal has already fetched, processed, and loaded them. For example, compare Fig 2.2 and Fig 2.3 - extra tiles are being loaded even when Unreal Engine is not rendering them due to occlusion.
Unreal Engine already saves the unnecessary draw calls for occluded objects, but the tile selection algorithm can go one step further and save unnecessary network requests for occluded tiles. As a bonus, this will also allow the visible tiles to load in faster.
Cesium for Unreal’s approach to occlusion-informed tile selection consists of the following steps.
Occlusion results can take several frames to arrive. By default, we do not traverse past a tile if it is still waiting for occlusion results. This avoids initiating wasteful network loads for tiles that we may soon find to be occluded.
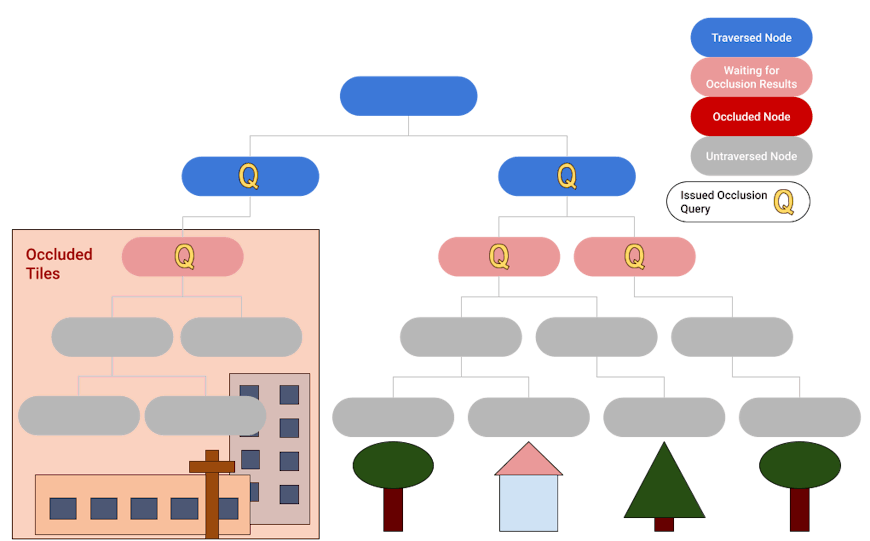
Fig 2.4: We wait to traverse past tiles that have pending occlusion results.
Once it’s discovered that a tile is occluded, the selection algorithm no longer needs to traverse the tile’s subtree since all the descendants are guaranteed to be occluded as well.
The selection algorithm assumes a tile remains visible this frame if it has at least one child that was previously confirmed to be visible. This assumption allows the selection to avoid issuing redundant occlusion queries for inner tiles that may be “obviously” unoccluded. Note that once all the children of a tile are confirmed to be occluded, the tile will automatically start issuing occlusion queries again. Note in Fig 2.5 below, we save four occlusion queries by applying this assumption.
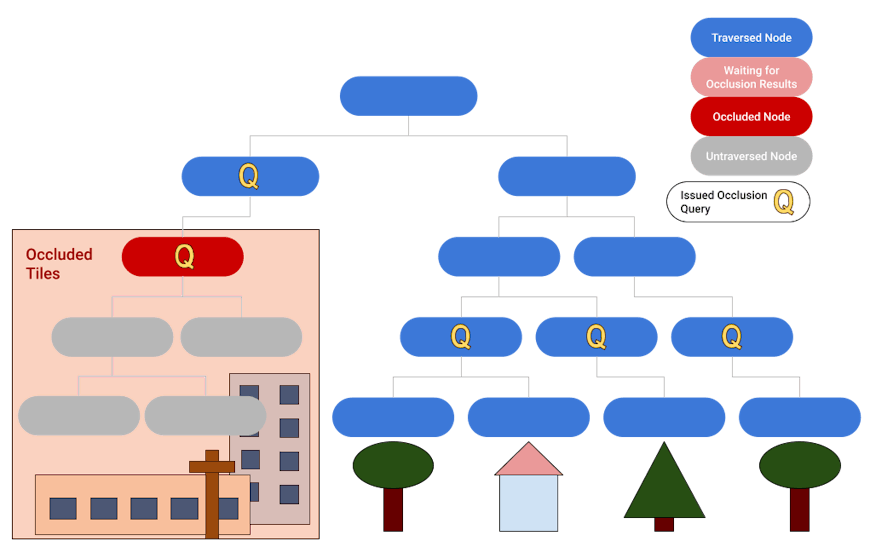
Fig 2.5: The selection algorithm does not traverse past occluded nodes. Inner nodes with any previously traversed grandchildren do not request occlusion.
When a tile is determined to be occluded, one option is to simply not load it. This will not negatively affect the current view, but could create noticeable holes as the camera moves to disocclude the previously occluded tile. These holes can sometimes be plugged by switching to an already-loaded, lower LOD tile. But this is not possible if the lower LOD tile has any previously-rendered descendants (previously visible detail would disappear and be replaced with a potentially, very low detail tile).
Fig 2.6: Directly culling tiles can cause holes in later frames.
Instead of “culling” the loading of occluded tiles, the selection algorithm can simply avoid further refining the tile. Furthermore, it is not necessary to traverse an occluded tile’s children, since the entire descendant subtree is implied to be occluded as well. Although the occluded tile itself is loaded, this approach saves loading all of the tile’s descendants. This solves the holes issue described above, at the cost of having to load a few more tiles.
Since occlusion results are only used to determine whether to refine a tile, it’s not necessary to issue occlusion queries for tiles that don’t need to be refined (e.g., leaf tiles and tiles that have sufficient detail). Notice the leaf tiles on the right side of Fig 2.5 do not issue occlusion queries. Note that even though the selection algorithm sometimes loads non-visible tiles, Unreal Engine still saves the draw calls using the renderer-level culling strategies mentioned previously.

Fig 2.7: Using non-refinement instead of culling eliminates holes, but causes some subtrees to initially load slower.
The same camera view from Fig 2.1-2.3 is again shown below. This time the effect of occlusion culling in the 3D Tiles selection algorithm is visualized. Unlike Fig 2.2 and 2.3, the below pictures do not show renderer-level culling. Instead they show the number of tiles loaded by the tile selection algorithm for the current view (some of the selected tiles may still be culled later by the renderer).
Note that with the default settings, the selection algorithm does not load tiles outside the frustum.
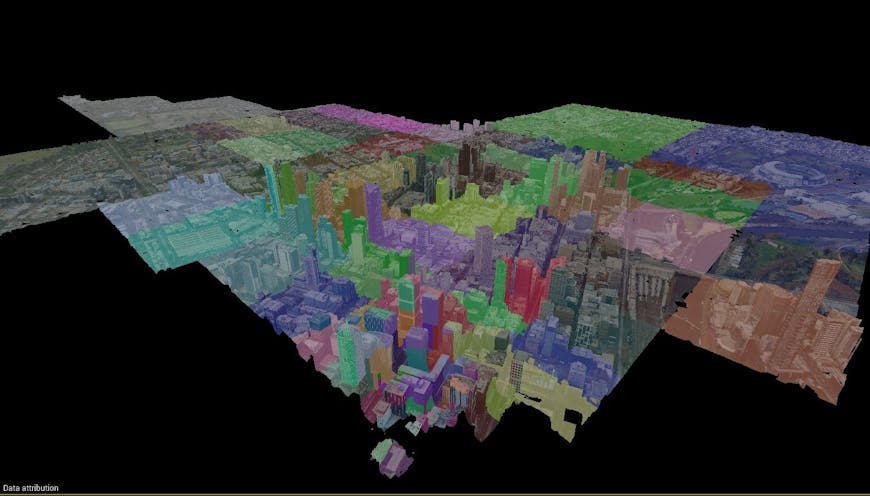
Fig 3.0: The same camera view from Fig 2.1-2.3 is again shown from above. Each tile is tinted with a random color to make it easier to tell the tiles apart. In this first picture, 3D Tiles occlusion culling is off and 93 tiles were loaded.
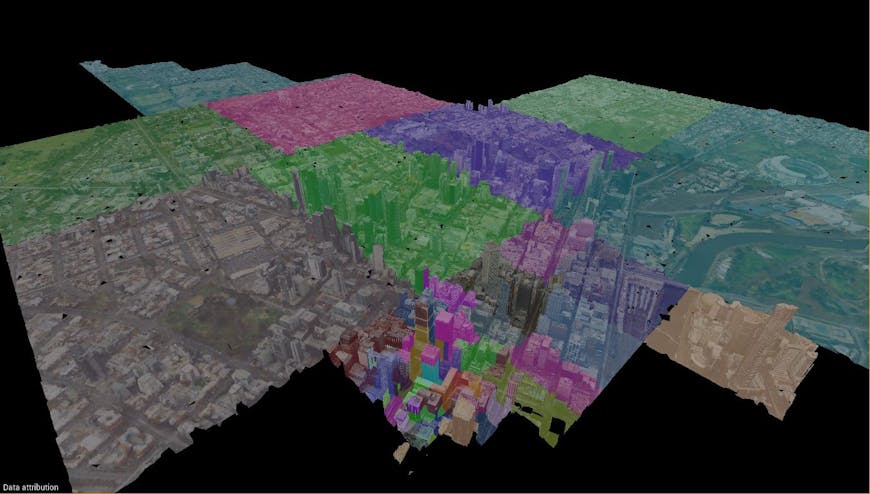
Fig 3.1: Here 3D Tiles occlusion culling is turned on, only 51 tiles are loaded. As mentioned in the previous section, the selection algorithm refuses to refine occluded tiles. Compared to the above picture, notice how there are fewer and lower-detail tiles in the areas that are largely occluded from the camera. On the other hand, the unoccluded areas closer to the camera are unaffected by occlusion culling.
Occlusion culling will most benefit dense scenes with high depth complexity. Ground-level scenarios such as walking or driving will tend to have a higher occlusion ratio compared to aerial scenarios like flight simulators.
We tested a few representative scenes and camera movements with and without occlusion culling to quantify these generalizations. The scripted camera flights below are representative of the typical case, ideal case, and worst case for occlusion culling with 3D Tiles.
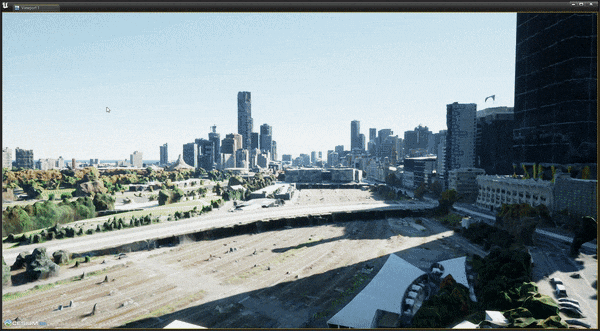
Fig 3.2: We use a scripted fly-through of the Melbourne tileset to compare total tile loads with and without occlusion culling. This flight is representative of a typical exploration of a city tileset.
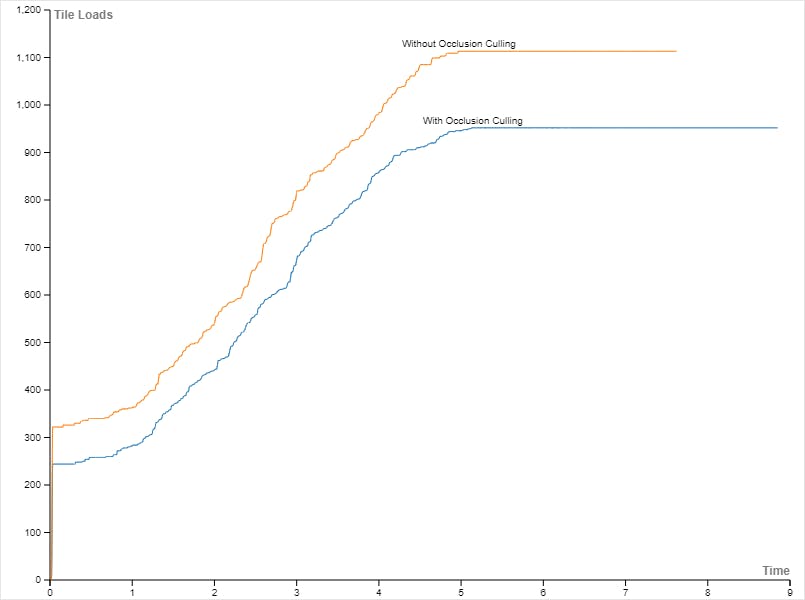
Fig 3.3: The tile loads for the scripted flight in Fig 3.2, with and without occlusion culling. This is a typical-case performance for occlusion culling in Cesium for Unreal. Occlusion culling saves around 17% of the tile loads in this case.
Fig 3.4: A ground-level fly-through of the Melbourne tileset with high depth complexity.
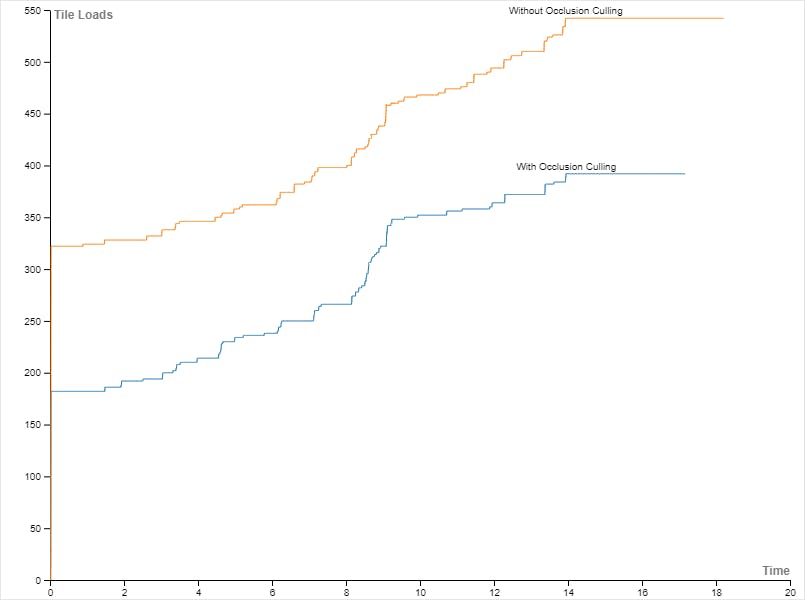
Fig 3.5: The tile loads for the scripted flight in Fig 3.4, with and without occlusion culling. This is the ideal viewing scenario for occlusion culling. Occlusion culling saves around ~31% of the tile loads in this case.

Fig 3.6: An aerial fly-through of the Melbourne tileset with very few opportunities for occlusion.
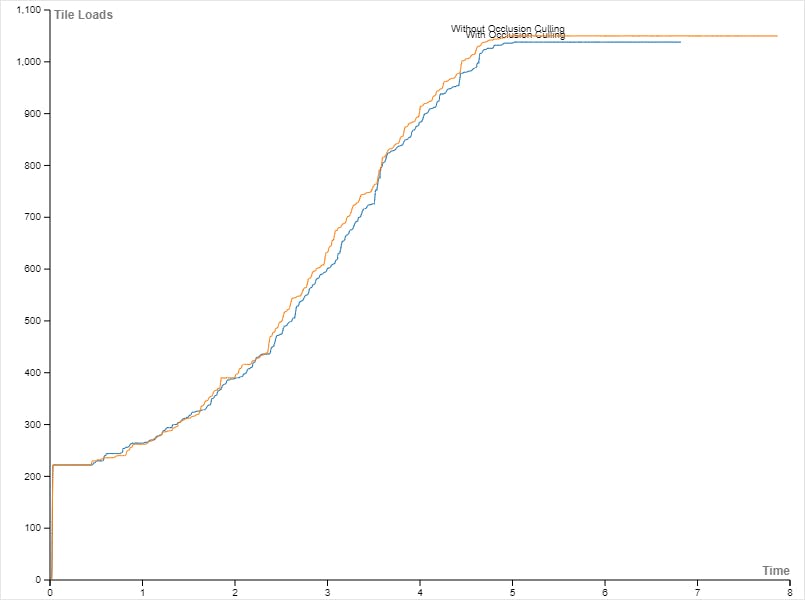
Fig 3.7: The tile loads for the scripted aerial flight in Fig 3.6, with and without occlusion culling. Aerial views, such as flying high over cities and terrain with deep unobstructed horizon views, do not typically benefit much from occlusion culling. In use cases where occlusion is rare, there is a slight, but almost imperceptible, compute overhead due to additional relatively simple occlusion checks. You may try disabling occlusion culling on the Cesium3DTileset actor to save on occlusion query overhead.
These improvements and others are available as of Cesium for Unreal v1.16.2, available now. If you already have Cesium for Unreal, update the plugin version from the Epic Games Launcher.
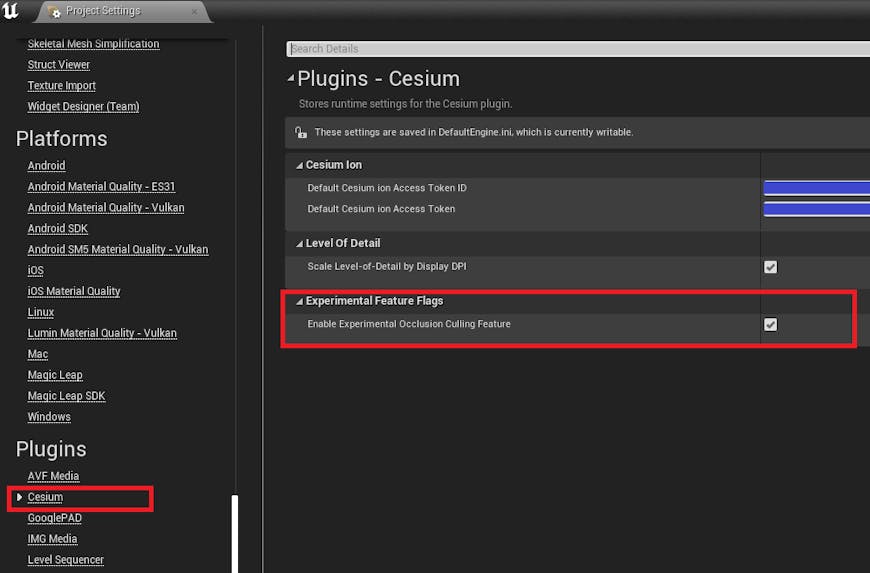
To enable experimental 3D Tiles occlusion culling support, go to Edit → Project Settings, scroll down to the Plugins section and click on Cesium on the panel to the left. Check Enable Experimental Occlusion Culling Feature.
If you are new to Cesium for Unreal, this is a great time to try it out - check out our Quickstart Tutorial to get started!