Placing Objects on the Globe
Having created a Level and imported some real-world assets like Cesium World Terrain or a photogrammetry model of a city, the next thing you will likely want to do is add some other objects from the standard Unreal Engine toolbox: meshes, foliage, characters, and many, many more. Fortunately, Cesium for Unreal is well-integrated with the Unreal Engine workflows you are already familiar with.
Still using Cesium for Unreal v1? We recommend upgrading as soon as possible, but you can find the tutorial for the old version here.
In this tutorial, you will:
- Add some simple Unreal Engine objects to a level.
- Learn in more detail how Cesium for Unreal integrates into Unreal Engine, which will help you avoid surprises as you build your levels.
- You have a world created with Cesium for Unreal, perhaps created by following the Quickstart or the Adding Photogrammetry tutorial. Now you want to add some more Unreal Engine objects to it.
Adding objects near the origin of the CesiumGeoreference is the same as adding them to any other Unreal Engine level.
1If the editor camera is not reasonably near (within a few kilometers of) the CesiumGeoreference already, click the CesiumGeoreference in the Outliner and then click Place Georeference Origin Here in the Details panel. You may also want to reset the Location of the DynamicPawn to (0, 0, 0) so that Play mode starts in the same place.
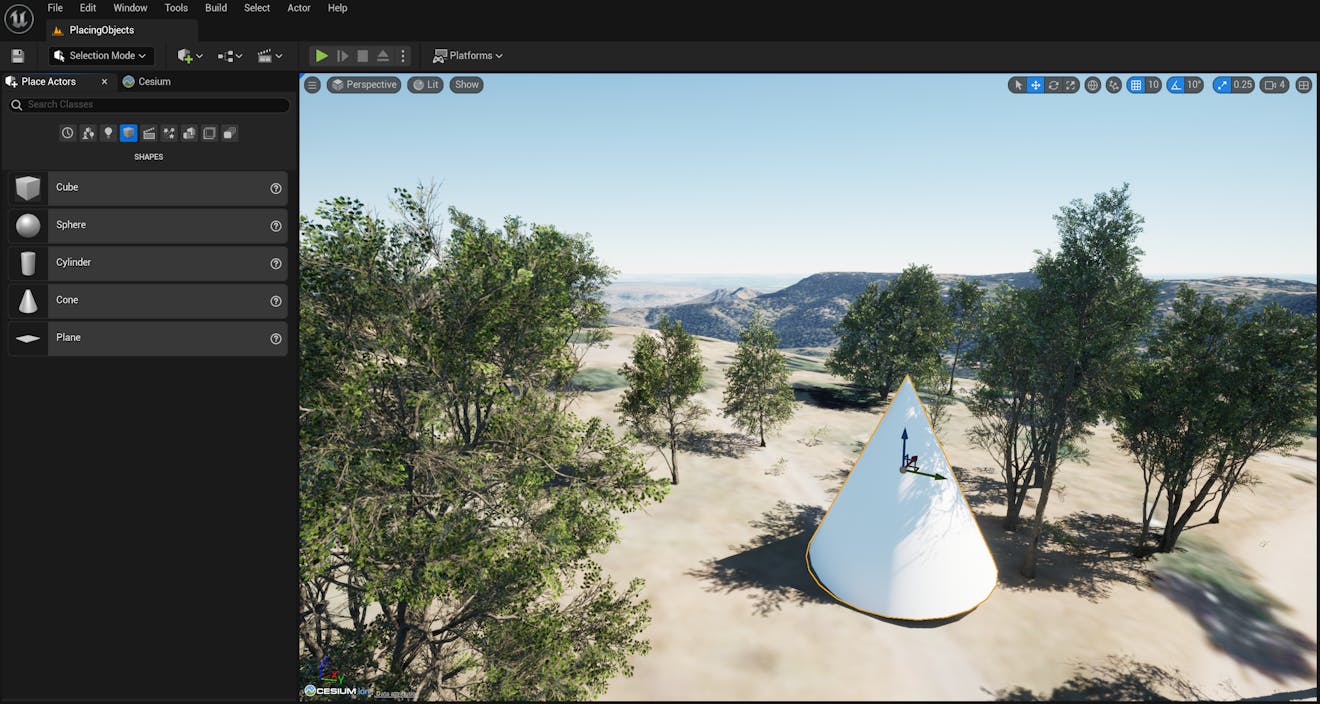
2Click Window -> Place Actors to open the Place Actors panel.
3Drag a static mesh object, such as a Cone, into the level viewport.
4Use the Level Editor viewport to move, rotate, and scale the static mesh as desired.
Any normal Unreal Engine object can be added to the level in the usual way. However, there are some details that will be useful to know more about, and they are discussed below.
Cesium for Unreal’s Cesium3DTileset actors stream massive datasets into your application in a view-dependent manner. They perform two functions that are essential for rendering datasets that can easily measure in the terabytes or larger: level-of-detail and culling.
Level-of-detail means that the complete tileset is broken into a multi-resolution pyramid of individual pieces, called tiles. In broad terms, Cesium for Unreal selects high-resolution tiles for parts of the model that are close to the viewer, and lower-resolution tiles for parts that are farther away.
Culling means that we don’t load or render parts of the model that aren’t visible. A key form of culling is view-frustum culling, which excludes tiles that are behind the viewer or otherwise outside of its field-of-view. Culling these tiles means less data downloaded and less load on Unreal Engine to render the tileset, improving runtime performance and efficiency.
However, culling comes with an important caveat: if you don’t see it, it doesn’t exist. Culled tiles are not sent to Unreal Engine at all, which means:
- They don’t cast shadows.
- They can’t cause any physics interactions.
Imagine a character in front of you, standing on the Cesium World Terrain surface. Unreal Engine’s gravity simulation holds the character to the surface. Now you turn around so your back is to the character. The tile the character was standing on is no longer visible, and so it will be culled. Suddenly the character is hovering over a void, and they start falling to their doom!
Similarly, a tall building will stop casting a shadow when you turn our back on it, because it truly ceases to exist in the Unreal Engine world.
To avoid these problems, we can disable view-frustum culling for tilesets that are important for physics, shadows, and other purposes. Click the Cesium3DTileset in the Outliner, find the Cesium -> Tile Culling section in the Details panel, and uncheck Enable Frustum Culling.
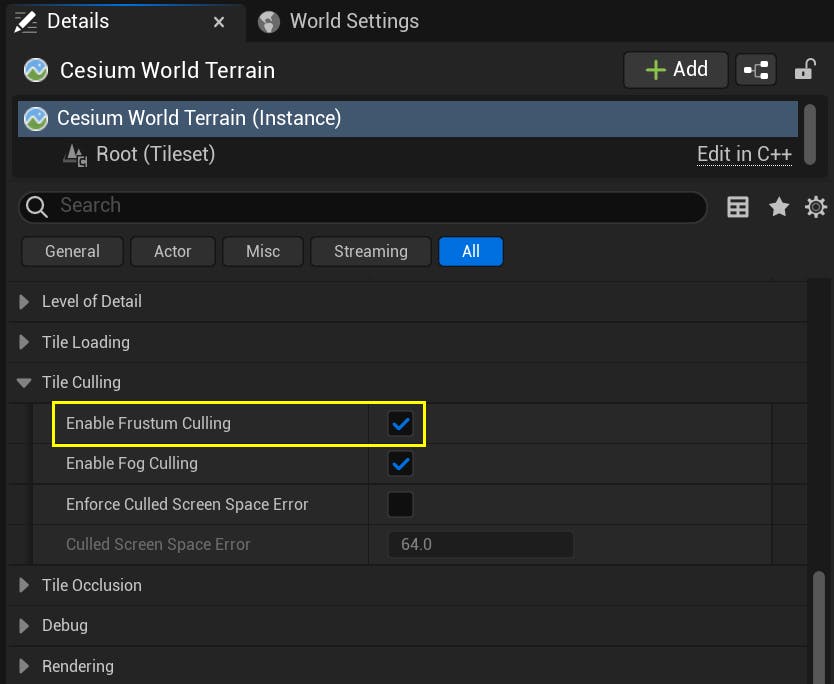
As mentioned previously, disabling frustum culling does have a performance cost, but it is essential for some use-cases.
Due to Earth curvature, the farther we move away from the CesiumGeoreference origin location, the less the Unreal Engine minus Z direction is an accurate representation of the local “down” direction. To be precise, the down direction changes by roughly 0.01 degrees for every kilometer we move from the origin. A hundred kilometers away from the origin, the gravity direction will be “wrong” by about 1 degree. That’s probably not so bad for most applications, but by the time we get to the opposite side of the globe, the gravity direction is 180 degrees from what we expect it to be. Objects placed on the opposite side of the globe and configured to obey Unreal Engine gravity will “fall” into space!
The roundness of the Earth affects other Unreal Engine behavior, too, not just physics. Cameras usually maintain an upright orientation, but the notion of “upright” is incorrect for a round planet. The Cesium DynamicPawn accounts for this automatically, but other Pawns will not.
Dealing with the unfortunate reality of a round planet requires employing one of the following techniques, in order from simplest to most complex:
- Stay within a relatively small area, probably a hundred kilometers or so.
- Set up independent sublevels, each with their own CesiumGeoreference, in each part of the globe that is of interest. This technique is described in the Building Global Scenes with Sublevels tutorial.
- Use the CesiumGlobeAnchorComponent to add limited globe-awareness to any Unreal Actor (see "We can turn dynamic objects into georeferenced objects" below).
- Manually extend your game objects to be fully aware of the round Earth.
When we place regular Unreal Engine objects, as we did with the Cone above, we give them particular coordinates in the game world. So far, this is probably not surprising.
However, the relationship between this game world coordinate system and the real world is not fixed. It is defined by the origin properties of the CesiumGeoreference actor, and it can be changed. The important thing to note is that, when the CesiumGeoreference origin changes, the entire Unreal Engine world moves to a new place on the globe, including all of the objects in it.
If we place an object in the mountains near Denver, and then change the CesiumGeoreference origin so we’re looking at mountains in Northern Italy instead, the object will move to Northern Italy. Thus, it is usually important not to move the CesiumGeoreference origin after you begin building out your level.
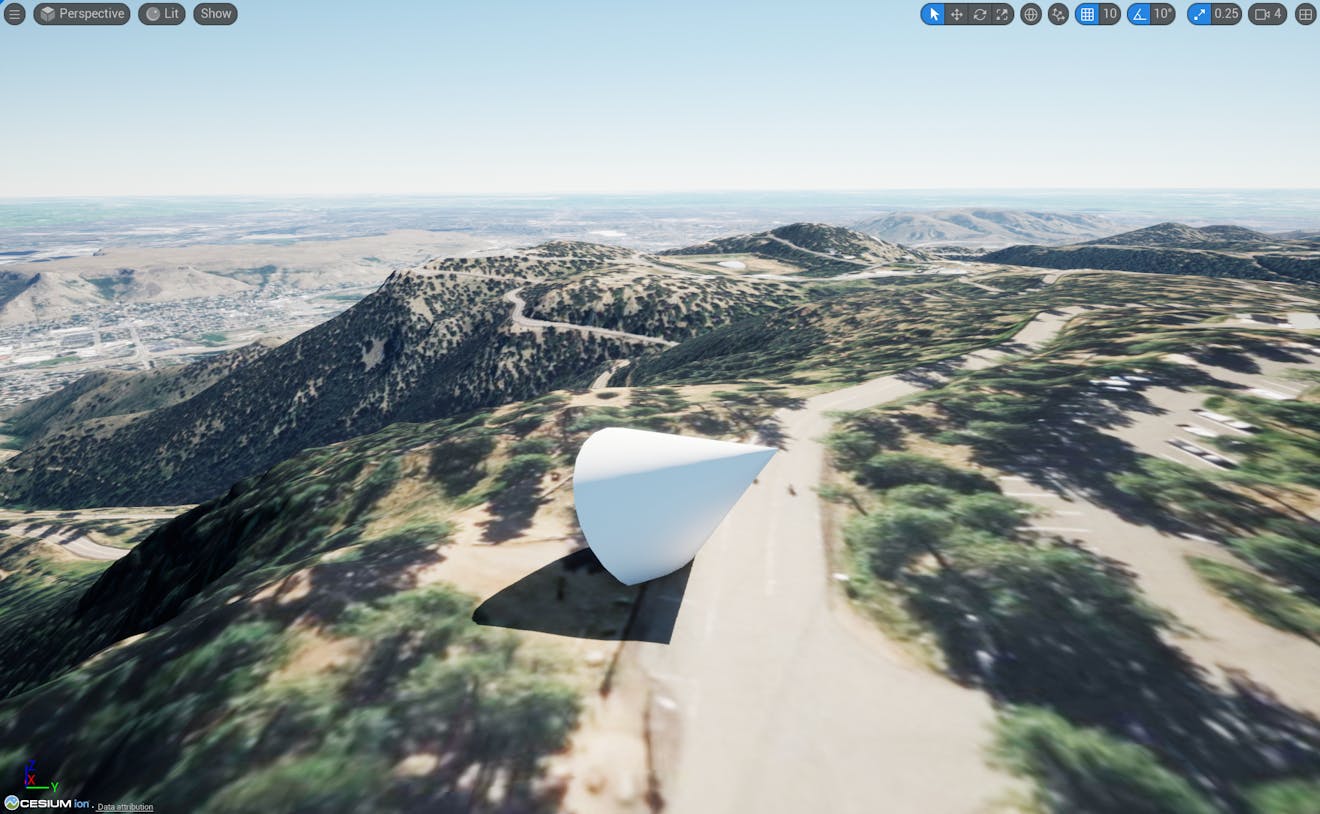
A cone placed in the mountains near Denver.
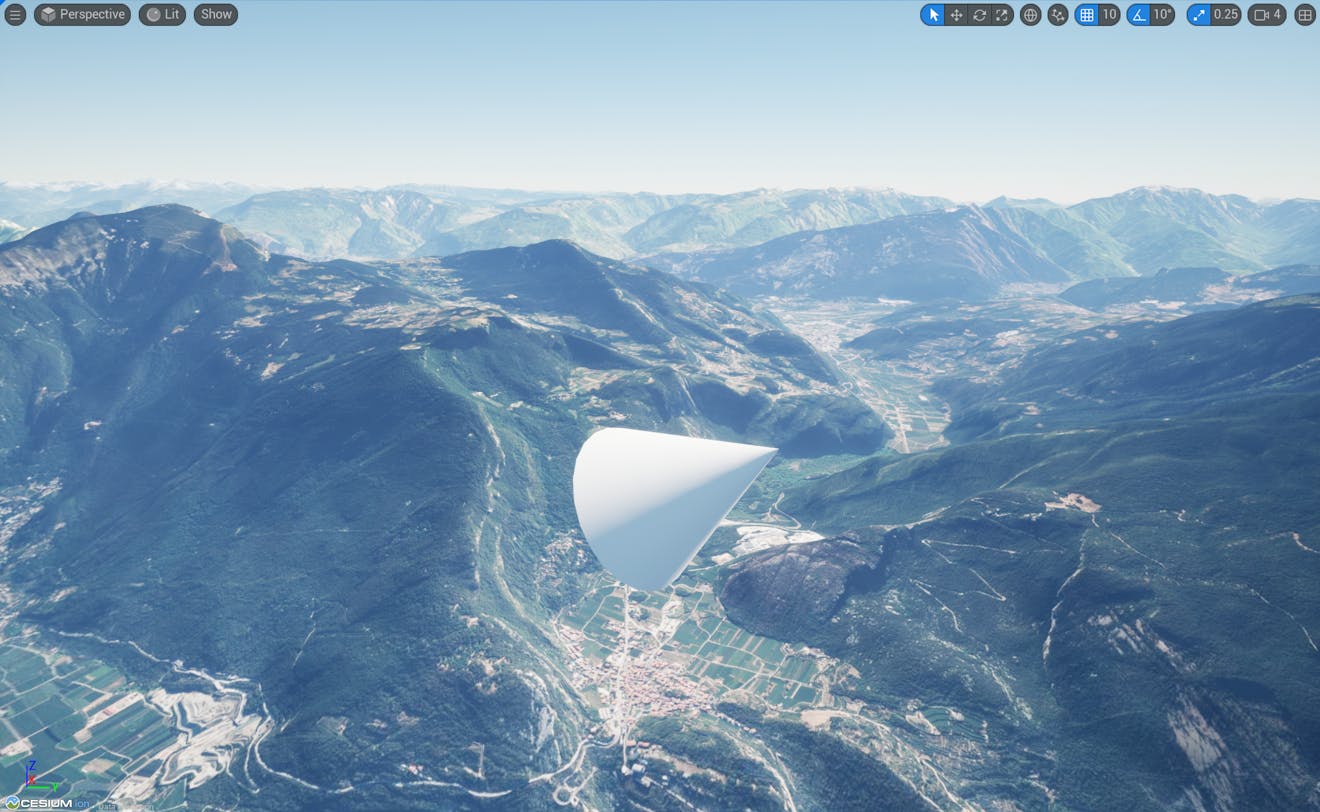
When we change the CesiumGeoreference to Northern Italy, the cone moves, too.
The above is true for almost all objects in Unreal Engine, but there are some objects that obey a different set of rules. We call these objects Georeferenced objects.
Unlike regular objects which are fixed to the game world, a georeferenced object is fixed to the globe. It has a position expressed with double-precision, Earth-Centered, Earth-Fixed (ECEF) coordinates, or - equivalently - longitude, latitude, and height. If those coordinates put it next to the William Penn statue at the top of Philadelphia’s City Hall, for example, it will stay perched up there until we move it, even if we adjust the origin coordinates in the CesiumGeoreference so that our level is now centered on the Sydney Opera House in Australia.
The Cesium DynamicPawn is an example of a georeferenced object. That’s why, as described in the Quickstart, a change in the CesiumGeoreference does not change the position of the pawn on the globe. Another important georeferenced object is Cesium3DTileset. Tilesets know where they should be on the globe, and they stay there.
We can turn a normal Unreal Engine Actor into a georeferenced object by attaching a CesiumGlobeAnchor Component to it:
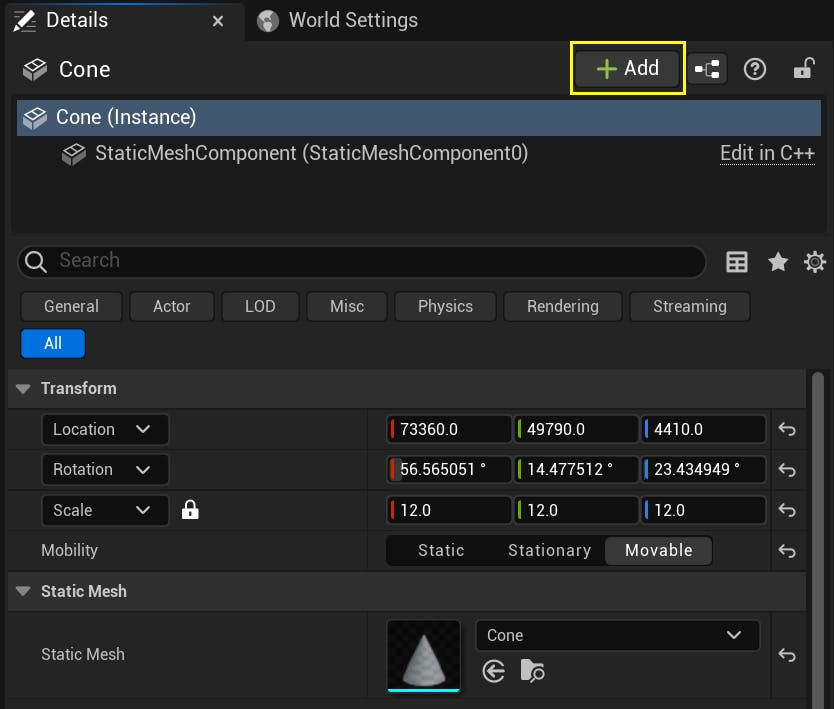
1Click the Actor in the Outliner, then change the Actor’s Mobility property to Movable. The reason for this change is explained below.

2Click Add in the Details panel.
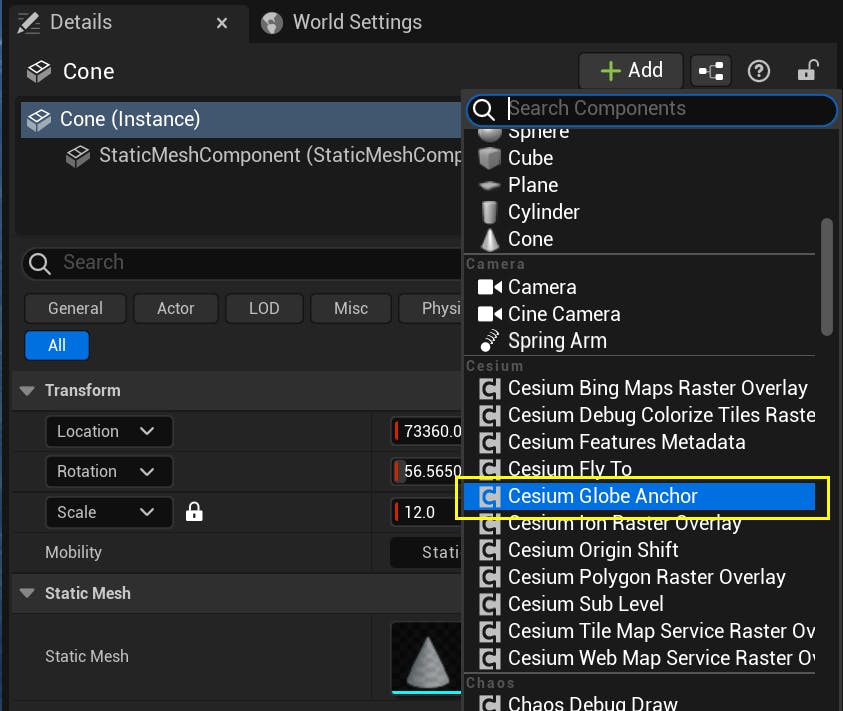
3Find or search for the CesiumGlobeAnchor component and click to add it to the Actor.
Just by adding the CesiumGlobeAnchor component, we have converted this Actor into a georeferenced object. Now, if we change the CesiumGeoreference Actor’s origin, the object will stay exactly where it was on the globe. We can also specify Longitude/Latitude/Height or Earth-Centered, Earth-Fixed coordinates directly on the CesiumGlobeAnchor component to place the object with precise numerical coordinates. Lastly, we can give the Actor a precise orientation based on a Roll, Pitch, and Yaw relative to a local East-South-Up coordinate system at the object's location.
There are two limitations worth noting, however.
The first was alluded to above: we can only add the CesiumGlobeAnchor component to a movable actor. Even if this object will never move with respect to the globe, a change to the CesiumGeoreference actor’s origin will change its location in the game world. Therefore, from the perspective of Unreal Engine, it is movable.
The second limitation is that giving an Actor a precise and consistent position with respect to the globe will not automatically solve every problem. In particular, Unreal Engine gravity will still pull georeferenced objects in the wrong direction when they’re far from the origin.
If you want to have multiple areas in different parts of the globe, all with working physics, and also be able to benefit from the optimizations that come from the use of static objects, that’s a job for sublevels.
Historically, most game engines used single-precision floating-point coordinates for their vector and matrix types. This presents a problem for globe-scale applications, because an Earth-sized planet requires extremely large coordinate values, while also requiring precise, sub-centimeter positioning of objects when zoomed in close. Failure to handle this appropriately leads to a rendering artifact called “jitter”, where rounding errors in large coordinate values of a camera and another object near the camera cause the object to appear to “jump around” as either the camera or the object moves.
In this image, the camera is zoomed in close to a cone that is located very far from the origin. The cone and axes exhibit “jitter”, jumping around and sometimes even vanishing with small camera motion.
Fortunately, Unreal Engine 5 now uses double-precision coordinates for its CPU-side vector and matrix types. This is hugely beneficial for planet-sized rendering, and a major strength of Unreal Engine over most other game engines. With Unreal Engine 5, we generally don't have to worry about jitter at all.
However, it is still sometimes useful to keep coordinate values small by shifting the origin. For example, if you're using the World Position node in a Material, or using other specialized systems that don't cope well with extremely large coordinate values. This is called shifting or rebasing the origin, and is done by setting the coordinate values of a particular object (usually a camera) to zero and adjusting the coordinates of every other object in the level so that they are in the same position relative to the designated object.
Cesium for Unreal implements origin shifting using the CesiumOriginShiftComponent. It can be added to any Actor, and is included in the DynamicPawn by default. By default, it only shifts the origin when entering a new sub-level. See Building Global Scenes with Sublevels for more information about sub-levels.
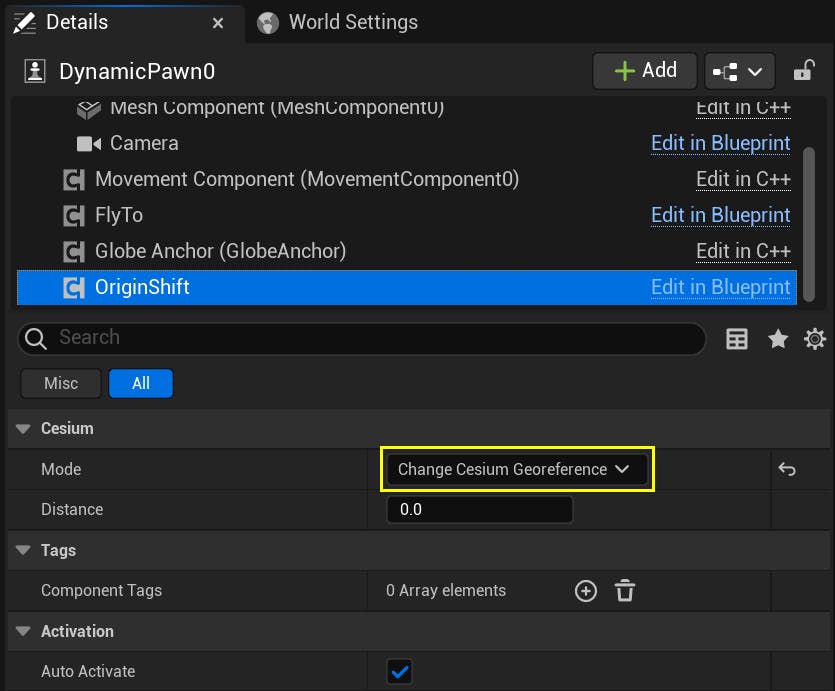
By switching the Mode property to Change Cesium Georeference, the component will automatically enact a powerful form of origin rebasing. Whenever the object moves more than Distance units (usually centimeters) from the origin, the origin will be rebased so that the object is at the origin again. The rebasing works by setting the origin longitude, latitude, and height of the CesiumGeoreference. After the origin shift, the Unreal world coordinate system will be centered at the object's location, and it will have a coordinate system where +X points East, +Y points South, and +Z points Up.
When using this origin shifting mode, it is essential that every object in the level have a CesiumGlobeAnchorComponent. Objects without this component will appear to move when the origin is shifted. It is also important not to have two CesiumOriginShiftComponents active at the same time.
Continue to the Building Global Scenes with Sublevels tutorial.