View 3D Gaussian Splat Tilesets with LODs in CesiumJS
Gaussian splats with levels of detail (LODs) let you stream photoreal splat representations at scale. In this tutorial, you can load a Gaussian splat LOD dataset from Cesium ion, inspect how LOD refinement works, and fine-tune performance using standard 3D Tiles controls.
3D Gaussian splats preserve the fine details in thin and elongated geometry such as cranes, streetlights, and vegetation while maintaining visual fidelity of larger structures such as buildings.
You’ll learn how to:
- Create a CesiumJS viewer with global terrain.
- Load a 3D Gaussian splat tileset with built in LODs from Cesium ion.
- Set the initial camera view.
- Tune performance and visual quality using screen space error settings. Visualize LOD refinement using bounding volumes (optional).
- Use the 3D Tiles Inspector to explore tile hierarchy and behavior (optional).
- A CesiumJS application set up with ES module imports
- A Cesium ion account (recommended so you can later upload and stream your own datasets)
This tutorial uses a public Cesium ion asset, so you do not need to explicitly set your own access token to follow along. CesiumJS includes a default evaluation token for Cesium ion access.
Start by creating a viewer and enabling global terrain. Enabling Cesium World Terrain with Bing Maps imagery overlay will provide your geospatial context for your 3D Gaussian splat tileset.
import * as Cesium from "cesium";

const viewer = new Cesium.Viewer("cesiumContainer", {
  terrain: Cesium.Terrain.fromWorldTerrain(),
});
Load the public 3D Gaussian splat tileset hosted on Cesium ion by using its Cesium ion asset ID, and add it to your scene.
let tileset; // will be assigned once the tileset finishes loading
try {
  tileset = await Cesium.Cesium3DTileset.fromIonAssetId(4547222);
  viewer.scene.primitives.add(tileset);
} catch (error) {
  console.log(`Error loading tileset: ${error}`);
}

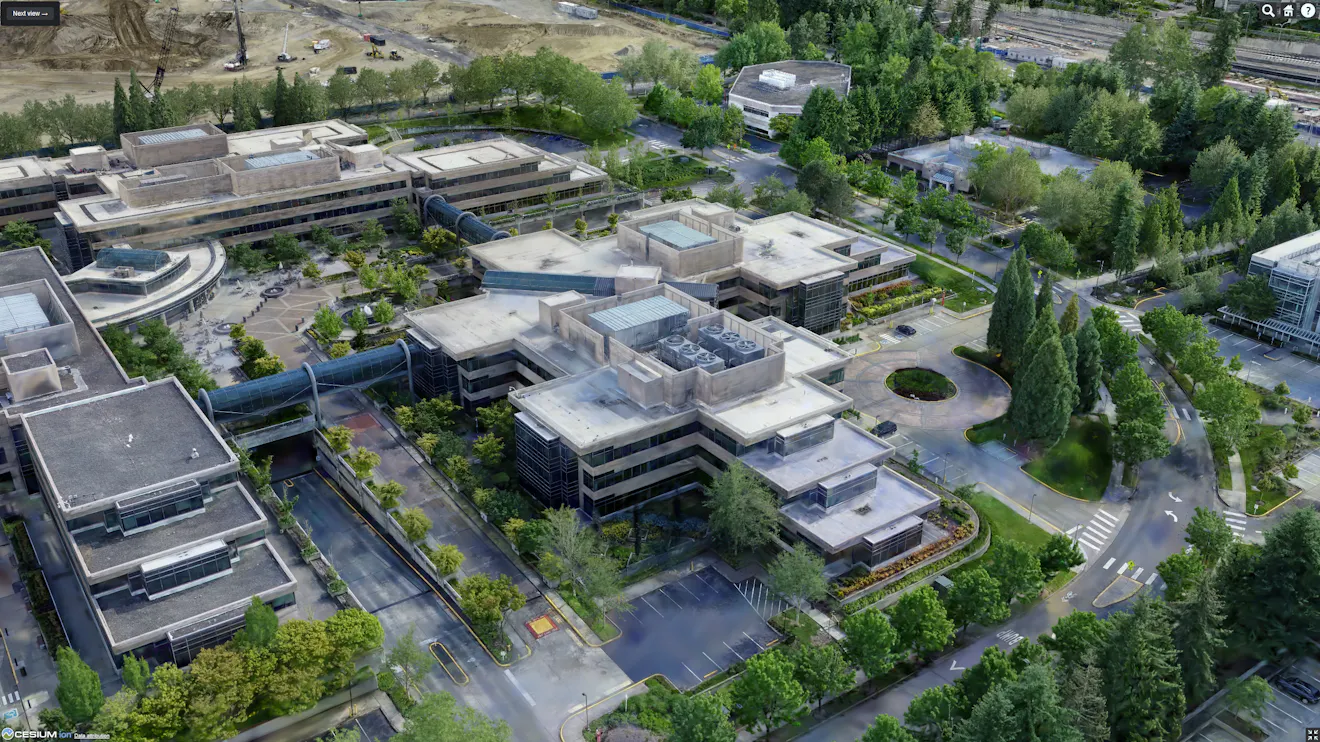
3D Gaussian splat tileset of Microsoft Redmond Campus, as viewed in CesiumJS. Captured in partnership with Bentley Systems. This tileset uses 20,169 photos (427.7 gigapixels, DJI FC6310 camera), covers an area of about 3.7 sq km, with mean ground sampling distance 3 cm. The reconstruction is 110 million splats.
Why is the tileset declared with let?
The tileset is declared with let so it can be reused later in the tutorial for optional debugging steps, such as enabling the 3D Tiles Inspector or visualizing bounding volumes.
If you are not planning to enable the 3D Tiles Inspector or other optional debugging features later in the tutorial, you can load the tileset like this:
try {
  const tileset = await Cesium.Cesium3DTileset.fromIonAssetId(4547222);
  viewer.scene.primitives.add(tileset);
} catch (error) {
In this case, the tileset is created and used immediately, and no shared reference is needed later.
viewer.camera.setView({
  destination: Cesium.Cartesian3.fromDegrees(-122.141186, 47.644605, 170.48),
  orientation: {
    heading: Cesium.Math.toRadians(100.0),
    pitch: Cesium.Math.toRadians(-25.0),
    roll: 0.0,
  },
});
You can automatically zoom the camera to the loaded tileset instead of setting an explicit camera view.
This approach uses the tileset’s bounding volume to position the camera.
await viewer.zoomTo(
  tileset,
  new Cesium.HeadingPitchRange(
    Cesium.Math.toRadians(0.0),
    Cesium.Math.toRadians(-15.0),
    200.0,
  ),
);
Level of detail refinement in 3D Tiles is driven by screen space error. The maximumScreenSpaceError value controls how much visual error (in pixels) is allowed before a tile refines to higher detail.
In practice:
- Higher values allow coarser tiles to remain visible longer, improving performance.
- Lower values cause tiles to refine sooner, increasing visual detail at a higher cost.
Adjust screen space error in code.
You can tune this value directly on the tileset:
tileset.maximumScreenSpaceError = 16;
Common starting ranges:
- 24–64 for performance-oriented views
- 8–16 for higher visual fidelity at the cost of performance
The optimal value depends on dataset scale, camera distance, and target hardware.
When you’re debugging LODs, you can make the refinement visible by drawing tile bounding volumes.
CesiumJS exposes explicit debug flags on Cesium3DTileset:
- debugShowBoundingVolume: renders the bounding volume for each visible tile
- debugShowContentBoundingVolume: renders the bounding volume for each visible tile’s content
You can toggle these in code:
// Show tile bounding volumes (good for understanding refinement)
tileset.debugShowBoundingVolume = true;

// Show content bounding volumes (can help when content bounds differ)
tileset.debugShowContentBoundingVolume = true;
What to look for
As you zoom in, you can watch bounding volumes subdivide/refine as tiles meet the screen space error threshold. This gives you a concrete way to confirm that LOD refinement is happening when you expect it.
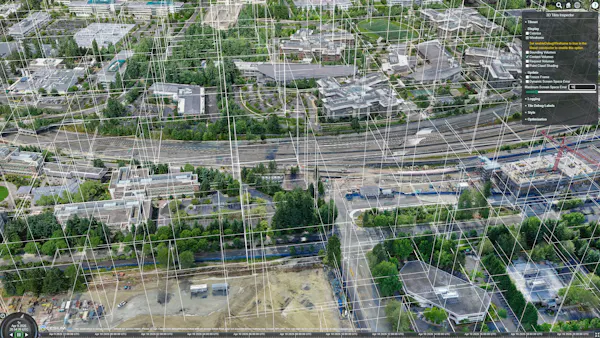
Smaller, denser content volumes indicate earlier refinement, resulting in higher visual fidelity with more detailed tiles visible at this zoom level.
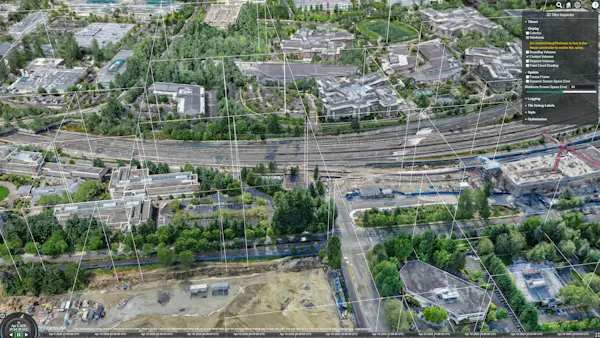
Larger, fewer content volumes indicate later refinement, resulting in lower visual fidelity with coarser tiles at the same camera position.
Add the 3D Tiles Inspector to your CesiumJS viewer. Use it to inspect and debug tile refinement and performance as you iterate.
viewer.extend(Cesium.viewerCesium3DTilesInspectorMixin);

// Connect the already-loaded tileset to the inspector (public API only)
if (tileset && viewer.cesium3DTilesInspector?.viewModel) {
  viewer.cesium3DTilesInspector.viewModel.tileset = tileset;
}
Explore and experiment with the 3D Gaussian splat tilesets Sandcastle.
Gaussian splats are not triangle meshes and do not use traditional physically based materials. Color is derived from view-dependent data stored in the dataset, and current rendering focuses on diffuse appearance.
As a result:
- Splats excel at photoreal detail, thin structures, and complex geometry.
- They do not behave like mesh materials with full lighting models.
- Visual appearance may differ from mesh-based workflows, especially under dramatic lighting changes.
To generate Gaussian splats from your own source photos in your Cesium ion account, follow the tutorial and select Gaussian splats as the output.
The tileset does not load
- Confirm the asset ID is correct.
- If loading your own asset, verify that a valid Cesium ion access token is provided.
- Check the browser console for authentication or network errors.
Performance is lower than expected
- Verify the browser is using a dedicated GPU through your operating system’s graphics settings. After changing GPU preferences, restart the browser before testing performance. This s especially important for Windows laptops with hybrid graphics
- Increase the maximumScreenSpaceError.
- Reduce simultaneous debug visualizations when not needed.
Bounding volumes do not appear
- Ensure debug flags are set on the same tileset instance added to the scene.
- Confirm the tileset has successfully loaded before toggling debug options.
- CesiumJS documentation: core API reference and guides for building 3D geospatial applications with CesiumJS
- Cesium ion documentation: managing access tokens, assets, and third-party data integrations
- Create 3D reality models with Cesium ion: Cesium ion allows you to reconstruct a 3D reality model from a collection of photos. This guide explains how.
- Introducing 3D Gaussian splats with hierarchical LOD using 3D Tiles