Connecting to Cesium ion with OAuth2
Cesium ion uses the Authorization Code Grant flow for accessing a user’s account using OAuth2.
There are three ways to get a client_id. Pick what fits how your application is distributed.
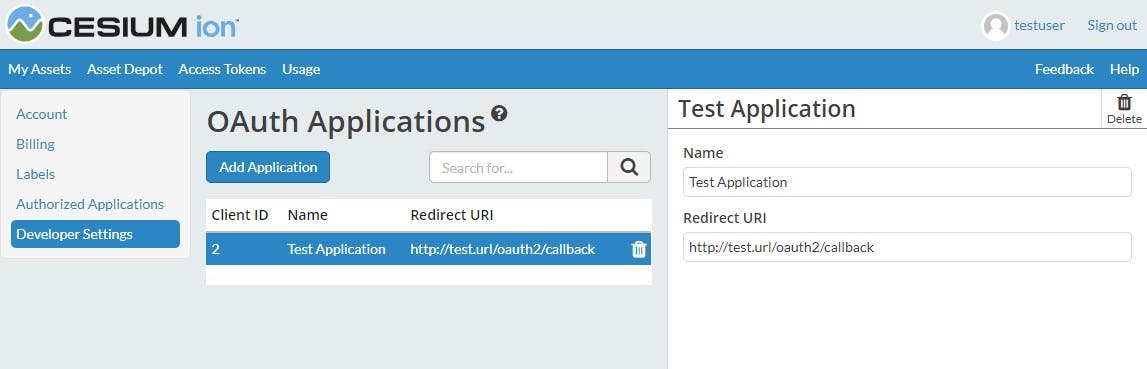
Enter the name of your application that will be displayed to the user and one or more redirect URIs. Each redirect URI must be passed to the Code Authorization and Token Exchange API calls and will be the location the user is redirected to once they authorize your application. You'll be assigned a numeric client_id.
This is the right choice for applications you can log into Cesium ion and manage yourself—a web app, a service, anything with a fixed owner.
Client ID Metadata Documents (CIMD)
If your application can host a stable HTTPS URL but can't hold a dashboard account per deployment -- for example, a self-hosted tool your users each run on their own domain -- you can skip registration entirely. Host a JSON document describing your client at a URL you control, then use that URL itself as your client_id:
{
  "client_id": "https://your-app.example.com/client-metadata.json",
  "client_name": "Your App",
  "redirect_uris": ["https://your-app.example.com/callback"]
}
The client_id field inside the document must exactly match the URL it's served from. Cesium ion fetches this document on every authorization and token request, so keep it available and stable. See draft-ietf-oauth-client-id-metadata-document for the full spec.
CIMD clients are always public clients (no client_secret), and PKCE (below) is required.
POST https://api.cesium.com/oauth/register

{
  "client_name": "Your App",
  "redirect_uris": ["https://your-app.example.com/callback"]
}
You'll get back a client_id (prefixed dcr:) to use for the rest of the flow. No login or dashboard account is needed to call this endpoint. See RFC 7591 for the full spec.
DCR clients are always public clients (no client_secret), and PKCE (below) is required. Registering again with the same name and redirect URIs returns your existing client_id rather than creating a new one, so it's safe to register on every app launch.
You will make a request for a code that will prompt the user for permissions. Once permission is granted we will redirect the user back to you with the code.
Request
This request should be made by redirecting the user to this page. It will prompt the user to log in to Cesium ion and ask for their permission to give you access. For native applications, this request should be made through a browser and not an embedded web view.
GET https://ion.cesium.com/oauth
Parameters:
response_type(Required) Must always have the value code since we use only one flow type.client_id(Required) The client ID for your application: a numeric ID (dashboard registration), a CIMD document URL, or a DCRdcr:ID.redirect_uri(Required) The URI that a user will be redirected to once they authorize your application. This must match the URI provided when you registered your application.- scope (Required) A space separated list of requested scopes. Possible scopes are:
-assets:list: List the metadata for all assets available to the account.
-assets:read: Read metadata and access the tiled data for individual assets in the account.
-assets:write: Create, modify, and delete assets in the account. - state A unique string that will be sent back to the
redirect_uri. Used to protect against cross-site request forgery attacks. This is not required but strongly recommended.
The following two parameters are used if you implement the PKCE extension, which is now required on all clients to increase security.
code_challengeA Base64 URL encoded SHA256 hash of thecode_verifierthat you will pass with the token exchange request.code_challenge_methodMust be S256.
GET [redirect_uri]
Parameters:
redirect_uriThe URI you passed during the request. This must match the Redirect URI of the registered application.- code This is a code that you will use during the token exchange step.
- state This is the exact string you passed during the request. If it is different do not proceed to the token exchange step.
POST https://api.cesium.com/oauth/token
Parameters:
grant_type(Required) Must always have the valueauthorization_code.client_id(Required) The client ID for your application: a numeric ID (dashboard registration), a CIMD document URL, or a DCRdcr:ID.- code (Required) This is a code that you were provided during the authorization step.
redirect_uri(Required) The URI that a user was redirected to during the authorization step. This must match the URI provided when you registered your application.code_verifier(Required) The string whose hash value was passed to the authorization step in thecode_challengeparameter.
Response
The format of the response depends on the Accept header used during the request.
If application/json is an acceptable response, you receive:
{
    "access_token": "[access_token]",
    "token_type": "bearer",
    "refresh_token: "[refresh_token]",
    "expiresIn": [value_in_seconds]
    "refreshTokenExpiresIn": [value_in_seconds]
}
If application/xml is an acceptable response, you receive:
<OAuth>
  <access_token>[access_token]</access_token>
  <token_type>bearer</token_type>
   <refresh_token>[refresh_token]</refresh_token>
  <expires_in>[value_in_seconds]</expires_in>
  <refresh_token_expires_in>[value_in_seconds]</refresh_token_expires_in>
</OAuth>
Otherwise you receive:
access_token=[access_token]&token_type=bearer&refresh_token=[refresh_toke]&expires_in=[value_in_seconds]&refresh_token_expires_in=[value_in_seconds]
access_tokenThe token that can be used to access the Cesium ion API. These tokens expire within a month; you can use the refresh token to receive a new access token with the same scope for the user.
To grab a new token after the access token expires and before the refresh token has expired, make the following request to the ion API:
POST https://api.cesium.com/oauth/token
Parameters:
grant_type(Required) Must always have the value refresh_token.client_id(Required) The client ID for your application: a numeric ID (dashboard registration), a CIMD document URL, or a DCRdcr:ID.refresh_token(Required) The refresh token received with the access token you are trying to renew.redirect_uri(Required) The URI that a user was redirected to during the authorization step. This must match the URI provided when you registered your application.
Send
https://ion.cesium.com/oauth?response_type=code&client_id=1456&redirect_uri=https%3A%2F%2Fmy.website.com&scope=asset:read%20assets:list&state=a576f975g00d&code_challenge=bKE9UspwyIPg8LsQHkJaiehiTeUdstI5JZOvaoQRgJA&code_challenge_method=S256
Redirect (once user approves access):
https://my.website.com?code=6907&state=a576f975g00d
Send
https://api.cesium.com/oauth/token
With POST data and Accept header application/json
{
    "grant_type": "authorization_code",
    "client_id": 1456,
    "code": 6907,
    "redirect_uri": "https://my.website.com",
    "code_verifier": "abc123"
}
Response:
{
    "access_token": "eyJhbGciOiJIUzI1NiIsInR5cCI6IkpXVCJ9.eyJ1c2VyIjoiMSIsImlhdCI6MTUxNjIzOTAyMn0.fZSuqRyznO9h4U2qdPLrGNj1lQ4rR-4vkrr0dy7ryCc",
    "token_type": "bearer",
   “expires_in”: 2592000,
   “refresh_token”: “skfYws5OXrQtNDqjlwBjZg==”
   “refresh_token_expires_in”: 7776000,
}
For renewing the token, send:
https://api.cesium.com/oauth/token
With POST data and Accept header application/json
{
    "grant_type": "refresh_token",
    "client_id": 1456,
    "redirect_uri": "https://my.website.com",
    "refresh_token": "skfYws5OXrQtNDqjlwBjZg=="
}
Response:
{
    "access_token": "eyJhbGciOiJIUzI1NiIsInR5cCI6IkpXVCJ9.eyJqdGkiOiJlMzgyMzczMC1jZWI1LTQ3MmEtYWI2Zi1kZTJkZjcxNDhmZTIiLCJpZCI6MiwiaWF0IjoxNzY1ODA4NzcxLCJleHAiOjE3NjU4MDg4MzF9.618ncYq4DXYcgozXM9cSaiVJpxx00RVizhaOiLtl4aE",
    "token_type": "bearer",
   “expires_in”: 2592000,
   “refresh_token”: “ZN3YEYuYVYvTtxf//IKJYGAz==”
   “refresh_token_expires_in”: 7776000,
}
Computing the code challenge
Here is a code sample that can be used in your application to generate the code_challenge for the PKCE extension.
NodeJS
const crypto = require("node:crypto");
// This code should be randomly generated
const codeVerifier = "abc123";
const hash = crypto.createHash("sha256").update(codeVerifier).digest();
const codeChallenge = hash.toString("base64url");
Browser
// This code should be randomly generated
const codeVerifier = "abc123";
const hash = await crypto.subtle.digest(
  "SHA-256",
  new TextEncoder().encode(codeVerifier),
);
const codeChallenge = new Uint8Array(hash).toBase64({
  alphabet: "base64url",
  omitPadding: true,
});