Automate Your Uploads with the Cesium ion REST API
The Cesium ion REST API allows you to add discovery, uploading, 3D Tiling, and streaming of massive 3D datasets to your applications and workflows. This tutorial will teach you the basics of the API with a complete code example in Node.js.

The German Reichstag building you are about to upload and tile with the Cesium ion REST API.
All Cesium ion endpoints require authentication in the form of an access token provided in the Authorization header of the request. ion uses the OAuth 2.0 Bearer <your_access_token> format. Let’s start by generating a token that we can use in this tutorial:
- Navigate to the Access Tokens page of your ion account.
- Click Create Token.
- In the name field, enter “REST Tutorial”.
- Make sure assets:read, assets:write, and assets:list are all enabled.
- Click Create.
- Click the copy button to copy the token to the clipboard.
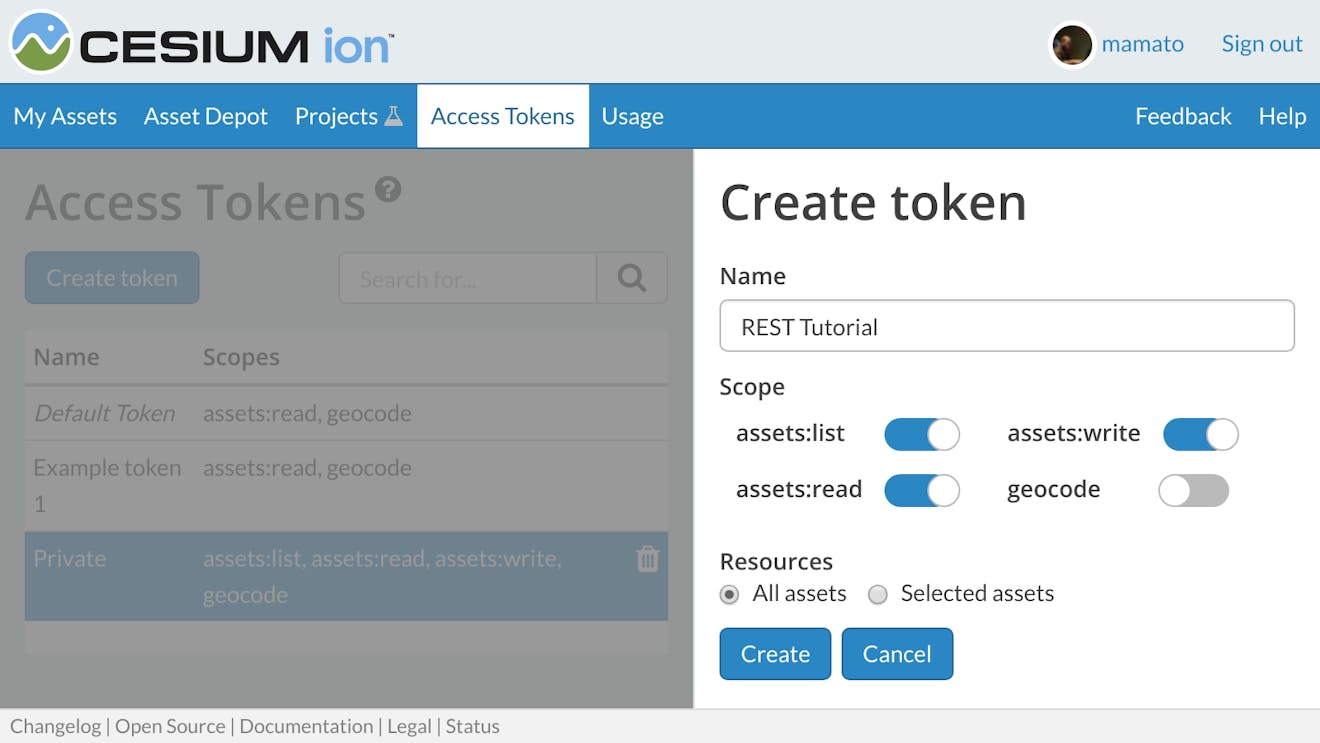
The token options we’ll be using in this tutorial.
Now that you have a token, you can test it out with the below cURL command which will retrieve a list of assets in your account. Be sure to replace <your_access_token> with the token you just copied to your clipboard.
curl "https://api.cesium.com/v1/assets" -H "Authorization: Bearer <your_access_token>"If you see JSON output that starts with {"items":[{"id", everything worked! This is the list of assets from your ion account. If you see output like {"code":"InvalidCredentials","message":"Invalid access token"}, double check that the token on your Tokens page and the token on the command line match.
Scopes are used to restrict what actions an access token can be used for. Cesium ion has the following scopes:
| Scope | Description |
|---|---|
| assets:list | List the metadata for all assets available to the account. |
| assets:read | Read metadata and access the tiled data for individual assets in the account. |
| assets:write | Create, modify, and delete assets in the account. |
| geocode | Perform geocodes. Not yet available in the REST API. |
Tokens with the assets:write scope should be kept secret, as they allow someone to modify the assets in your account. Most CesiumJS applications only need assets:read and geocode.
Now that you know the basics of making requests, let’s actually upload some data to create a new asset using Node.js. We’ll also be relying to two third-party libraries to simplify things, the request-promise library for making requests, and the aws-sdk for uploading data.
The cURL request we made above would be written in Node.js as:
// Retrieve a list of assets available with the supplied accessToken
const request = require('request-promise');
const accessToken = '<your_access_token>'; // Replace this with your token from above.
const response = await request({
    url: 'https://api.cesium.com/v1/assets',
    headers: { Authorization: `Bearer ${accessToken}` },
    json: true
});
Whether you have imagery, terrain, 3D buildings, point clouds, photogrammetry, or one of the many other types of data we support, ion creates a tiled version of it that we refer to as an asset.
There are three types of assets:
| Asset Type | Description |
|---|---|
| 3DTILES | A 3D Tiles tileset |
| IMAGERY | A TMS and WMTS compatible imagery layer |
| TERRAIN | A quantized-mesh-1.0 tileset |
Uploading data to ion is a four step process:
- Provide ion information about your data.
- Upload your data to the provided Amazon S3 bucket.
- Notify ion that you are finished uploading data so that it can begin tiling.
- Optionally monitor the tiling status until the asset is ready for use.
We go over the code for each of these steps below, but the complete Node.js example can be downloaded from GitHub.
We’ve provided some CityGML sample data for this tutorial. Download it by clicking here. It is a single, textured CityGML building of the German Reichstag.
To create a new asset, we POST information about our data and what we want to do with it to the /v1/assets endpoint. The POST body looks like this:
const postBody = {
    name: 'Reichstag',
    description: 'See [Wikipedia](https://en.wikipedia.org/?curid=217577).',
    type: '3DTILES',
    options: {
        sourceType: 'CITYGML',
        clampToTerrain: true,
        baseTerrainId: 1
    }
}
nameis any non-empty string.descriptionis a Markdown-compatible string.typeis one of the three asset types from the table above. We are uploading CityGML, which can only be used to generate 3DTILES.optionsare the options to the ion tiling pipeline and are specific to the type of data we are uploading. In this example we are specifying:sourceTypeto indicate we are uploading CityGML data.clampToTerrainto tell the pipeline we would like it to adjust the heights of buildings in the file so that they set on the ground.baseTerrainIDto specify a terrain asset id to be considered as ground for clamping. In this case, 1 indicates the Cesium World Terrain but you can use any terrain available in your account. The GET /v1/assets endpoint can be used to fetch a list of available terrain assets. If left undefined and clampToTerrain is true, buildings are clamped to the the WGS84 ellipsoid.
There are additional sourceType values available, as well as more options for CityGML. See the POST /v1/assets reference for the full list of options.
To actually create the asset, we POST the above object with the following code:
const response = await request({
    url: 'https://api.cesium.com/v1/assets',
    method: 'POST',
    headers: { Authorization: `Bearer ${accessToken}` },
    json: true,
    body: postBody
});
The response returned by the server contains 3 properties:
- response.uploadLocation provides temporary credentials and location information for uploading source data to ion. The credentials last about an hour.
- response.onComplete includes information we will use to POST back to the server once we are done uploading out data.
- response.assetMetadata contains all information about the asset such as its id and status as well as the name and description we just posted.
It will look similar to the below:
{
  "assetMetadata": {
    "id": 21111,
    "type": "3DTILES",
    "name": "Reichstag",
    "description": "See [Wikipedia](https://en.wikipedia.org/?curid=217577).",
    "attribution": "",
    "bytes": 0,
    "dateAdded": "2019-04-19T00:30:54.111Z",
    "status": "AWAITING_FILES",
    "percentComplete": 0
  },
  "uploadLocation": {
    "bucket": "assets.cesium.com",
    "prefix": "sources/21111/",
    "accessKey": "ASIATXRQLSFCKKLAIVXW",
    "secretAccessKey": "Qa6YC2yq78hoCR4KYF4atHEnytfgLJMNV0KPdpw8",
    "sessionToken": "FQoGZXIvYXdzEIr//////////wEaDIEDvhx6N7x4..."
  },
  "onComplete": {
    "method": "POST",
    "url": "https://api.cesium.com/v1/assets/21111/uploadComplete",
    "fields": {}
  }
}
We can use any S3 compatible library to perform the upload, but we recommend the official AWS SDK which is widely available in many languages. Everything we need is in the response.uploadLocation object.
Initializing the S3 API will be identical for every asset:
const AWS = require('aws-sdk');
const uploadLocation = response.uploadLocation;

const s3 = new AWS.S3({
    apiVersion: '2006-03-01',
    region: 'us-east-1',
    signatureVersion: 'v4',
    endpoint: uploadLocation.endpoint,
    credentials: new AWS.Credentials(
        uploadLocation.accessKey,
        uploadLocation.secretAccessKey,
        uploadLocation.sessionToken)
});
As this point, we can use the s3 instance to upload as many files as needed. In this example everything is contained in a single zip file, so we can use a single upload call. If you have multiple files, just make multiple s3.upload calls with different Body and Key properties. Be sure to replace path_to_file with the location of Reichstag.zip.
const input = 'path_to_file/Reichstag.zip';
const fs = require('fs');
await s3.upload({
    Body: fs.createReadStream(input),
    Bucket: uploadLocation.bucket,
    Key: `${uploadLocation.prefix}Reichstag.zip`
}).promise();
Once the data is uploaded, we issue a second POST request using the information in the response.onComplete object. This tells the server that all source data has been uploaded and it can begin the tiling process.
const onComplete = response.onComplete;
await request({
    url: onComplete.url,
    method: onComplete.method,
    headers: { Authorization: `Bearer ${accessToken}` },
    json: true,
    body: onComplete.fields
});
The asset is now being tiled into 3D Tiles and no further action needs to be taken. You can go to your Assets Dashboard and see the tiling progress. You can also use the REST API to monitor the progress so you can take some action when it’s finished. This is possible using the GET /v1/assets/{assetId} endpoint where {assetId} is response.assetMetadata.id from the initial POST response.
async function waitUntilReady() {
    const assetId = response.assetMetadata.id;

    // Issue a GET request for the metadata
    const assetMetadata = await request({
        url: `https://api.cesium.com/v1/assets/${assetId}`,
        headers: { Authorization: `Bearer ${accessToken}` },
        json: true
    });

    const status = assetMetadata.status;
    if (status === 'COMPLETE') {
        console.log('Asset tiled successfully');
        console.log(`View in ion: https://ion.cesium.com/assets/${assetMetadata.id}`);
    } else if (status === 'DATA_ERROR') {
        console.log('ion detected a problem with the uploaded data.');
    } else if (status === 'ERROR') {
        console.log('An unknown tiling error occurred, please contact support@cesium.com.');
    } else {
        if (status === 'NOT_STARTED') {
            console.log('Tiling pipeline initializing.');
        } else { // IN_PROGRESS
            console.log(`Asset is ${assetMetadata.percentComplete}% complete.`);
        }

        // Not done yet, check again in 10 seconds
        setTimeout(waitUntilReady, 10000);
    }
}

waitUntilReady();
Now that you know the basics, you can learn about the various other options and endpoints available through the ion REST API reference guide.
ion also supports OAuth 2.0 if you want to allow users to bring their own ion account into your application. See our OAuth 2.0 tutorial for more details.