Connecting to Cesium ion with OAuth2
Cesium ion uses the Authorization Code Grant flow for accessing a user’s account using OAuth2.
Once logged into Cesium ion, click on your username in the upper right corner to go to your settings.
Under Developer Settings, click Add Application
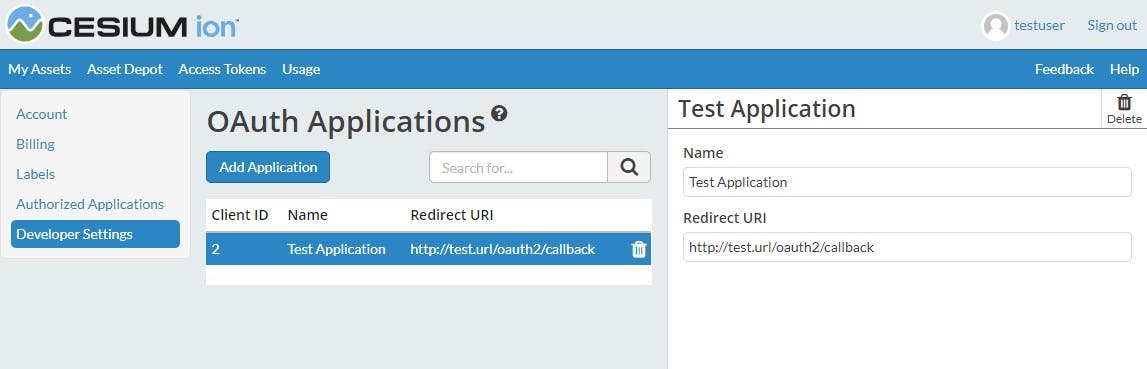
Enter the name of your application that will be displayed to the user and the redirect URI. The redirect URI must be passed to the Code Authorization and Token Exchange API calls and will be the location the user is redirected to once they authorize your application.
You will make a request for a code that will prompt the user for permissions. Once permission is granted we will redirect the user back to you with the code.
Request
This request should be made by redirecting the user to this page. It will prompt the user to log in to Cesium ion and ask for their permission to give you access. For native applications, this request should be made through a browser and not an embedded web view.
GET https://ion.cesium.com/oauthParameters:
- response_type (Required) Must always have the value code since we only use one flow type.
- client_id (Required) The client ID that was assigned to your application when you registered it.
- redirect_uri (Required) The URI that a user will be redirected to once they authorize your application. This must match the URI provided when you registered your application.
- scope (Required) A space separted list of requested scopes. Possible scopes are:
- assets:list : List the metadata for all assets available to the account.
- assets:read : Read metadata and access the tiled data for individual assets in the account.
- assets:write : Create, modify, and delete assets in the account. - state A unique string that will be sent back to the redirect_uri. Used to protect against cross-site request forgery attacks. This is not required but strongly recommended.
The following 2 parameters are used if you implement the PKCE extension. This is recommended to increase security. If you use the extension, then both are required.
- code_challenge A Base64 URL encoded SHA256 hash of the code_verifier that you will pass with the token exchange request.
- code_challenge_method Must be S256
Response
Once they user has granted permission, Cesium ion will redirect the user to the redirect_uri you specified in the request.
GET [redirect_uri]Parameters:
- redirect_uri The URI you passed during the request. This much match the Redirect URI of the registered application.
- code This is a code that you will use during the token exchange step.
- state This is the exact string you passed during the request. If it is different do not proceed to the token exchange step.
Once you have the code you can exchange it for an access_token, which you can then use that to access the user’s account.
Request
POST https://api.cesium.com/oauth/tokenParameters:
- grant_type (Required) Must always have the value authorization_code.
- client_id (Required) The client ID that was assigned to your application when you registered it.
- code (Required) This is a code that you were provided during the authorization step.
- redirect_uri (Required) The URI that a user was redirected to during the authorization step. This must match the URI provided when you registered your application.
The following parameter is required if you used the PKCE extension in the authorization step.
- code_verifier The string whose hash value was passed to the authorization step in the code_challenge parameter.
Response
The format of the response depends on the Accept header used during the request.
If application/json is an acceptable response you receive:
{
    "access_token": "[access_token]",
    "token_type": "bearer"
}
If application/xml is an acceptable response you recieve:
<OAuth>
  <access_token>[access_token]</access_token>
  <token_type>bearer</token_type>
</OAuth>
Otherwise you recieve:
access_token=[access_token]&token_type=bearer- access_token The token that can be used to access the Cesium ion API.
Send
https://ion.cesium.com/oauth?response_type=code&client_id=1456&redirect_uri=https%3A%2F%2Fmy.website.com&scope=asset:read%20asset:list&state=a576f975g00d&code_challenge=bKE9UspwyIPg8LsQHkJaiehiTeUdstI5JZOvaoQRgJA&code_challenge_method=S256Redirect (once user approves access):
https://my.website.com?code=6907&state=a576f975g00dSend
https://api.cesium.com/oauth/tokenWith Post data and accept header application/json
{
    "grant_type": "authorization_code",
    "client_id": 1456,
    "code": 6907,
    "redirect_uri": "https://my.website.com",
    "code_verifier": "abc123"
}
Response:
{
    "access_token": "eyJhbGciOiJIUzI1NiIsInR5cCI6IkpXVCJ9.eyJ1c2VyIjoiMSIsImlhdCI6MTUxNjIzOTAyMn0.fZSuqRyznO9h4U2qdPLrGNj1lQ4rR-4vkrr0dy7ryCc",
    "token_type": "bearer"
}
Computing the code challenge
Here is a code sample that can be used in your application to generate the code_challenge for the PKCE extension.
const crypto = require('crypto');

const codeVerifier = 'abc123'; // This code should be randomly generated
const hash = crypto.createHash('sha256').update(codeVerifier).digest();
const codeChallenge = hash.toString('base64')
        .replace(/\+/g, '-')
        .replace(/\//g, '_')
        .replace(/=/g, '');