Fly Between Locations on the Globe
In this tutorial, you’ll learn to fly smoothly between two locations on the globe using O3DE’s Script Canvas.
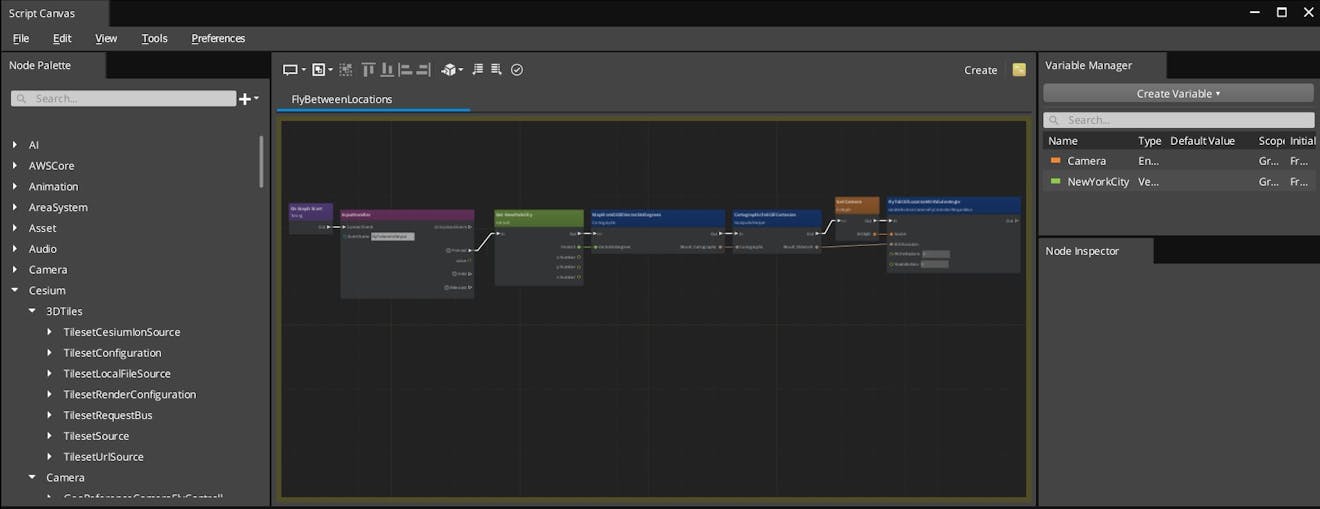
The Script Canvas you'll create in this tutorial.
You’ll learn how to:
- Set up an input binding to detect a user’s key press
- Access Cesium gem functions through O3DE’s Script Canvas
- Use the Script Canvas to smoothly fly to another location on the globe
- An installation of Open 3D Engine, Stable 21.11 release or later
- A project with the Cesium for O3DE gem installed
- A Cesium ion account
See the Cesium for O3DE Quickstart to learn how to install Cesium for O3DE, connect to Cesium ion, and create a level with Cesium World Terrain.
1Create a new level.
2Add the Cesium World Terrain + Bing Maps Aerial Imagery and Cesium OSM Buildings tilesets from the Cesium ion panel.
3Click on the Level entity and change the ECEF Position Type from Cartesian to Cartographic. Set the coordinates of the origin to the following:
Longitude: -105.25737
Latitude: 39.736401
Height: 2250.0
4Add a Cesium Camera Controller to the scene. Be sure to set the camera’s Far Clip plane to a high number, like 9000000.
5If desired, delete the Atom Default Environment entities that you don’t need - the Shader Ball, Grid, and Ground.
You may also wish to change the HDRI Skybox image on the Global Sky entity. This tutorial uses the default_level_cubemap_iblspecular.tif skybox included with the engine.
Need help with any of these steps? Be sure to read the Quickstart tutorial for more information.
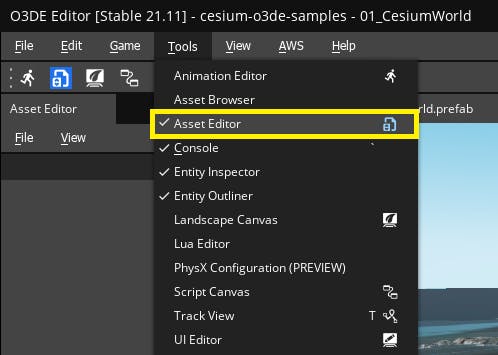
1Open the Asset Editor by clicking on Tools on the top menu of the editor, then selecting Asset Editor from the menu that appears.
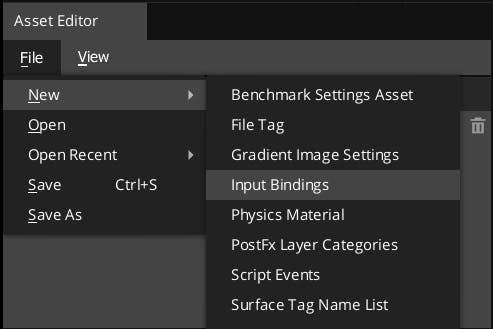
2In the Asset Editor, click on File -> New -> Input Bindings to create a new Input Bindings asset.
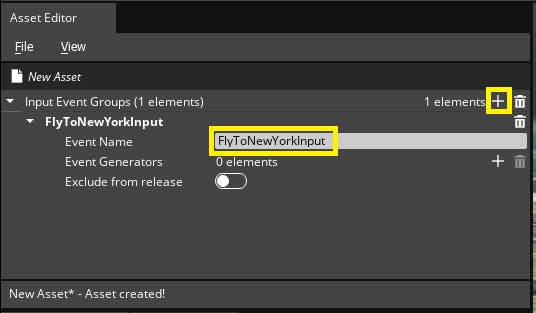
3Click on the Plus button next to the Input Event Groups to create an input event. In the Event Name field, enter a descriptive name for the event. This tutorial uses “FlyToNewYorkInput.” You will need this name later for your Script Canvas.
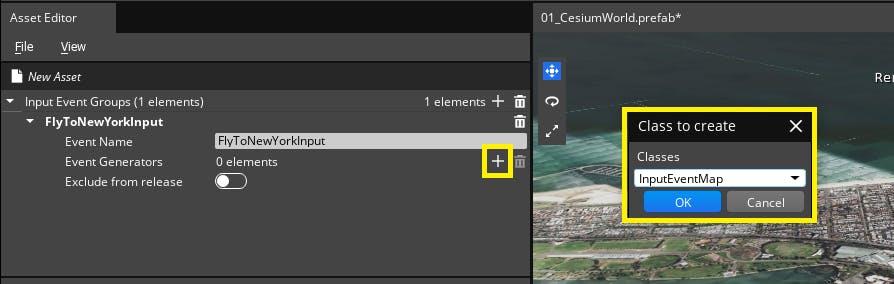
4In the Event Generators, click on the Plus button to open the Class to create dialog. In the dialog, choose InputEventMap, then click Ok.
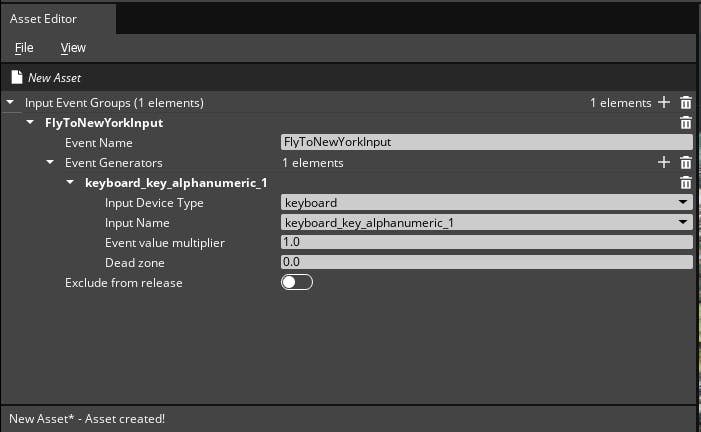
5A <Select Input> submenu will be created under Event Generators.
Choose “keyboard” for the Input Device Type.
For the Input Name, choose the keyboard key that will be pressed to invoke the flight to New York. This tutorial uses “keyboard_key_alphanumeric_1”, which corresponds to the “1” key on a standard keyboard.
6Click File -> Save on the top of the Asset Editor menu to save the Input Bindings asset. Give the Input Bindings asset a descriptive name like “FlyInputEvent.”
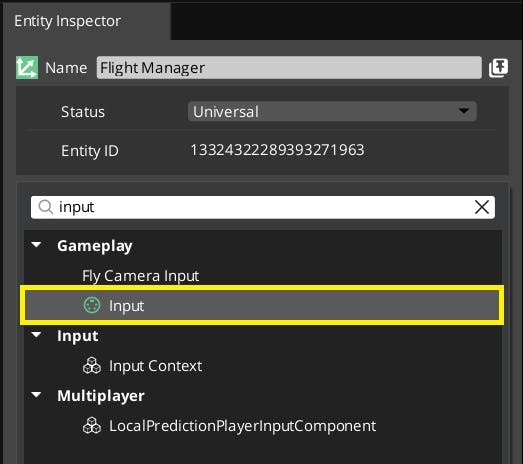
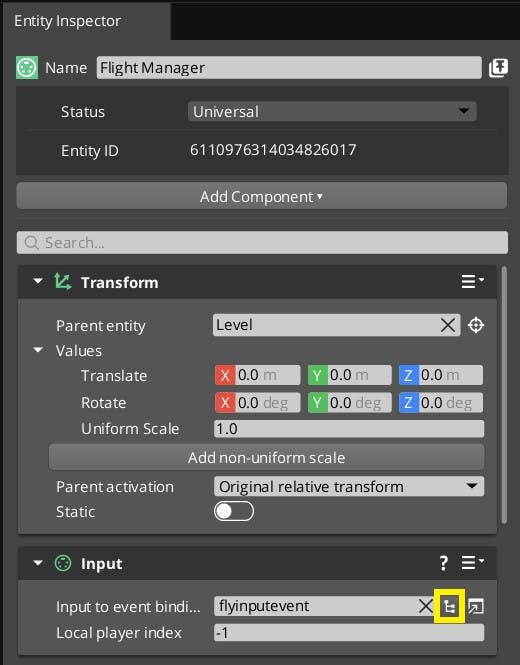
1In the Entity Outliner, right click anywhere and choose Create Entity. Give the entity a name, like “Flight Manager.”
2In the Entity Inspector, click the Add Component button. Search for “Input” and select the Input component. A new component will appear on the entity.
3Next to the variable Input to event bindings, click the file hierarchy button. In the window that appears, select the Input Bindings asset you created in the last section.
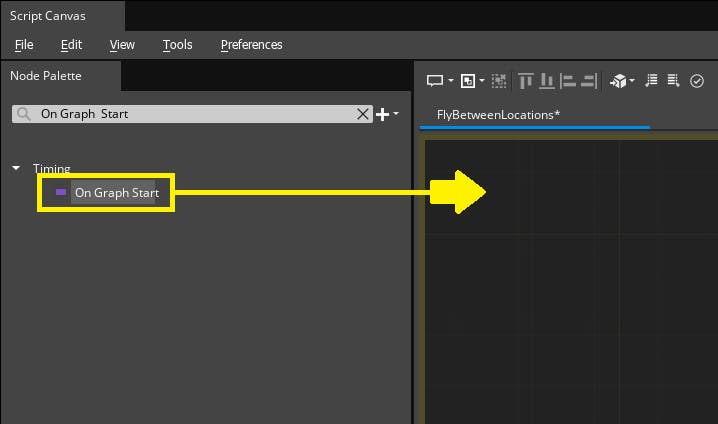
1Open the Script Canvas by clicking the button in the top toolbar.

2Create a new Script Canvas with File -> New Script. Press Control+S to save your new canvas. Name it something like “FlyBetweenLocations.”
3In the Node Palette, search for “On Graph Start”. Add the On Graph Start node to your script by clicking and dragging it from the Node Palette to the graph.
The On Graph Start node is an entry point that will run the script when the entity that owns the script is activated.
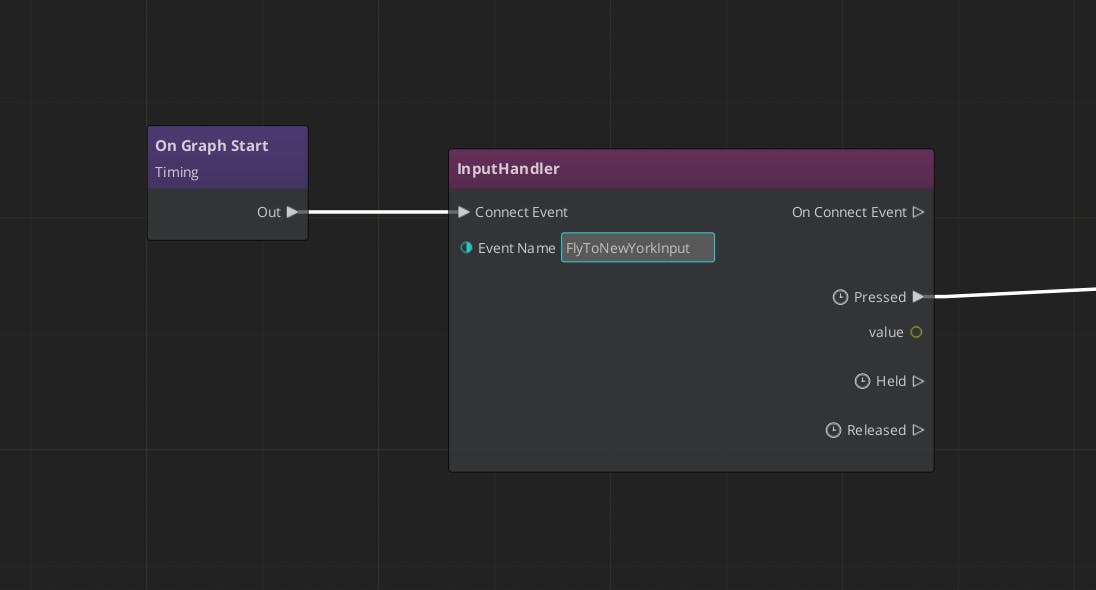
4In the Node Palette, search for and add the Input Handler node to the script. This node handles the input events specified in the Input Bindings asset.
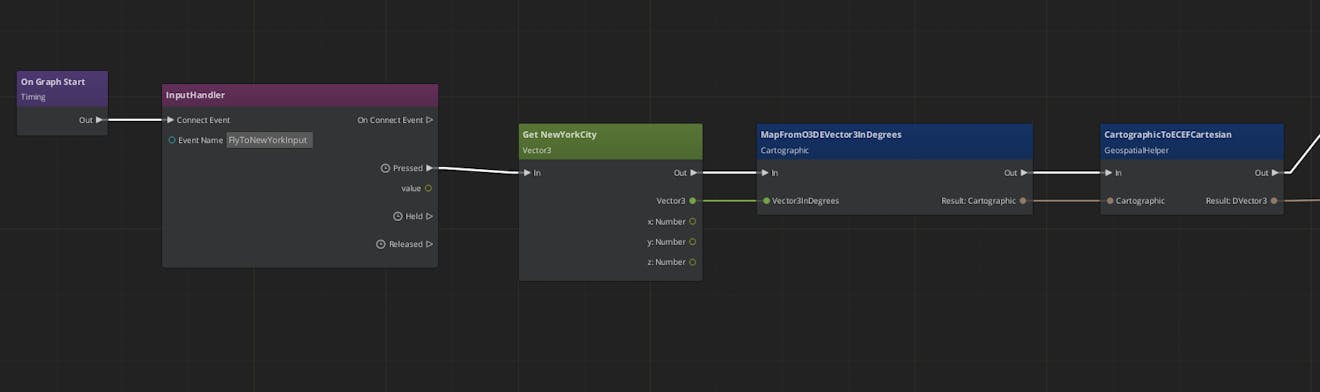
5Connect the Out pin of On Graph Start to the Connect Event pin on the Input Handler node as pictured below.
For the Event Name entry in the Input Handler node, enter the event name that you set up in step 1.5 when creating the Input Bindings asset. Once the graph starts, the event handler will handle the event triggered by the keyboard “1” key.
6To fly to New York City, you will need its location in ECEF coordinates. In this tutorial, you will specify the location’s Longitude and Latitude coordinate in degrees, then convert that location to ECEF.
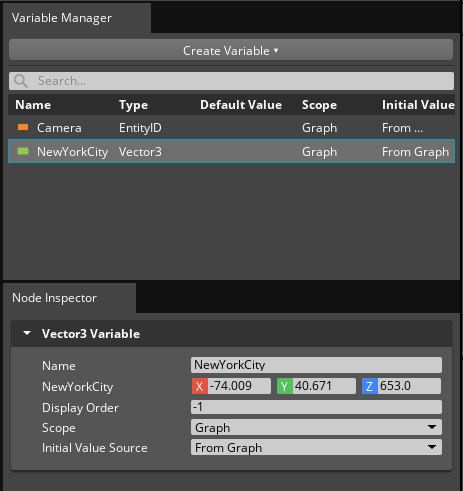
In the Variable Manager, click on Create Variable and add a Vector3 variable. Name the new variable “NewYorkCity”. This variable will represent the Cartographic coordinate of the New York City location. The X and Y values represent the Longitude and Latitude in degrees, and the Z represents the Height.
7Click on the “NewYorkCity” variable in the Variable Manager and enter the following values in the Node Inspector panel.
X: -74.009
Y: 40.671
Z: 653.0
Then, drag the new variable from the Variable Manager to the script. When you drop it in the graph, you will be prompted to choose from one of three options: Get NewYorkCity, On NewYorkCity Changed, and Set NewYorkCity. Choose Get NewYorkCity.
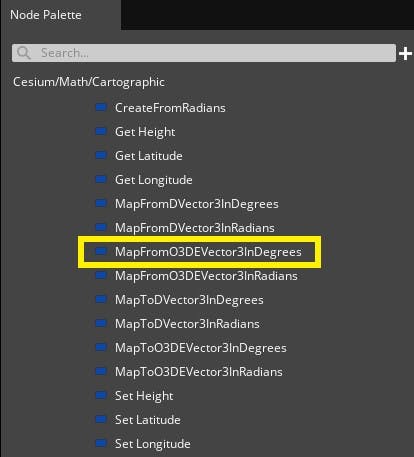
8The “NewYorkCity” variable needs to be mapped to a true Cartographic type. In the Node Palette, add the MapFromO3DEVector3InDegrees node from Cesium/Math/Cartographic category to your script.
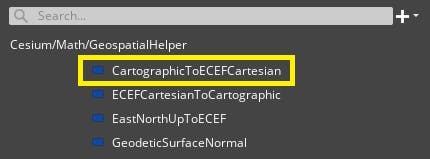
9Since the camera’s fly function needs the ECEF location, you will need to convert the Cartographic to the ECEF Cartesian coordinate. In the Node Palette, add the CartographicToECEFCartesian node from Cesium/Math/GeospatialHelper category to your script.
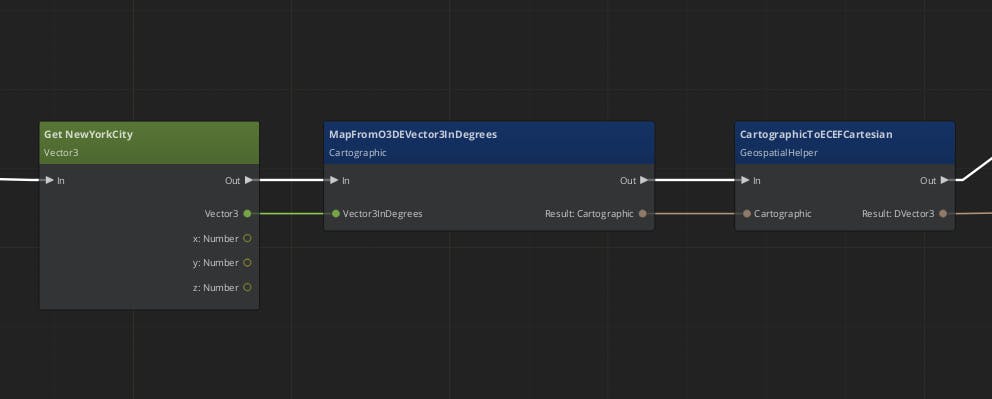
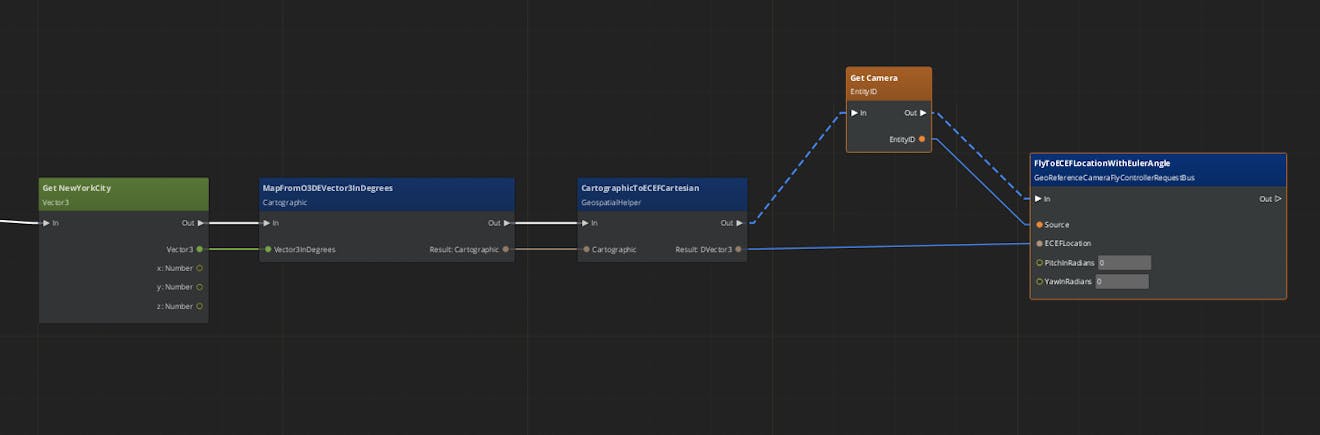
10Connect the nodes as pictured below.
11Then, connect the Pressed pin of the Input Handler node to the In pin of the Get NewYorkCity node.
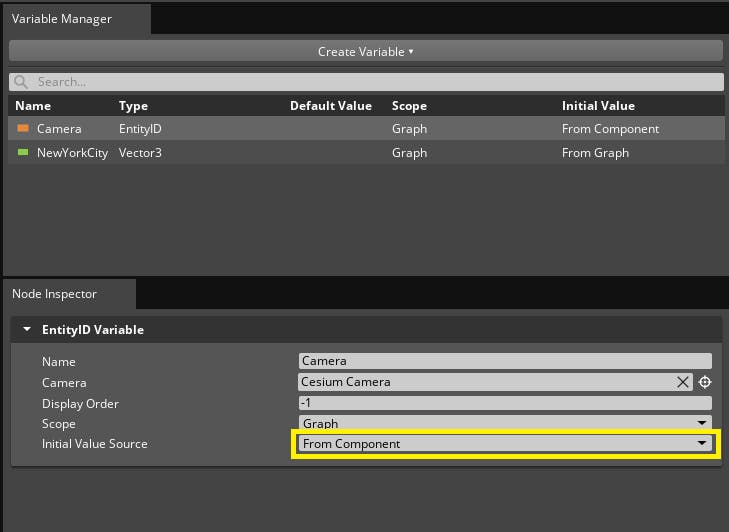
12Create a new EntityID variable and name it "Camera".
13In the Variable Manager, click on the newly created "Camera" variable. Change the Initial Value Source of the Camera from From Graph to From Component.
14Drag the Camera variable on to the script to add a Get Camera node.
15In the Node Palette, add a FlyToECEFLocationWithEulerAngle node from the Cesium/Camera/GeoreferenceCameraFlyControllerRequestBus category.

16Connect all the nodes as shown to set up the fly function:
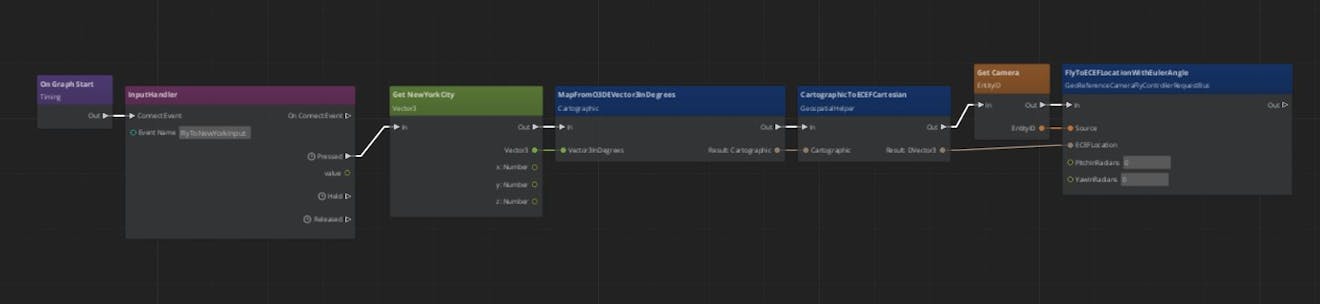
The final graph should resemble the graph below.
17Click on File -> Save on the top menu of the Script Canvas editor to save the script.
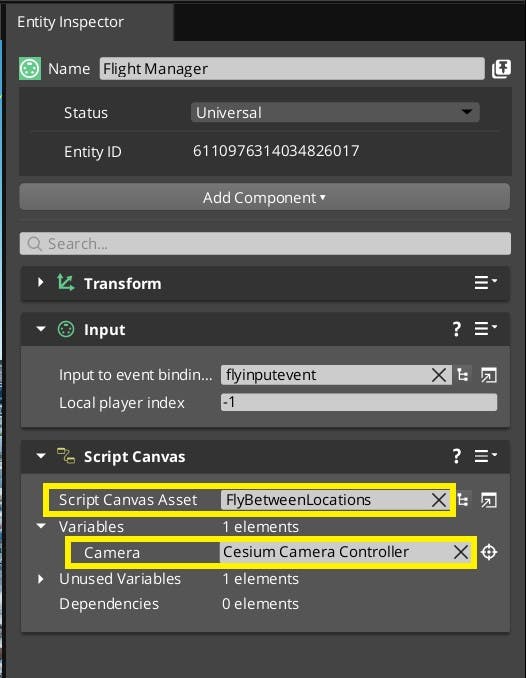
1Close the Script Editor. In the Entity Outliner, click on the Flight Manager entity that you created in Step 3.
2In the Entity Inspector, click on Add Component and add a Script Canvas component.
3On the new Script Canvas component, add your Script Canvas asset.
4Click and drag the Cesium Camera Controller entity from the Entity Outliner to the Camera variable on the Script Canvas component.
5Save your level. Then, press the Play button in the upper right corner to try it out! If everything is set up correctly, the camera should fly to New York City when you press the "1" key on your keyboard.
You’ve completed all of the Cesium for O3DE Quickstart tutorials. For an extra challenge, try setting up a second location to fly to, bound to the “2” key.
As you create with Cesium for O3DE, consider sharing your projects on the Cesium Community Forum or by tweeting @CesiumJS on Twitter!