Cesium and Angular
This is a guest post by Aristeidis Bampakos of Plex.Earth about integrating Cesium with Angular. - Sarah
Angular is a popular web platform, created and maintained by Google, that allows developers to build applications for the web, mobile, and desktop. It uses well known software patterns such as dependency injection and declarative templates to solve development challenges.
In this tutorial, we are going to build a simple web application from the ground up using Angular and learn how to integrate the CesiumJS npm module. In case you have not used Cesium before, you can check out the Getting Started Tutorial for more information.
The source code of this tutorial can be found in cesium-angular-example repository.
Prerequisites
- A basic understanding of command line, TypeScript, and web development.
- A browser that supports WebGL
- An IDE or code editor. Visual Studio Code is nicely integrated with Angular but you can use any editor of your choice.
- Node 6.9.0 or higher, together with NPM 3 or higher.
Create a basic Angular app
In this section, we’ll describe how to set up a basic Angular application. If you’ve already got an app set up and just want to add Cesium, skip to Add Cesium to an Angular app.
Initialize an app with Angular CLI
To create a new Angular application, we are going to use Angular CLI, a tool that simplifies development of Angular applications from the first commit to the final production deployment. Open a console and run the following command to install Angular CLI globally:
npm install -g @angular/cli
Create a new Angular application by running the following command in the console:
ng new my-app
This will create a foldermy-app, initialize it as a git repository, and install the necessary package dependencies. Run the following command in the console to compile the application:
ng serve
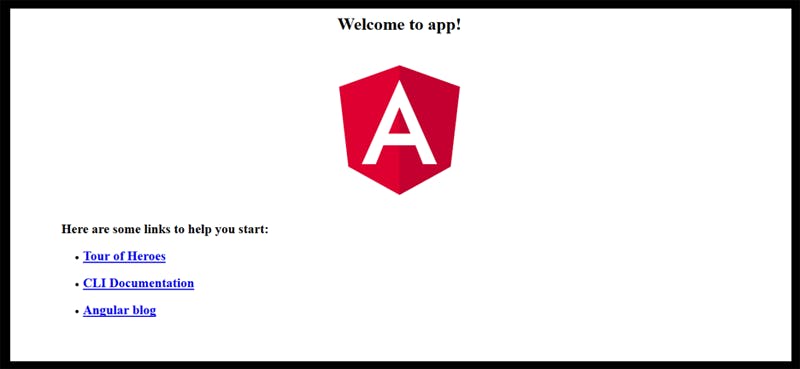
Open your browser and navigate tohttp://localhost:4200. If you can see the following, then you have built your first Angular application successfully!
npm install --save cesium
Configure Cesium in Angular
Now that we have installed Cesium, we need to include its files (Javascript, CSS, and necessary assets) in our project. There is no need to do it in the index.html file as explained in the original Getting Started Tutorial. Angular CLI provides a configuration file called .angular-cli.json that is located at the root directory of the project and is used to configure our Angular application including any third party libraries that we are using. Open .angular-cli.json and add the CesiumJS file in the scripts section, the CSS file in the styles section, and the whole build Cesium folder in the assets array.
"assets": [
 {
  "glob": "**/*",
  "input": "../node_modules/cesium/Build/Cesium",
  "output": "./assets/cesium"
 },
 "assets",
 "favicon.ico"
],
"styles": [
  "../node_modules/cesium/Build/Cesium/Widgets/widgets.css",
  "styles.css"
],
"scripts": ["../node_modules/cesium/Build/Cesium/Cesium.js"]
Display the Viewer
Those who are familiar with Angular should know that an Angular application consists mainly of modules and components. For the sake of simplicity, our application consists of one module and one component only. The component will be used to host the Cesium viewer. There are two ways to add the viewer on the component: we can create a new component or a directive (specifically an attribute one). Either way is correct. In this tutorial, we will follow the approach of the directive because it seems more appropriate since the viewer object manipulates the DOM.
Open a console, navigate to the app directory, and use the following command to create a new directive:
ng generate directive cesium
The result of the above command is twofold:
- It creates the file cesium.directive.ts.
- It registers the directive with the main application module by adding it to the declarations array.
The directive will be used to create the Cesium viewer object and initialize it. According to Angular documentation, initialization logic in a directive or component should be placed inside the ngOnInit function, which is part of the OnInit interface.
import { Directive, OnInit } from '@angular/core';

@Directive({
 selector: '[appCesium]'
})
export class CesiumDirective implements OnInit {

 constructor(private el: ElementRef) { }

 ngOnInit() {
  // Put initialization code for the Cesium viewer here

 }

}
We inject ElementRef class in the constructor to get a reference to the HTML element that has the directive attached to it and initialize the Cesium viewer with that reference.
const viewer = new Cesium.Viewer(this.el.nativeElement);
At this point, the editor may throw an error, as shown below:

This is because Typescript cannot find types for Cesium. To overcome this, open typings.d.ts and add
declare var Cesium;
Open the app.component.html file and replace its contents with the following:
<div appCesium></div>
Add some styles for the viewer in the styles.css file:
html, body, div[appCesium] {
width: 100%; height: 100%; margin: 0; padding: 0; overflow: hidden;
}
Finally, open main.ts and define an environment variable that tells Cesium the base URL to load static files from:
window['CESIUM_BASE_URL'] = '/assets/cesium/';
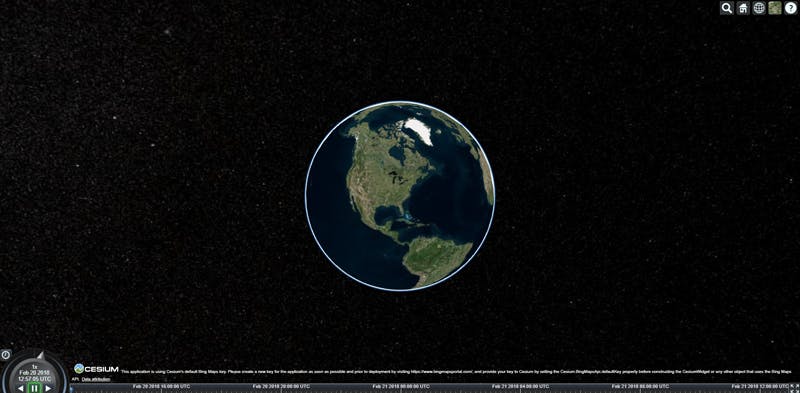
Run ng serve again. You will see the Cesium viewer loaded on the page.
Resources
The ng5 branch of the Developer-Plexscape/cesium-angular-example repository contains the source code from this post. Note that the master branch of the repo points to the latest version of Angular.
For a full blown library integration of Angular and Cesium, see the angular-cesium npm module.
To learn more about Angular, take a look at the Angular Quickstart or dive into Angular Architecture.
To connect, you can follow me on Twitter.