Visualizing iTwin Design Data in CesiumJS
In the previous tutorial, you uploaded site photos to Cesium ion and generated a reality model to use as context. In this tutorial, you’ll upload a design model to the iTwin Platform using the iTwin CLI and stream it into CesiumJS for visualization within that context.

You’ll learn how to:
- Upload a design model to the iTwin Platform using the iTwin CLI.
- Stream 3D Tiles of the iTwin into CesiumJS.
If you’d like to see the final result first, here’s the completed code. Otherwise, continue through the tutorial.
This tutorial uses iTwin Platform APIs that are currently in Technology Preview. These APIs are intended for testing and evaluation purposes only, not for use in production environments.
- Completed code from the first tutorial in this series: Adding Design Context Using Cesium ion
- A Cesium ion account
- A Bentley developer account
- iTwin CLI installed
- Node.js + npm installed
- Git installed
You’ll upload the design model with the iTwin CLI, a tool for managing iTwin projects and models. You can find the full documentation here.
1Open a terminal and log in to the iTwin CLI using your Bentley Developer account:
itp auth login
2Create a new iTwin. Be sure to copy the iTwin ID for use in Step 2.
itp itwin create --class Endeavor --sub-class Project --name "Cesium iTwin Tutorial" --save

Endeavor and Project are used to classify capital project digital twins. Learn more about iTwin types here.
3Create a new iModel. Be sure to copy the iModel ID for use in Step 3.
itp imodel create --name "Rail Bridge Design" --save

An iTwin is the digital twin of a project, used to organize and manage disparate data like models, documents, and issues. An iModel is a versioned container within the iTwin that holds the actual 3D design data, which can be streamed into CesiumJS as 3D Tiles.
Download the design model zip and extract it somewhere easy to access.
4Upload the Option A design file located in OptionA\Bridge.dgn.
itp imodel populate --file "c:\path\to\OptionA\Bridge.dgn"
When an iModel is updated, it automatically generates a 3D Tileset for streaming. This process may take several minutes, during which you’ll see “Waiting for synchronization to complete” messages.
5Generate a Sandcastle URL and open it in your browser to confirm the model displays correctly.
itp imodel view cesium-sandcastle
Running this command after uploading ensures the iTwin Platform generates new 3D Tiles for the iModel.
You might see “Waiting for export to complete” messages displayed during this process, which may take several minutes.
Once completed, the iModel may appear to be floating in space, as the default sandcastle does not include terrain.

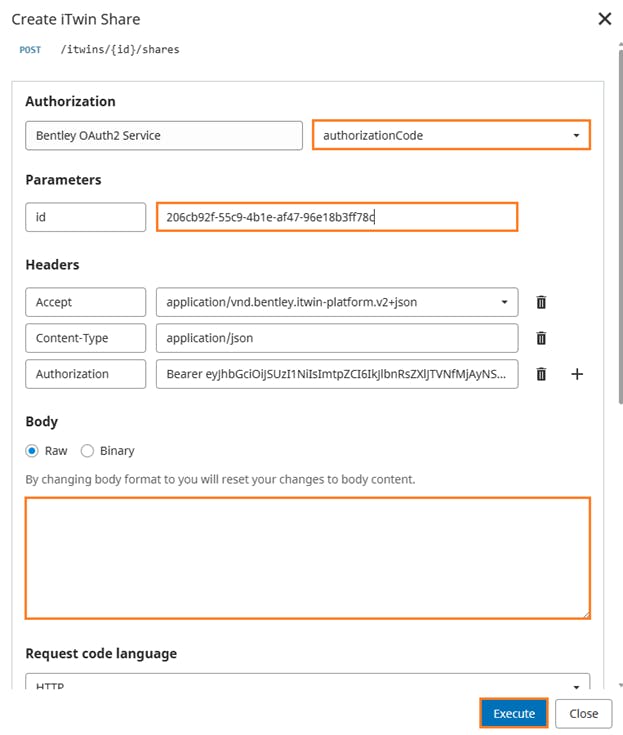
A share key allows read-only access to your iTwin—similar to Cesium ion tokens—so users don’t need to log in.
1Open Create iTwin Share API in your browser and sign in with your Bentley developer account.
2Click Try it out.
3In the Authorization drop down, select authorizationCode.
4If prompted, choose your Bentley developer account.
5Under Parameters, next to the id field paste your iTwin ID from Step 1.
If you didn’t save your iTwin ID from Step 1, you can retrieve it using the iTwin CLI command below:
itp context info
6Under Body, delete the prefilled content to use the default 90-day expiry.
Click Execute and scroll down to the bottom of the window to find the HTTP response.
7Under HTTP response, copy the shareKey value.
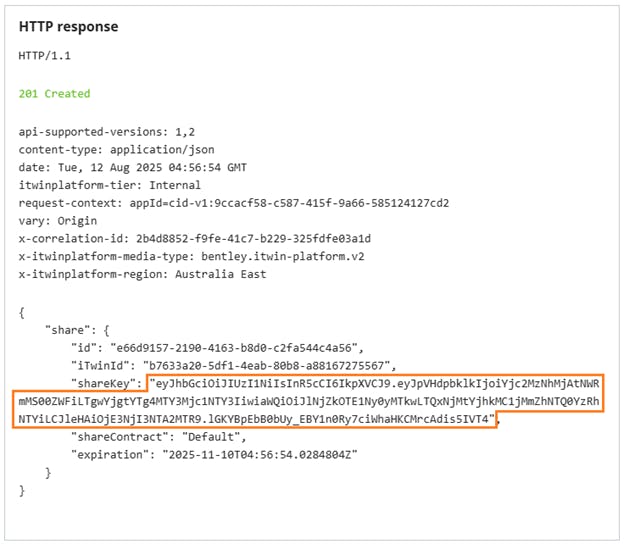
8In your app’s .env file, add:
VITE_ITWIN_SHARE_KEY="your-share-key"
1Open src/main.js in the app.
2At the end of the main function, add the following code. Replace your-imodel-id with your actual iModel ID from Step 1.
const railDesignOptionA = await Cesium.ITwinData.createTilesetFromIModelId({iModelId: "your-imodel-id"});  // *** Replace your-imodel-id ***

viewer.scene.primitives.add(railDesignOptionA);
It may take a few minutes for the 3D Tiles to generate on first load.
3Start the app:
npm run dev
4Open the app in your browser. You should now see the bridge design model overlaid on the reality model from the previous tutorial.
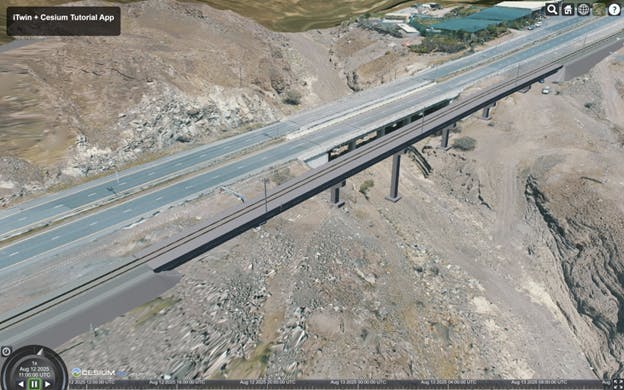
You’ve successfully visualized a design model within real-world context using the iTwin Platform and CesiumJS. In the next tutorial, you’ll add multiple design options and build a simple UI to switch between them.